Hi SRK members. I would like to start off thanking the community for the help I've got from all the tutorials and guides that can be found on SRK forum.
I would like to thank Toodles help, rtdzign's tutorials, info from one of Phreakazoid187 post and TRNG padhacking thread.
I would like to thank purplearms for his ArcEye 2s
I would like to thank Art Hong for his great plexi and custom art cut outs.
These are some of the tutorials and threads I got info from
http://shoryuken.com/f177/rj-45-mc-cthulhu-imp-xbox-360-dual-mod-tutorial-diagram-225565/
http://shoryuken.com/f177/rj-45-multi-console-cthulhu-arcade-stick-tutorial-ver-2-a-231734/
http://shoryuken.com/f177/switch-less-usb-selector-ps3-360-imp-re-design-underway-input-appreciated-179629/
http://shoryuken.com/f177/*-padhacking-thread*-113675/
Post #73 by Phreakazoid187 for soldering Guide button on the fightpad.
http://shoryuken.com/f177/soldering-madcatz-sfiv-fightpad-179270/index3.html
Also additional infomation I got from slagcoin.
slagcoin Joystick Controller page
I would like to thank these two shops I've got my parts from.
Lizard Lick Amusements
AkihabaraShop.jp
This is my first custom built arcade stick that will be multi-console. It's still under construction as I still haven't have my box finished yet but the internals been put together and tested.
NOTE: UDATE the MC Cthulhu firmware before soldering the Imp v2 to it or you'll have problems!
Wiring diagram hope this helps a bit (corrected)
![MCCthulhuImpv2360rj45diagram.jpg]()
Let's start with the PCBs. Here I've got the MC Cthulhu and Imp v2
![ad319e4f-e281-d138.jpg]()
I've soldered the RJ45 pin connector to the Imp v2
![ad319e4f-e2f2-feba.jpg]()
![ad319e4f-e329-2b5e.jpg]()
For those who dont want to solder a RJ45 pin connector this is a diagram of the board for direct wire solder. I borrowed the pic of the Imp v2 from LizardLicks photo since I dont have one without the pin connector and photoshopped each spot.
![impv2RJ45PINOUT.jpg]()
![RJ45toIMPv2direct.jpg]()
Here I soldered the wires on the underside of the MC Cthulhu row 1 G,A,B,C,D,E,F,V and one wire to the 2nd row V
![ad319e4f-e3ca-fb5e.jpg]()
![ad319e4f-e3e2-9859.jpg]()
I then soldered the corresponding wires to the Imp v2
![ad319e4f-e43b-afdc.jpg]()
I've also soldered a wire to the VCC point on the Imp v2 and connected the other end to the VCC screw terminal on the MC Cthulhu
![ad319e4f-e452-1261.jpg]()
![ad319e4f-e4cb-2c2d.jpg]()
Then I prepped the Madcatz Xbox 360 PCB that I took out of a Brawl pad.
I cut the USB cable at a decent length so I could just use the wires off that to solder instead of soldering new wires.
![ad319e4f-e560-4883.jpg]()
![ad319e4f-e5ac-be8b.jpg]()
![ad319e4f-e5bf-d71b.jpg]()
![ad319e4f-e5d4-c4d5.jpg]()
Now soldering the xbox PCB to the MC Cthulhu. I soldered all the corresponding wires to row A-H and 1-9.
![ad319e4f-e644-39e5.jpg]()
![ad319e4f-e672-e83a.jpg]()
I've put everything together to test out if everything is working and it's working on PC/360/PS3 so far with no problems. I haven't made the other cables yet.
![ad319e4f-e6ea-86d6.jpg]()
I promise it won't look so messy like that once it's in the box lol.
![ad319e4f-e6d1-0125.jpg]()
Hot glued the 360 PCB wires
![ad319e4f-579e-070f.jpg]()
![ad319e4f-57ae-8477.jpg]()
These are the sides for the case
![ad319e4f-50c9-84bb.jpg]()
![ad319e4f-50dc-399b.jpg]()
![ad319e4f-50ec-72e5.jpg]()
![ad319e4f-50fa-a6c6.jpg]()
Case almost done.
![c6e4c3f8-f1c6-192f.jpg]()
![c6e4c3f8-f1df-99b0.jpg]()
![c6e4c3f8-f1ef-49da.jpg]()
Case together and running. Just need a finishing touch. Buttons are Seimitsu PS-14-K-N Clear on top six buttons. PS-14-D-N-K Smoke for Home/Select/Start buttons. PS-14-D-N-K Clear for P4/K4 buttons on the side. Seimitsu LS-56-1 stick with double spring, Clear bubble ball top and Octagonal gate.
![ad319e4f-a9a3-c8d8.jpg]()
![ad319e4f-a9b2-92d1.jpg]()
![ad319e4f-a9c1-152c.jpg]()
![ad319e4f-a9d1-fa81.jpg]()
![ad319e4f-a9e0-c7be.jpg]()
![ad319e4f-a9f5-61d3.jpg]()
Artwork and plexi
![ad319e4f-cb9a-c66a.jpg]()
![ad319e4f-dc03-2ca2.jpg]()
This is how far I got.
I have finally finished my custom stick with the installation of Toodles FGwidget LED control board and purplearms ArcEye2s. Here is a video of my stick.
[media=youtube]xL7plFWzgro[/media]
Hitbox build.
![ad319e4f-dc62-e794.jpg]()
![ad319e4f-dc74-bcd9.jpg]()
![ad319e4f-dc83-84f6.jpg]()
Pad hacking.
![ad319e4f-263e-eeab.jpg]()
![ad319e4f-9aba-d78e.jpg]()
Hitbox finished.
![ad319e4f-99c3-0972.jpg]()
![ad319e4f-99d5-20fa.jpg]()
![ad319e4f-99e8-b351.jpg]()
I would like to thank Toodles help, rtdzign's tutorials, info from one of Phreakazoid187 post and TRNG padhacking thread.
I would like to thank purplearms for his ArcEye 2s
I would like to thank Art Hong for his great plexi and custom art cut outs.
These are some of the tutorials and threads I got info from
http://shoryuken.com/f177/rj-45-mc-cthulhu-imp-xbox-360-dual-mod-tutorial-diagram-225565/
http://shoryuken.com/f177/rj-45-multi-console-cthulhu-arcade-stick-tutorial-ver-2-a-231734/
http://shoryuken.com/f177/switch-less-usb-selector-ps3-360-imp-re-design-underway-input-appreciated-179629/
http://shoryuken.com/f177/*-padhacking-thread*-113675/
Post #73 by Phreakazoid187 for soldering Guide button on the fightpad.
http://shoryuken.com/f177/soldering-madcatz-sfiv-fightpad-179270/index3.html
Also additional infomation I got from slagcoin.
slagcoin Joystick Controller page
I would like to thank these two shops I've got my parts from.
Lizard Lick Amusements
AkihabaraShop.jp
This is my first custom built arcade stick that will be multi-console. It's still under construction as I still haven't have my box finished yet but the internals been put together and tested.
NOTE: UDATE the MC Cthulhu firmware before soldering the Imp v2 to it or you'll have problems!
Wiring diagram hope this helps a bit (corrected)

Let's start with the PCBs. Here I've got the MC Cthulhu and Imp v2

I've soldered the RJ45 pin connector to the Imp v2


For those who dont want to solder a RJ45 pin connector this is a diagram of the board for direct wire solder. I borrowed the pic of the Imp v2 from LizardLicks photo since I dont have one without the pin connector and photoshopped each spot.
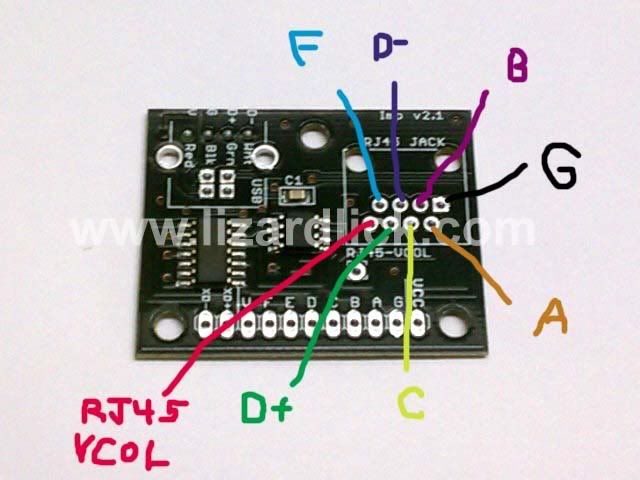

Here I soldered the wires on the underside of the MC Cthulhu row 1 G,A,B,C,D,E,F,V and one wire to the 2nd row V


I then soldered the corresponding wires to the Imp v2

I've also soldered a wire to the VCC point on the Imp v2 and connected the other end to the VCC screw terminal on the MC Cthulhu


Then I prepped the Madcatz Xbox 360 PCB that I took out of a Brawl pad.
I cut the USB cable at a decent length so I could just use the wires off that to solder instead of soldering new wires.


Now soldering the xbox PCB to the MC Cthulhu. I soldered all the corresponding wires to row A-H and 1-9.


I've put everything together to test out if everything is working and it's working on PC/360/PS3 so far with no problems. I haven't made the other cables yet.

I promise it won't look so messy like that once it's in the box lol.

Hot glued the 360 PCB wires


These are the sides for the case


Case almost done.


Case together and running. Just need a finishing touch. Buttons are Seimitsu PS-14-K-N Clear on top six buttons. PS-14-D-N-K Smoke for Home/Select/Start buttons. PS-14-D-N-K Clear for P4/K4 buttons on the side. Seimitsu LS-56-1 stick with double spring, Clear bubble ball top and Octagonal gate.


Artwork and plexi


This is how far I got.
I have finally finished my custom stick with the installation of Toodles FGwidget LED control board and purplearms ArcEye2s. Here is a video of my stick.
[media=youtube]xL7plFWzgro[/media]
Hitbox build.


Pad hacking.


Hitbox finished.


