Quantcast
Channel: Tech Talk — shoryuken
Viewing all 8072 articles
Browse latest View live

ZD Arcade Control Encoder And ZD ReMatch (PS3/PC) (The most cost efficient PCBs to date!)

$
0
0
I don't know if this is well known or not but i didnt see any threads mentioning this so ill just post everything here.
[copypasta]
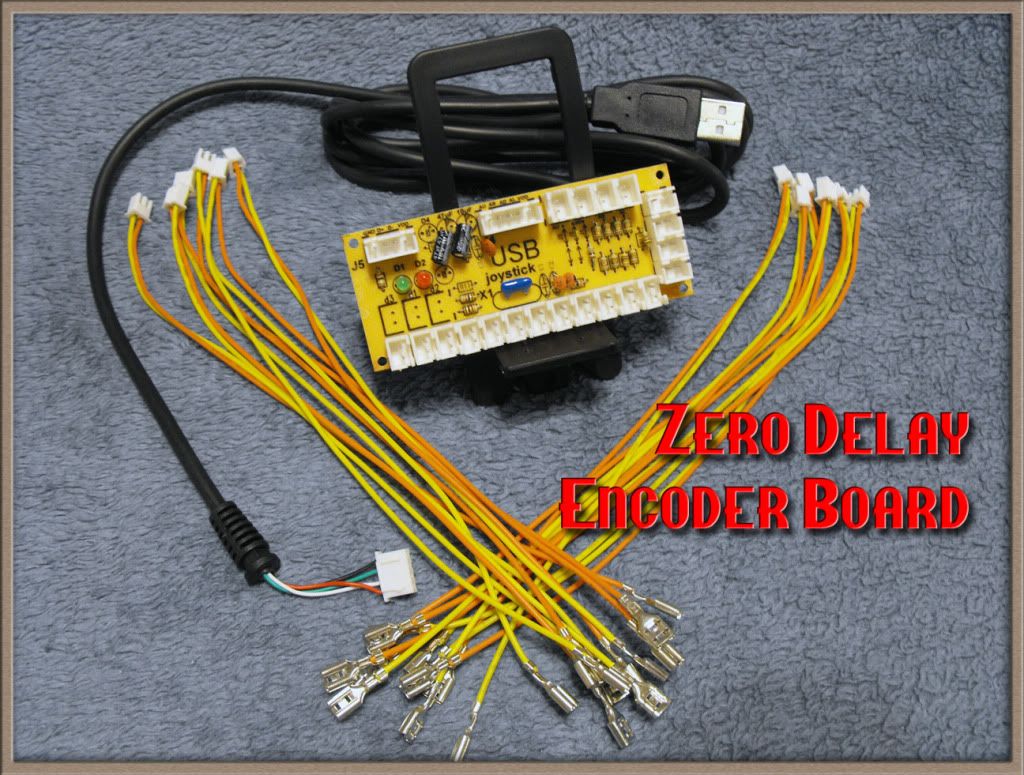
Zero Delay Arcade Control Encoder
ZeroDelayEncoderBoardRev2.jpg
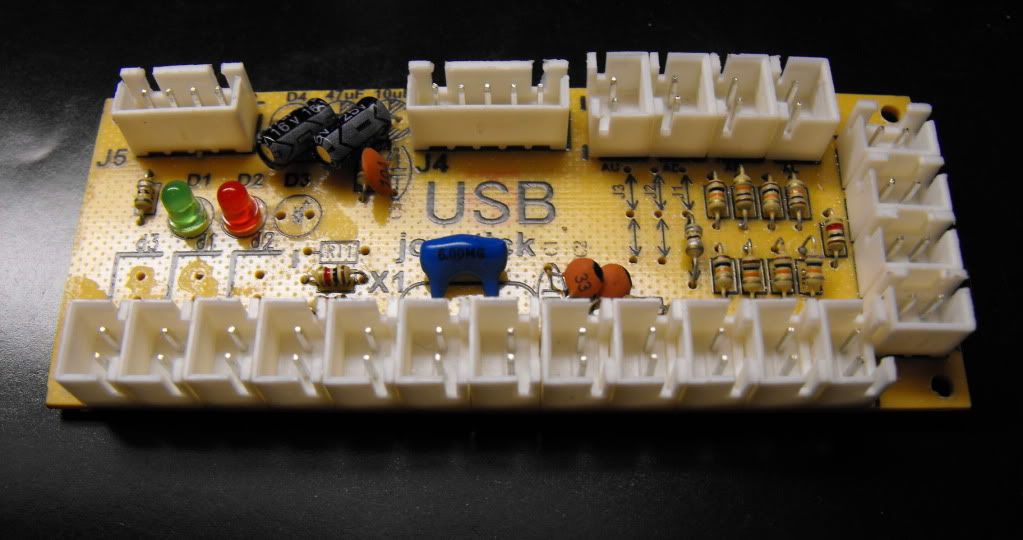
The Zero delay is the most cost effective encoder option available. It is plug and play, lag free and very compact. (8.5 cm X 3.5 cm X 1 cm)
The Zero Delay board comes with:
  • USB Cable
  • 4 Wire sets for joystick.
  • 8 Wire sets for 8 buttons, or 12 wire sets if you want to upgrade.
  • Instructions
The Zero Delay also has these additional features for those that wish to utilize them:
  • Hat switch for secondary joystick, POV controls, or console style gaming controls
  • Autofire option
  • Rapidfire option
  • 5 pin port for Japanese (Sanwa) ports
BoardFront.jpg
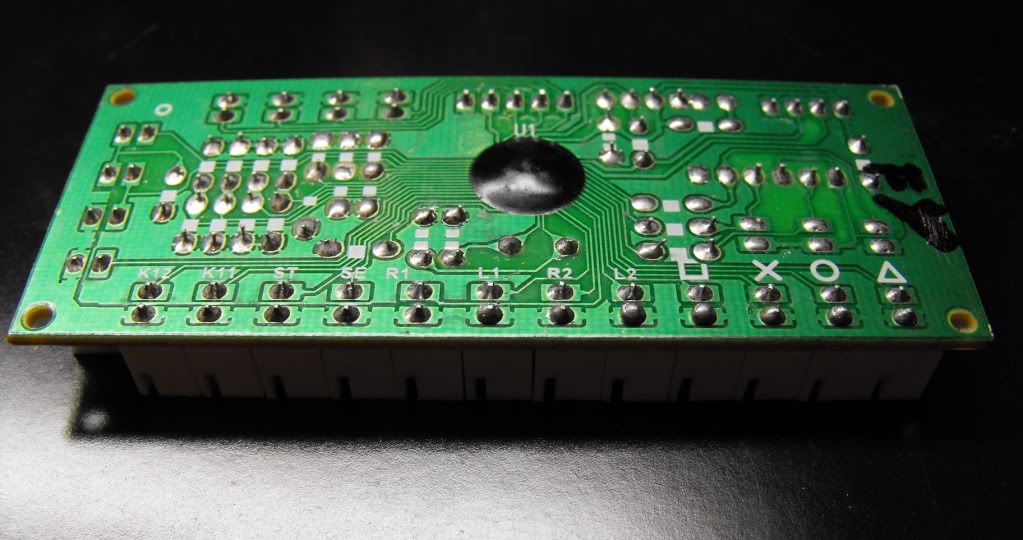
BoardBack.jpg

FAQ:

Q: What method does this board encode the controls?
A: Controls are encoded like a gamepad.

Q: How do I hook up the controls?
A: one end of the wire plugs right into the board port, the other end connectors into the joystick or button switch. The included instructions will let you know what each port maps to. The terminals will fit up to .187 size terminals, which is the most common size for arcade switches. If you have switches that take the larger .25 terminals, you can either soldier on the terminals or crimp on new connectors.

Q: Have these boards been inspected?
A: Each board was given QC initials. Also, I have personally plugged every board in my PC and determined that it registers correctly with the PC. I have also visually inspected all the wires and boards.

Q: How should payment be made?
A: I am set up for Paypal. If you are interested in purchasing, send me a PM.

Q: Is this compatible with PS3?
A: I have had a chance to try it out, yes, it worked great. It should be great for fighters!

Q: Does it need special software?
A: It uses the standard joystick drivers on the computer, no software needed!
[/copypasta'd]

I'm sure you all are dying to know the price by now, this thing only cost $14.75 SHIPPED!

I personally haven't had a chance to FULLY test these out myself but so far they're holding up as promised. The main thing i wanted to test out on this is to see if optical joysticks work with this thing. I haven't had much luck but they're several VCC points on the PCB so someone else who's more hella tech savvier can test that out themselves.

I also don't know how long these things hold out or last but for $14.75 shipped that really shouldn't even be an issue. And for all you skeptic ass niggas out there that think this is too good to be true:
Spoiler:
101_0455.jpg 101_0458.jpg

Im not sure if im allowed to link to other forums to where you can buy it, so if you're interested in this and want to talk to the man himself thats selling these send me a convo and ill link you to his thread....or better yet just google it and and im sure you'll get a direct hit...lol

Again, this is compatible with PS3 and PC ONLY! sorry Xbox 360 heads. You lose out once again.........blame Micro$oft.

Just wanted to let those in the dark know whats up. If you have any question feel free to ask.
That is all.

EDIT:
Fuck it.
EncoderBanner.jpg
eb476b4dda56f9cfea44fcfcd91fa127.gif.....CLICK DAT!

Xbox One PadHack Thread - Calling the goons "Toodles, Gummowned, Phreak and You" Do it for the Kids

$
0
0
Making the thread so we can combine our efforts and do this as soon as we can. I am going to try to get my hands on a controller asap.

P.S. This may be a little early but..... the people need this. Also missed Team tech talk, sup. If you are a big dog around here, please reply below, I only know OG's

JUST WANT TO THANK EVERYONE FOR THEIR AWESOME WORK. HERE IS AN AWESOME PCB PINOUT GUIDE BY CHAOTIC MONK(Great Job!)
Heres an attempt to consolidate the thread into a guide.

If your new to padhacking, highly recommend reading this as it goes over a lot of it http://www.slagcoin.com/joystick/pcb_wiring.html

Before you begin, test the controller out and make sure all the inputs work. Last thing you'd want to do is void it and later discover its a dud.

Start off by removing the boards from inside the pad as done in this vid (you can stop watching at 6:26).
image

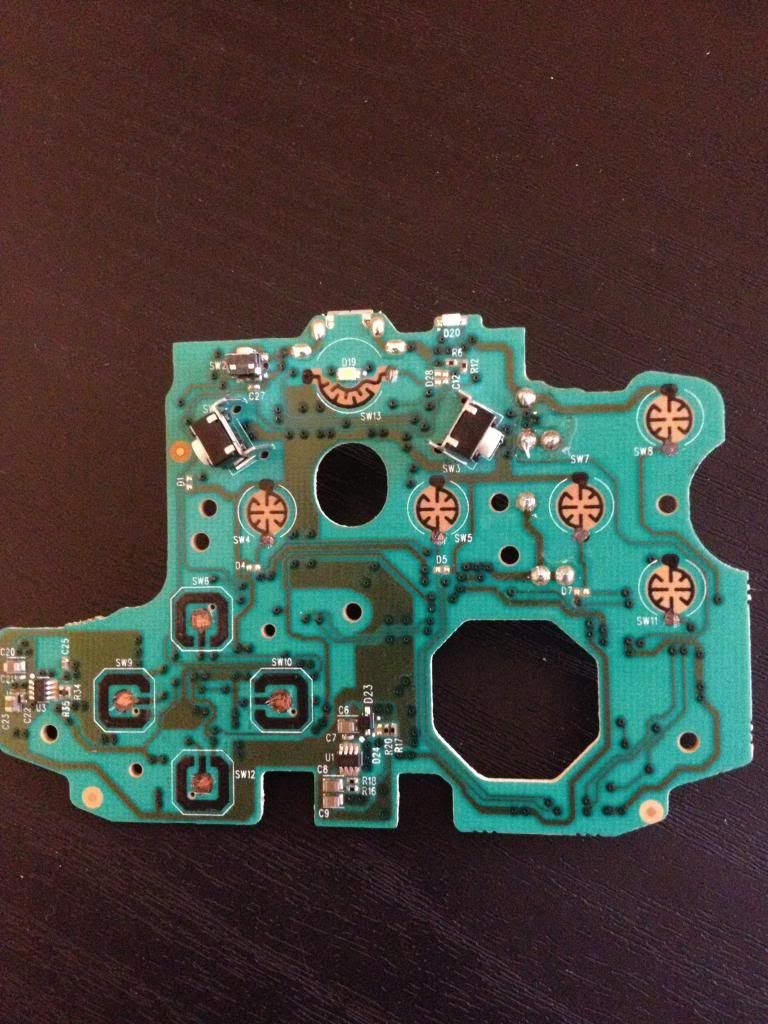
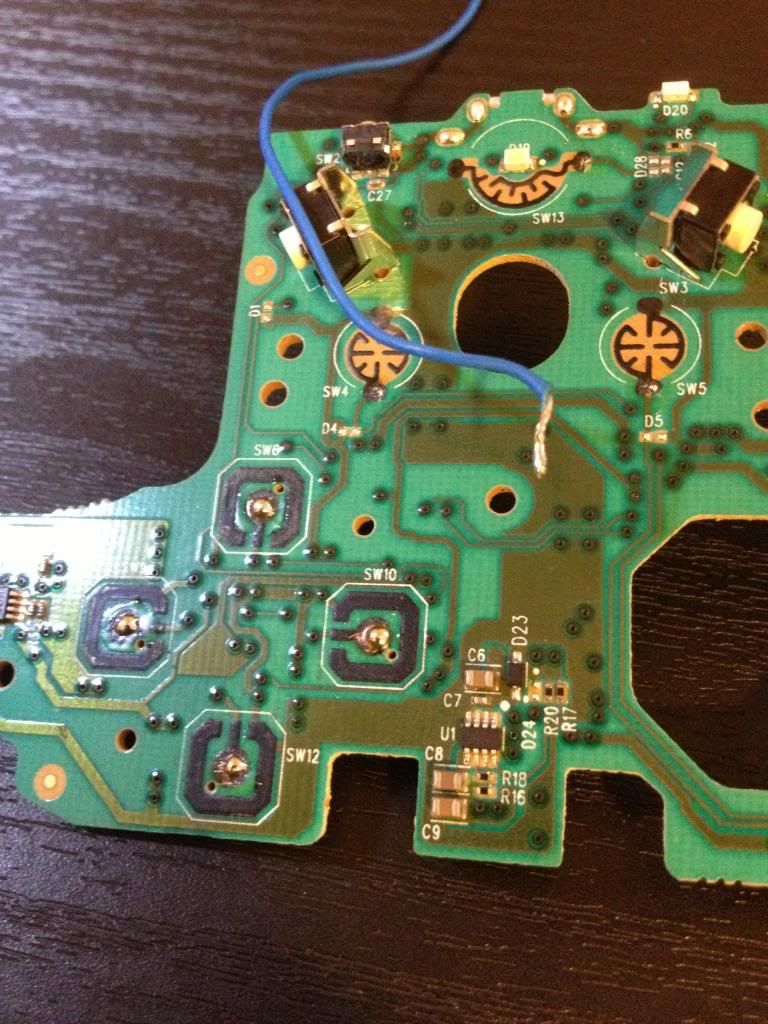
You'll be left with 2 PCBs shown below with the spots you'll be connecting too (optionally you could connect to the pins shown but can be difficult due to close proximity)
pcb.jpg~original

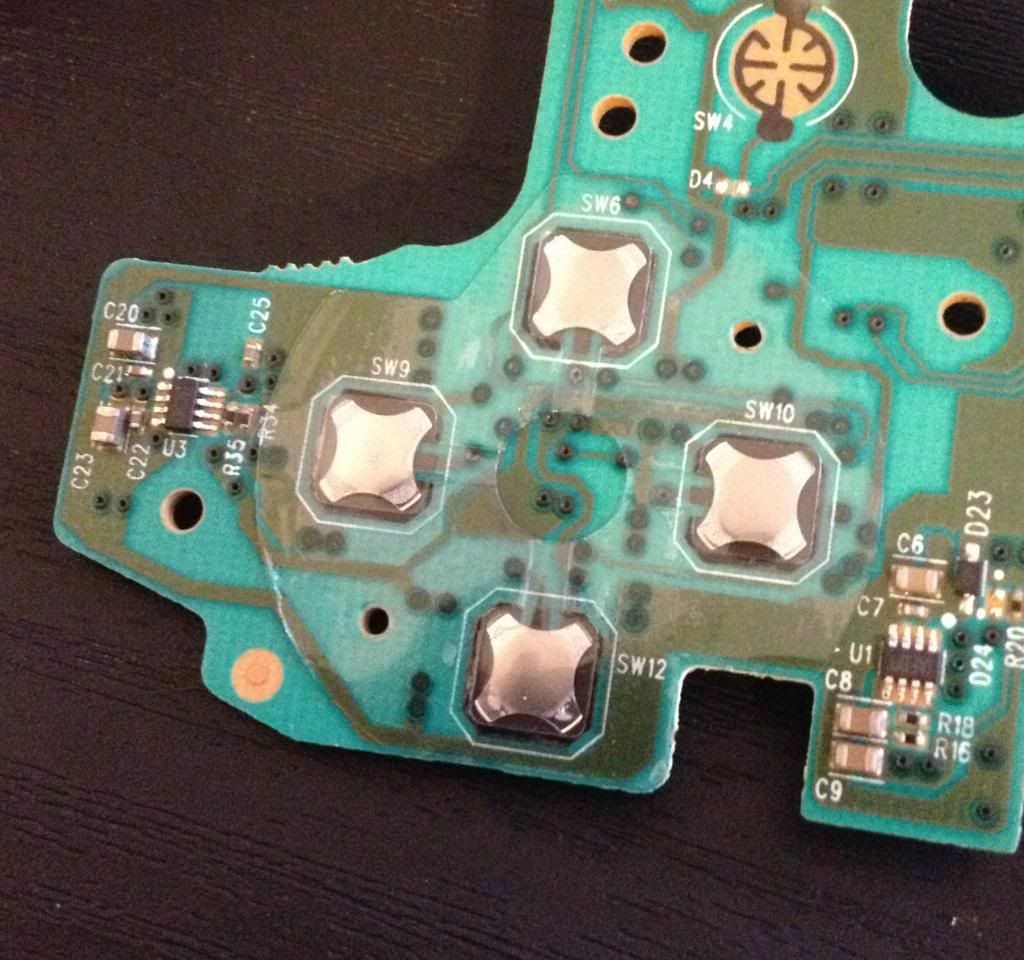
On Top Board Topside you'll notice a 'sticker' on the dpad.
dpad.jpg

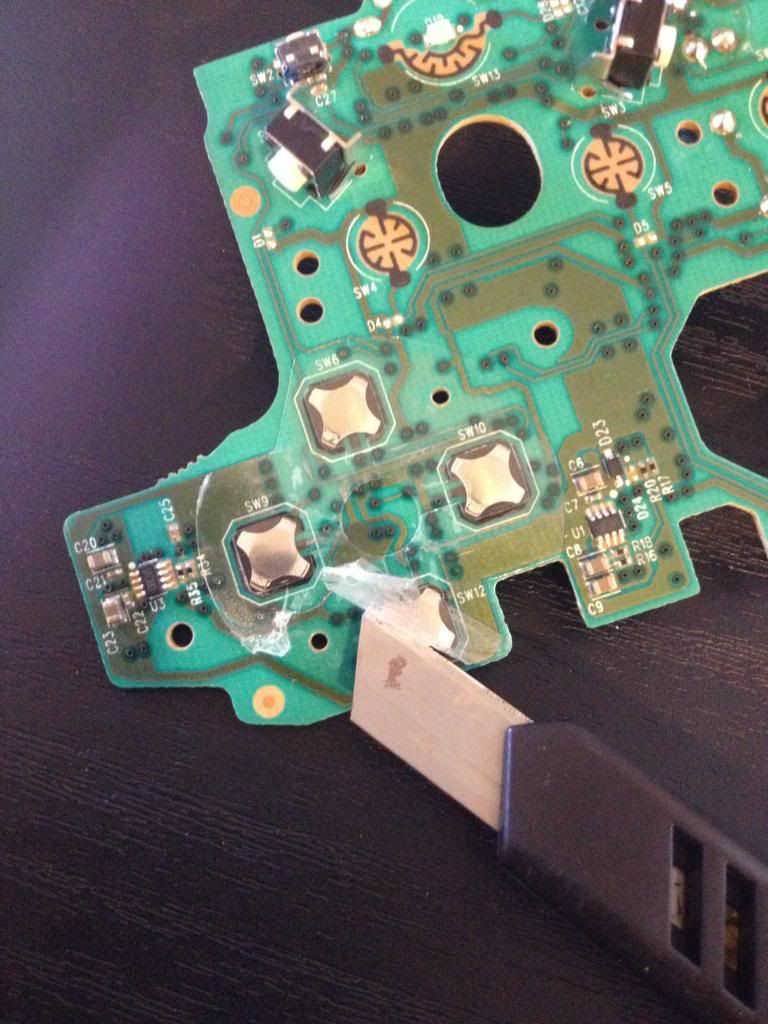
You'll want to use something thin and sharp to lift an edge then you should be able to just peel it off.
removedpad.jpg

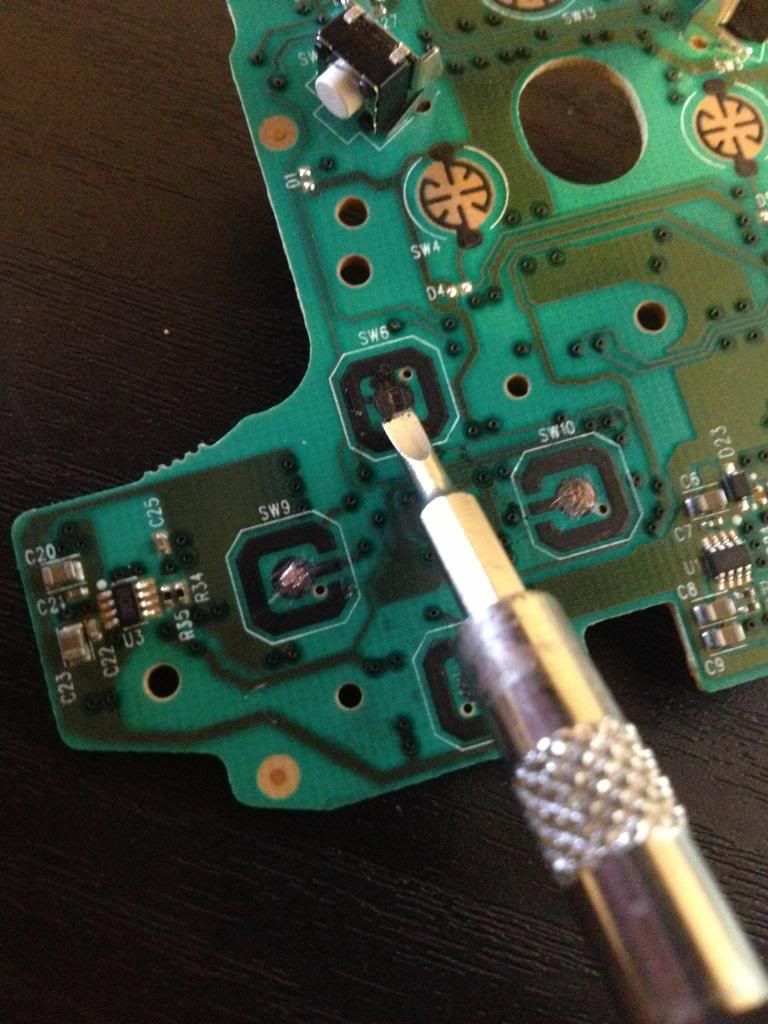
Gently and carefully scrape off the black stuff at the signal points till you see shiny metal (careful not to scrap too much or you could take off the contact point).
scrape.jpg

keep going on all the signal points till you have shiny metal visible and ready for tinning.
scraped2.jpg

Tin (apply small amount of solder) the signal points and wires. Can be made easier with the use of flux
tinned.jpg

Solder the wires to the signal points (put tinned wire against tinned signal point, apply heat and they should join together)
solder.jpg

You'll want to apply a dab of hot glue to the wire next to each solder to stop it from moving around and potentially breaking off.

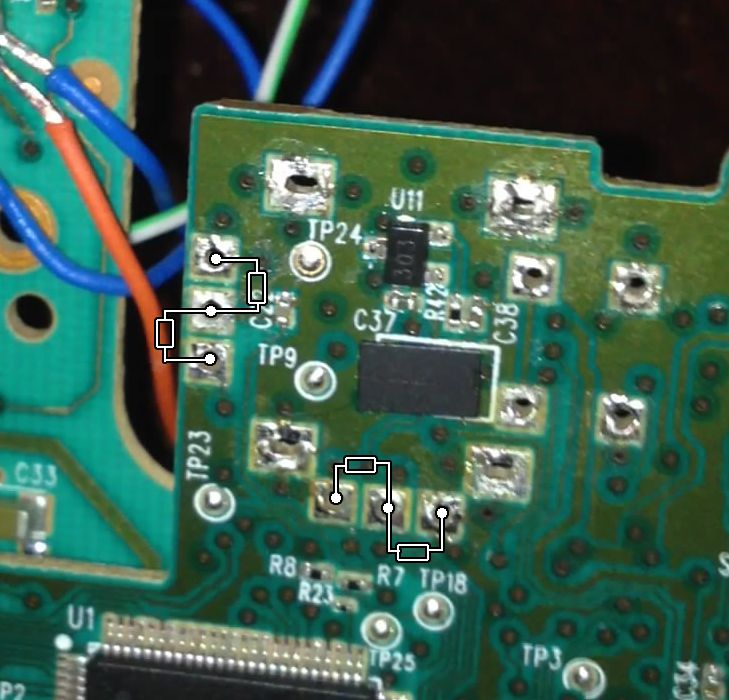
When connecting the triggers (RT & LT), you'll need to use a 100ohm resistor
2w30soi.jpg (img credit MacabreMonster)

The two analog cubes can be left on the board or taken off and replaced with resistors.

If leaving on the board simply cut down the grey analog pole that sticks out of the cube and while making sure its centered, apply hot glue to keep it in place.
PE1fxl8.jpg (img credit socks)

If removing, you'll need to replace with 4 resistors (10k ohm recommended).
There'll be 2 sets of 3 points. You'll need to connect a resistor from each of the outer points to the center point.
analogresistor.jpg

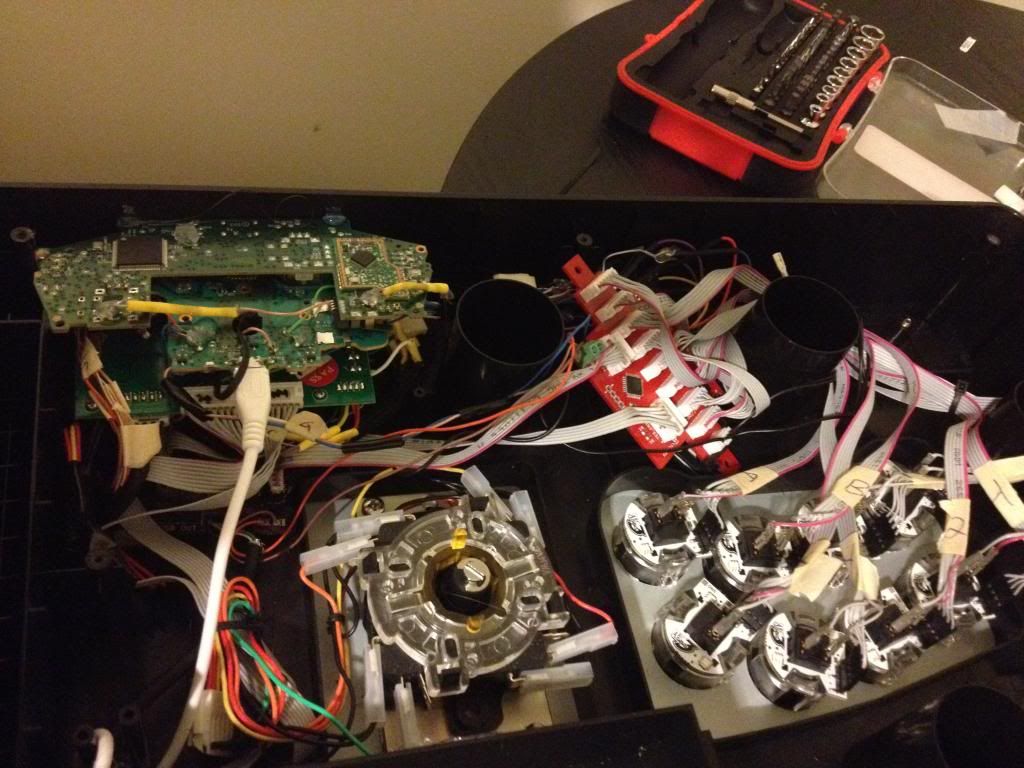
Once you have everything wired up your ready to add to your stick. The rest depends on what your setup is.

If your just doing an Xbone stick then its just a matter of connecting the wires to the button/stick and feeding a micro usb cable through.
330uuyx.jpg (img credit MacabreMonster)

If adding to an existing setup with other boards you'll either want to use a seperate usb cable for xbone and leave the existing usb for your current setup
or you'll need to add a switch to determine where the usb should go (could be an actual switch or an Imp board).
Just make sure every board has power (VCC) and ground connected to it or you'll run into issues with buttons pressing by themselves.
instick2.jpg

Good luck!

Big Arcade Naomi Marvel Vs Capcom 2 Problem.

$
0
0
I put a Marvel Vs Capcom 2 arcade machine at some liquor store and when I set it to coin operated, it always has 24 credits installed. Even when I use up all the credits and turn it off and turn it on, it always has 24 credits installed. That's a big problem.

Does anyone know how to fix this? Having 24 free credits installed every time the machine is turned on is not good.

Please help!!!

Thanks in advance.

where to buy console connectors?

$
0
0
Hey there where can I purchase if possible the connecters that attach themselves to the console. Now I'm specifically looking for the ones used in multi console setups so it would be these.

PS3
PS2
PSX
PC
Gamecube
Xbox - Manufactured 2001 (Not 360 or XBoxOne)
Dreamcast
Sega Saturn
TurboGrafx-16/PC-Engine
NES/Famicom
SNES/Super Famicom

I know its doubtful but a supplier that possibly has a flow of those connectors.

Also if you guys recoomend a cable manufactuer then I'm all ears. I want to produce a small batch of test cables

The Optical Joystick Discussion

$
0
0
I thought it would be pretty cool to start a thread dedicated to the discussion of optical joysticks. These include:

- The Happ/WICO Perfect 360 joystick
- The Sanwa JLHS-8Y FLASH 1 joystick
- The ASCII Answer (Optical) joystick

as well as recent reproductions:

- Toodles' Spark
- Rollie Electronics and Happ Controls' reproduction FLASH 1

What is an optical joystick and why should I care?

What's so great about optics? Well, the beauty of optical joysticks is that unlike their microswitch counterparts, there's not a single component on the PCB that moves. That means as long as you're not running these things out-of-spec, they'll last a really long time. The optical joysticks invented thus far have required +5V power to power their sensors and LEDs. All 5 sticks listed above have however been successfully installed onto PlayStation 1 and 2 era sticks without much of a hitch. This would normally be an issue since PS1 and PS2 PCBs output at only +3.3V.

All of the original joysticks been out of production for a long time. The Sanwa HS-ASSY FLASH 1 PCB was discontinued in 2006; the old WICO Perfect 360s have been out of production for maybe a decade (someone fact check me on this) and the ASCII optical joysticks were just hard to find to begin with. So, needless to say, if you want an original, you're going to have to prepare a chunk of cash to get it.

HOWEVER, do not be mistaken that just because they're reproductions that Toodles' Spark or Rolllie's FLASH 1 are any worse. They are reproductions, but they are based on the same design principles and standards that original optical joystick PCBs work on. They will work the exact same.


Where can I buy an optical joystick?

As stated, if you're looking to get an original optical joystick, be prepared to get some cash on hand because depending on which joystick you want, you're going to have to spend a LOT of cash. Here are some figures regarding the average going rate I've seen for these joysticks here on SRK's Trading Outlet:

WICO Perfect 360: $100.00 +/- $20.00
Sanwa JLHS-8Y FLASH 1: $200.00 (!) +/- $20.00
ASCII Answer (Optical): $120.00 +/- $20.00

And here's the price for the reproduction optical PCBs:

Toodles' Spark: $55.00 + shipping
Rollie's FLASH 1: To be determined

Except for the newer production Happ Perfect 360s, which you can get commonly from LizardLick for $39.95 plus shipping and handling, every other optical joystick ever made is out of production. Go figure why they're so sought after; the last time people were able to get an optical joystick for reasonable prices was around in 2006! :wasted:

If you are a fan of American parts you can still get a Happ Perfect 360 joystick from places like LizardLick. Just be aware that the newer Happ Perfect 360 joysticks are manufactured by Happ in their factories in China and the first batches of P360s have had issues with various aspects of the build; pivot grinding issues, diagonals not registering, and other issues have been noticed in the newer P360s (none of these reported issues have anything to do with the optics. If there were any optics issues, it's because you're not powering your joystick properly).

However, that was a few years ago when Happ first made the switch to their China factories. Today, their P360s are mostly issue free, though WICO P360 owners will tell you the new P360s "Just don't feel the same." You can get a newer Happ P360 for around $40.00 USD from LizardLick, but for a WICO P360, you're going to need to do a bit of hunting for them and shell out some more cash. I've seen WICO P360s go for around $120.00 here on SRK. The easiest way to tell if it was made by WICO or Happ is to look at the bottom of the joystick. If it was made by WICO, it will have "WICO" written on the bottom. If Happ, it will say "HAPP P360." There have been some cases where some people got a P360 without any writing on the bottom at all, and it's mostly been assumed that these are WICO P360s, but just be sure to ask.

If you are fan of Japanese parts and are looking to use an optical joystick, looking for an ASCII Answer (Optical) is probably your best bet. They're incredibly good in terms of build quality and you can find them for significantly cheaper than a Sanwa FLASH 1. Of course, you typically won't find them sold as just the joystick. The ASCII Answer is pretty elusive only because when you look for any possible ASCII joystick that might have them, people are worried about whether the stick they're buying actually has an optical joystick since ASCII did manufacture sticks with microswitch joysticks. This detailed post by jdm714 however helps us out a lot. It covers the 6 ASCII sticks ever produced that used an optical joystick along with giving us the Japanese katakana for the joystick so that if you're feeling ambitious, you can hunt for them on Japanese auction sites.
Spoiler:
For PlayStation
ASCII Stick 3 (?????????3)
?plugin=ref&serial=118

ASCII Stick Zero 3 (?????????ZERO3)
?plugin=ref&serial=154

ASCII Stick Justice (????????? ??????)
?plugin=ref&serial=146

For Dreamcast
ASCII Stick FT (?????????FT)
?plugin=ref&serial=80

ASCII Stick FT Special: SNK Version (?????????FT SP SNK?????)
?plugin=ref&serial=205

ASCII Stick FT Special: Capcom Version (?????????FT SP ?????????)
?plugin=ref&serial=204

Wiring up the ASCII Answer is a bit odd since it does not use a standard connector for its directions, voltage line, or ground. All we get with it is the wires that were attached to the original ASCII PCB. But courtesy of our encyclopedic resource, jdm714, we have a diagram for those who want to wire one up into another stick.

madcatzasciiwire.png

The colors correspond to each of the wires on the ASCII Answer PCB. Depending on whether you are using a Dreamcast or PlayStation 1 era ASCII Answer, your wire coloring may vary. This post by jdm714 tells of all the known color schemes so far:
Dreamcast has colors going Green, Brown, Gray, Yellow.
PlayStation has the colors going Green, Orange, Blue, Yellow.
The colors are different, but they are the same as diagrammed.

Alternatively, you can purchase a reproduction optical PCB to install into your Sanwa JLF in your stick of choice. The first contender is made by our resident PCB wizard, Toodles.

You might some PlayStation 1 era ASCII Answers had a purple wire (image courtesy of fujifilm, linked to by jdm714) instead of blue! But they wire up just the same. Bear in mind the diagram does not mean the ASCII Answer can exclusively be installed in a Mad Catz Arcade FightStick or with a Mad Catz PCB. It's just a reference diagram. It can be easily installed in any stick you want.

What about those reproductions? Resident PCB wizard Toodles has himself designed and manufactured an optical PCB designed for use in a Sanwa JLF joystick called the Spark. You can order one of these from his site. These are very reliable PCBs and are a very cost-effective solution if you want to try out an optical joystick for yourself.

Recently as well, Rollie Electronics in partnership with Happ Controls has begun reproducing the original FLASH 1 optical PCB designed for the Sanwa JLF joystick. I won't go into details, but you can find more information in their thread here:

http://shoryuken.com/forum/index.php?threads/the-original-flash1-is-back-a-product-review.151531/

Anyways, enough background information. I'd like to propose the following discussion question:

What should we dub the ASCII optical joystick?

The term "ASCII Optical" is certainly easy to remember and is definitely precise enough for people to understand what you're talking about, but (it might be just me) I feel that it's very boring sounding. Happ/Wico had their "Perfect 360" bit going, a name signifying the perfection in movement that their optical joystick gave to the player. Sanwa's FLASH 1 had a reference to light in the name, and is almost synonymous with the phrase "High-Speed Response."

So what about ASCII? I personally think that we should dub it the "ASCII Answer" for two reasons:

1) It was, after all, ASCII's own "answer" to Sanwa's optical joystick.
2) For the deep, psychological part of the name, the term "answer" refers to how the ASCII optical joystick shall always be there to "answer" to whatever request you may make of it.

I dunno though; I thought my own attempt was pretty lame so let's get talking about the ASCII's new name or anything else optical.


Have at it gentlemen! :tup:

Need Recommendation for PS4 2 Player Arcade Style Sticks? Thanks!

Converter Compatibility Thread

$
0
0
Read the FAQ before posting! :bluu:

There is not a converter for using a TE on a system other than the one it was designed for.

There is no USB to anything older. No USB to PS2, Dreamcast, etc. You must mod your stick with a MC Cthulhu or a second PCB.

If you want a stick that works on both Xbox 360 and PS3 (And PS2, Dreamcast, etc.) get a PS2 stick like a HRAP or Namco. You can then use converters to adapt it to various systems.

You can not plug a random USB controller or converter into either the Xbox 360 or PS2. The Xbox 360 only works with Xbox controllers due to its security scheme. The PS2 was never designed to accept it.

The PS3 can use HID compliant (driverless) USB controllers for PS3 and PS1 games (not PS2). This makes the USB Saturn pads worth getting. Beware of bootlegs.

The PS1 Dual Shock has the best compatibility with converters. If you are building a custom stick then these are the way to go. The original, non-analog controllers have problems with most converters and are not recommended if you can avoid them.

Most custom PS1/PS2 sticks were made with Sony PCBs. When submitting a compatilibility report open your stick and see what kind of pad is inside. The Dual Shock pads have analog sticks. The original Digital pads do not.

There are three versions of the SFAC stick. Unscrew the bottom of the case to check the PCB before purchasing an adapter. Check next to the system cable for the voltage. It will read either 3.5V 7.5V or 8V. This number is indicated in the listing below whenever possible.

Please test your converter if it can be connected to a PC:

If you purchase a converter that's USB (PS2 to PS3, etc.) and want to test it for lag (on Windows) then download this application developed by SRK member Colac. It's straightforward to use once you get the hang of it.
To accurately test your adapter/converter, you need to:

1) Turn off vertical sync in your graphics card settings.

2) Using a key on your keyboard to run through the program once and record down the input lag time from your keyboard.

3) Plug your gamepad and stick through the adapter that you want to test into your PC. Then, use programs like (xpadder) to map a button on your gamepad or stick to the SAME key that you tested in step one. Run the program and record down the input lag again.

4) Subtract the two results you got from previous steps. If the difference is less than 2 ms (i.e., stick input lag - keyboard input lag <= 2ms), then your adapter can be considered as lag free.

PS2 to PS3/USB

Note: Sony is at it again with 3.5. The Real and HAIS are reportedly done for.

The 2.7 firmware update rendered the Sumoto and TAC adapters unusable with the PS3. This was corrected with 2.8. I'm hesitant to recommend them in light of this but they are working again.

The majority of these converters should also work on a PC without drivers (InPin, Pelican). If you only care about PC compatibility then the Super Joy Box 3 Pro was highly recommended. It does not work on the PS3.

*Recommended* InPin: This is the best option that's readily available. It's sold by exclusively by SRK member laugh. Visit his eTokki shop to order one.
Compatible with: Sony PS2, PS1 DS, MAS, HRAP Series, Namco PS1, SFAC 3.5
Incompatible with: SFAC 8V?, certain PS1 Digitals

*Recommended* Pelican: People claim that these are the only adapter to feature code from Sony. They have excellent compatibility with the exception of PS1 digital PCBs. They're by far the most expensive ($50+) but can occasionally be found used at GameStop for a few dollars.
Compatible with: PS2 DS, PS1 DS, HRAP 2, SFAC 3.5, Namco PS1, Saulabi
Incompatible with: PS1 Digital, SFAC 7.5V

HVG2: These are reportedly a good converter if your stick has a analog capabilities; like a custom with a PS1 DS. It will not work with a digital PCB like most consumer sticks have (HRAP).
Compatible With: PS2 DS, PS1 DS, Hori Fighting Stick, SFAC 3.5V, 7.5V
Incompatible with: PS1 Digital, Namco PS1, HRAP Series, Tekken 5, Pelican PS2, SFAC Pad
Reviews: Riotblade

DragonPlus: There were conflicting reports on this adapter. Most of its owners reported it as lagless. Press Up+Select for Home.
Compatible with: HRAP 2/SA, Namco PS1
Incompatible with: PS1 Digital, Tekken 5 stick

Cablesforpc: This is the one to get for owners of the SFAC stick with an 8V PCB. It allows two PS2 controllers to be connected.
Compatible with: PS1 DS, SFAC 3.5V, 8V, HRAP 1
Incompatible with: SFAC 7.5V
Reviews: Annihilationscape

Sumoto: These were reported as the best adapter for Sony digital PCBs (original pads without analog sticks). A few users have claimed they're lagless, and I haven't seen a negative review on them yet.
Compatible with: PS2 DS, PS1 DS, PS1 Digital, Tekken 5, Pelican Universal, Pelican PS2, Ascii PS1, SFAC Pad
Incompatible with:

TAC: These were reported to work well with SFAC and HRAP series. MarkMan and others reported that it has issues so I would avoid it in favor of something else. Hold Analog for Home.
Compatible with: PS2 DS, SFAC 3.5V, HRAP 1, HRAP 2/SA
Incompatible with: PS1 Digital

Real (Incompatible with 3.5): These were once all the rage but are now discontinued. They notably do not work with PS2 DS controllers.
Compatible with: PS1 DS, HRAP 2/SA, Namco PS1, SFAC, SFAC Pad
Incompatible with: PS2 DS

Hais (Incompatible with 3.5): These reportedly work well and include a PS2 memory card reader. They have taken Sumoto's place as a solid/budget converter. Press Analog or Up+Select for XMB. Hold Up+Select for Home.
Compatible with: PS2 DS, PS1 DS, PS1 Digital, SFAC, SFAC pad, Saturn PS2 pad, Namco PS1, Tekken 5
Incompatible with: SFAC 8V, Pelican Universal
Reviews: Canto

PS2/3 to Xbox 360

*Recommended* Controller Converter Pro by Blaze (?): This is an unmarked converter that is similar in appearance to the Blaze PS2-360. It notably does not require a 360 controller for passthrough. It reportedly works well with a HRAP3 and features similar compatibility to the Blaze.
Compatible with: PS2 DS, PS3 DS3, HRAP3, HRAP2, Namco T5, SFAC Pad
Incompatible with: MadCatz TE and SE, Pelican Universal

PS2 to Xbox 360

*Recommended* PS&PS2 to 360 converter (Xtokki360) by Tinybee: These converters, originally sold through Focalprice, are the best available option for PS2 to 360. They do not require an Xbox 360 controller for passthrough like the others listed below. They are also the only converter to feature a headset jack. They are sold by SRK member laugh. He is the recommended supplier because of Focalprice's questionable shipping. Analog or Select + L3 for Guide.
Compatible with: PS1 Digital, PS1 DS, PS2 DS, HRAP Series, Namco, Tekken 5, MC Cthulhu, Mayflash PS2/PS3, Tekken 4, Fighting Stick PS, ASCII Stick 3
Incompatible with:
Reviews: kaioshade, DrgnAK

The following converters require a wired 360 controller to bypass Microsoft's security scheme. A wireless controller with a Play & Charge cable will not work. Read Ikagi-chan's post for more information. The Blaze and Xtokki360 above feature a Microsoft security chip to bypass this requirement.

*Recommended* Xconverter 360 by Joytron: These were the best option until the introduction of the Xtokki360. They are now discontinued. Previously sold by SRK member laugh who brought us the InPin. Analog = Guide.
Compatible with: PS1 Digital, PS1 DS, PS2 DS, HRAP Series, Tekken 5, MAS, Namco, SFAC 3.5, SFAC Controller
Incompatible with:
Reviews: laugh, Ikagi-chan, Gamecop

*Recommended* BlazePro: These Hong Kong converters can be had for $10 on eBay. They are basically superseded by the PS3 to 360 converter listed above.
Compatible with: PS1 Digital, PS1 DS, PS2 DS, HRAP Series, Namco, SFAC 3.5, SFAC Controller, Saturn PS2 pad, Blaze Twin Shock
Incompatible with:
Reviews: Source thread

Max Shooter by Mayflash: These work great except for an issue with simultaneous key presses. Pressing corresponding buttons, for example: Right+Circle will cause the converter to freeze until another button is pressed.
Compatible with: PS1 Digital, PS1 DS, PS2 DS, HRAP 1, SFAC 3.5V, SFAC Pad, Saturn PS2 pad, Namco PS1
Incompatible with: HRAP 2, SFAC 8V

XFPS by XCM: There are a few revisions of this adapter but I can't recommend it at all. It reportedly lags and/or drops input even with a real Sony PS1 or PS2 controller. The OP repeatedly trashes them earlier on in the thread. There are 10 negative posts for every positive I could find. Read this, this, this, this, this, and this before deciding to spend your money on one of these.
Compatible with: Sony PS2, PS1 DS
Incompatible with: Namco PS1, HRAP 2

Xbox 360 to PS3

Cross Battle Adapter by XCM: MarkMan confirmed that this drops inputs similar to the XFPS. People with 360 sticks should look into adding a Cthulhu PCB (Photos) for PS3 compatibility.
Compatible with:
Incompatible with:

PS2 to DC

*Recommended* Total Control Plus: These are usually recommended since they're readily available. Toggle the switches on it to change the triggers.
Compatible with: Sony DS 2, HRAP, HRAP 2, SFAC, Tekken 5
Incompatible with: Some MAS sticks

*Recommended* Dream Connection 2 by Innovation (original URL, sold out): These as reportedly the best converters but are expensive and hard to come by. The SFAC Pad isn't recommended because it treats L1 and R1 (the HP/HK buttons) as the same button.
Compatible with: PS2 DS, PS1 DS, PS1 Digital, SFAC 3.5V, SFAC Pad, HRAP 2/SA, Tekken 5, Pelican PS2
Incompatible with: SFAC 8V

PS2 to GameCube/Wii

*Recommended* Cube JoyBox Pro by Mayflash: These are the most commonly recommended converters for GC. They work with Tatsunoko vs. Capcom on Wii.
Compatible with: PS2 DS, PS1 DS, PS1 Digital, HRAP 1, HRAP 2/SA, MAS, Namco PS1, Tekken 5, SFAC 3.5V, SFAC Controller
Incompatible with:

Magic Path II by EMS: These apparently work equally as well as the Cube JoyBox. They're also reported to work fine with Tatsunoko vs. Capcom.
Compatible with: PS2 DS, HRAP
Incompatible with:

Game Elements (eBay): This is the converter I've happily used for years. It works great on the GameCube/Wii as well as the Xbox. ArcadeStickMonk used it as well.
Compatible with: PS2 DS, PS1 DS, SFAC 3.5V, HRAP 2 SA, MAS
Incompatible with: PS1 Digital (works on Xbox) SFAC 8V, Tekken 5 (Works on Xbox), SFAC Controller

PS2 to Xbox

*Recommended* Xbox Magic Box: These are lag free and the Saturn port is awesome. It went completely nuts when I plugged in my PS1 DS stick.
Compatible with: PS2 DS, PS1 Digital, HRAP, HRAP 2 SA
Incompatible with: PS1 DS, SFAC Pad, SFAC 8V

*Recommended* Game Elements: These work very well. See the GameCube section above.
Compatible with: PS2 DS, PS1 DS, PS1 Digital, SFAC 3.5V, SFAC Pad, HRAP 2 SA, MAS, Tekken 5
Incompatible with: SFAC 8V, Directional issues w/3rd Strike

X-Connection by Innovation: I would think the Innovation name would guarantee this one a winner, but it reportedly doesn't work with certain games or the HRAP 2.
Compatible with:
Incompatible with: HRAP 2

PS2 to Saturn, SNES, etc.

A company called ToToTEK makes a wide variety of PS2 to classic system adapters. There's one for 3DO, Neo-Geo, Famicom (NES), FC2003 (?), Saturn, GameCube, SNES, PC Engine (TurboGrafx-16), and Genesis (Mega Drive). They reportedly work well from everything I've read.

Saturn to Xbox

*Recommended* Xbox Magic Box: This works great with an official Sega pad. There isn't a Select button for Insert Coin but some Xbox emulators like FB Alpha allow it to be remapped. Only problem is that they're hard to find.
Compatible with: Model 2 (Japanese style) Sega Saturn Pad
Incompatible with: Nights Analog Pad

Saturn to PS2

*Recommended* Keio Console Converters: These are a godsend for people wanting to use their Saturn pads on other systems. They can be chained to other converters for use on the Xbox 360, PS3, etc.
Compatible with: Model 2 (Japanese style) Sega Saturn Pad, HSS-0130
Incompatible with:

Xbox to USB (Not PS3)

The original Xbox uses a USB connector with a funky male end. Female Xbox to male USB adapters can be had on eBay for a few dollars. No conversion is necessary. This reportedly works fine for the SFAC stick.

Xbox 360 to USB (Not PS3)

Xbox 360 sticks/controllers work fine on Windows using Microsoft's drivers. They're available for both 32-bit and 64-bit.

PS360+ In Xbox360 Madcatz TE - Device Not Recognized

$
0
0
Hey all, I have an issue with my PS360+ and I was hoping any of you could help.

After finally getting all the necessary parts and tools to get this mod done, I did it today. Eventually, I plugged it in to my laptop because it needs firmware updates, and my computer says the device is not recognized. I'm getting a little panicked because it's taken me a while for this to become a reality, and now it seems like it doesn't want to work. I tried following the update tutorial and all I get is "Unknown USB Device" in my device manager. Please help?

For context, My stick is xbox360 Madcatz Original TE, the connection is from the rj45 port to a neutrik rj45 feed through to a usb to my laptop, and my laptop runs windows 8.

Please, if you can help, I'll be extremely grateful.

Using my 360/PS3 stick on my MAC

$
0
0
Just heard a lot of great things about FightCade and that it is compatible with MAC. I have a 360/PS3 stick from the now out of business, Arcade In A Box. Haven't tested it yet but wanted to know if it would work on my MAC or do I need a converter or something like that. I also have a custom PS2 arcade stick, same question.

Thanks

*The "padhacking" thread*

$
0
0
I thought a pad hacking/pad info thread should be started so that everybody can see where to solder on different pcb´s.
If you want a picture added please write in the thread.


***Microsoft***

Xbox:

http://slagcoin.com/joystick/pcb_diagrams/xbox_diagram1.jpg
http://slagcoin.com/joystick/pcb_diagrams/xbox_diagram2.jpg
http://slagcoin.com/joystick/pcb_diagrams/xbox_diagram3.jpg
http://slagcoin.com/joystick/pcb_diagrams/xbox_diagram4.jpg


Xbox 360:

http://slagcoin.com/joystick/pcb_diagrams/360_diagram1.jpg
http://slagcoin.com/joystick/pcb_diagrams/360_diagram2.jpg
http://slagcoin.com/joystick/pcb_diagrams/360_diagram3.jpg
http://slagcoin.com/joystick/pcb_diagrams/360_diagram4.jpg
http://slagcoin.com/joystick/pcb_diagrams/360_diagram5.jpg
http://slagcoin.com/joystick/pcb_diagrams/360_diagram6.jpg
http://slagcoin.com/joystick/pcb_diagrams/360_diagram7.jpg

http://akihabarashop.jp/images/ChImpHookUp360Full.jpg
Chimp with Madcatz Xbox 360 PCB.

http://akihabarashop.jp/images/IMPconnection.jpg
MCC with Madcatz Xbox 360 PCB and Imp PCB.


***NEC***

Turbo Grafx 16:

http://slagcoin.com/joystick/pcb_diagrams/tg_diagram1.jpg


***Nintendo***

Nintendo Entertainment System (NES):

http://slagcoin.com/joystick/pcb_diagrams/nes_diagram1.jpg
http://slagcoin.com/joystick/pcb_diagrams/nes_diagram2.jpg
http://slagcoin.com/joystick/pcb_diagrams/nes_diagram3.jpg


Super Nintendo Entertainment System (SNES):

http://slagcoin.com/joystick/pcb_diagrams/snes_diagram1.jpg
http://slagcoin.com/joystick/pcb_diagrams/snes_diagram.jpg


Nintendo 64:

http://slagcoin.com/joystick/pcb_diagrams/n64_diagram1.jpg


Nintendo GameCube:

http://slagcoin.com/joystick/pcb_diagrams/gc_diagram1.jpg


***SEGA***

Sega Genesis:

http://slagcoin.com/joystick/pcb_diagrams/gen_diagram1.jpg
http://slagcoin.com/joystick/pcb_diagrams/gen_diagram2.jpg


Sega Saturn:

http://slagcoin.com/joystick/pcb_diagrams/sat_diagram1.jpg
http://slagcoin.com/joystick/pcb_diagrams/sat_diagram2.jpg


Sega Dreamcast:

http://slagcoin.com/joystick/pcb_diagrams/dc_diagram1.jpg


***SONY***

Sony Playstation 1:

http://slagcoin.com/joystick/pcb_diagrams/ps1_diagram1.jpg
http://slagcoin.com/joystick/pcb_diagrams/ps1_diagram2.jpg
http://slagcoin.com/joystick/pcb_diagrams/ps1_diagram3.jpg
http://slagcoin.com/joystick/pcb_diagrams/ps1_diagram4.jpg
http://slagcoin.com/joystick/pcb_diagrams/ps1_diagram5.jpg
http://slagcoin.com/joystick/pcb_diagrams/ps1_diagram6.jpg
http://slagcoin.com/joystick/pcb_diagrams/ps1_diagram7.jpg
http://slagcoin.com/joystick/pcb_diagrams/ps1_diagram8.jpg
http://slagcoin.com/joystick/pcb_diagrams/ps1_diagram9.jpg


Sony Playstation 2:

http://slagcoin.com/joystick/pcb_diagrams/ps2_diagram1.jpg
http://slagcoin.com/joystick/pcb_diagrams/ps2_diagram2.jpg
http://slagcoin.com/joystick/pcb_diagrams/ps2_diagram3.jpg
http://slagcoin.com/joystick/pcb_diagrams/ps2_diagram4.jpg
http://slagcoin.com/joystick/pcb_diagrams/ps2_diagram5.jpg
http://slagcoin.com/joystick/pcb_diagrams/ps2_diagram6.jpg
http://slagcoin.com/joystick/pcb_diagrams/ps2_diagram7.jpg


Sony Playstation 3:

http://slagcoin.com/joystick/pcb_diagrams/ps3_diagram2.jpg
http://slagcoin.com/joystick/pcb_diagrams/ps3_diagram3.jpg

PlayStation 4 and PS3 arcade stick compatibility

$
0
0
Sony recently released an "Ultimate FAQ" regarding the PlayStation 4. Part of this FAQ includes details on what PS3 peripherals will work on the PS4.

Now while we know that the system won't natively support PS3 peripherals, there's an interesting bit that provides some hope.
Will PS3 peripherals such as fighting sticks and steering wheels work with PS4?

Generally speaking, no. However, at launch, users will be able to use these controllers if a specific game title allows it to be used within the game. This decision is upon the game developer and will vary from game to game.

In other words, if the devs allow a game to use a certain peripheral (probably by packaging drivers and whatnot with the game itself) than it'll work with the PS4.

Bluetooth arcade stick?

$
0
0
Im about to make an arcade stick soon and I had a couple of questions regarding the build, I am new to this but id like to get it right the first time.

My current build is based off of the hitbox aracde using a cthulhu pcb with a flashed audrino for horizontal SOCD. Link below.

image

I would also be using a Cronus max and bluetooth adaptor if usb functionality is possible. Either way I plan to use the Cronus for maximum cross compatibility though.

1. Is there a way to add bluetooth functionality and charging to my arcade stick?
2. I would also like some basic led display that displays the current battery level, possible?
3. Is there a way to also change my output to mini usb?
4. I would like to have the option to use a headset with it which I see the "PS360+ PCB" supports but idk if the horizontal SOCD works with that pcb. Would anyone know about that?

I know the build seems a bit picky but I feel like if I'm gonna make one I might as well go all out. If anyone has any solutions to this that would be amazing. I'll post finished build when I'm done too because I'm getting a metal case built ;)

ps: Please address each question separately.

Thanks in advance :)

Help with p360 stick please

$
0
0
Hey there so I'm going to need some help with this particular question. Let me run down the situation real quick.

1. I have a MA's stick
2. I had a sf15 anniversary stick which has ps2 and xbox on the board

Alright now I can't really test this out as I don't actually own a ps2 or xbox. But I have a question. The stick is I'm not sure actually it feels like a wico p360 but I can't confirm as I should have written it down. Anyways the stick has a 5v connection otherwise it won't detect the inputs. On the board of the sf15 anniversary PCB however the board is not 5v its 8v

So I should probably instal a 5v regulator and that's not a biggie but just want to make sure that its either okay to connect it to the 8v. Or not okay to do this. Here are some pics sorry they are links.

http://imgur.com/25aguTz
http://imgur.com/5T8TUU1

HORI Fighting Commander 4 for PS3 and PS4

RecRoomMaster.com Xtention Cabs....


Is the Mad Catz Street Fighter X Tekken - FightPad SD controller allowed at competitions ?

$
0
0
Hey guys,

I was wondering if this controller was allowed at competitions ?
It has a turbo function.


MCZ-SF25-Video-Scre27161B3.jpg


Introducing Project Kajitsu: USB-JAMMA Controller based on Raspberry Pi... Oh, and its free!

$
0
0
What is Project Kajitsu?

Project Kajitsu (Kajitsu is Japanese for Berry) is the brain child of Mike Wolak and Jasen Hicks based on the $35 Raspberry Pi B+ Model. The goal was to use the Raspberry Pi with a custom Pi Hat / Linux kernel and turn 2 ordinary PS3 or XBOX360 controllers into 2 Discrete JAMMA compatible controllers. We succeeded.

Who did all of this and why?

All of the software, hardware, and testing associated with Project Kajitsu was done in house between Jasen and Mike. We undertook this project to bridge the gap between modern consoles and arcade games of the past. One of the fun benefits is that you can also control things like robots or other gadgets looking for 5V or 3.3V logic inputs!

Why the Raspberry Pi?

The Raspberry Pi B+ released in July 2014 opened the aperture on how much you can do with the Pi because of the expanded GPIO. It now has 40 pins instead of 26 with only a few being set aside for specific uses (power, ground, i2c, serial bus). This means we can use two controllers on the Pi and create enough discrete outputs for both Player 1 and 2 on a SuperGun. Think… only one device to handle two players!

What controllers are supported, and is there lag?

In the first release, RC12, Wired XBOX 360 and Wired PS3 Controllers are working with no no perceivable lag. With more testing and getting additional hardware other PCBs will be added in future releases. Our goal isn't to use all the controllers on the market but the main ones. Want to tinker? We’ll be releasing the source files at a later date so the community can tinker and experiment.

What about Bluetooth?

Bluetooth is an awesome technology that adds a little bit of freedom to your gameplay. Unfortunately, initial testing has shown the pairing sequence isn’t as simple as the plug and play usb version and requires more testing and tinkering on our part before we add that functionality. When we do add it, PS3 and Wii controllers should work with Project Kajitsu.

Tell me more about this Linux you are running…

Our custom light weight Linux operating system image boots our USB-DISCRETE App in less than 3 seconds! Mike Wolak has fine tuned the Pi image to behave more like a high speed micro-controller vs. an underpowered desktop computer allowing nearly instantaneous startup times.

What/When can I download?

Today, you can download the BETA RC12 version of our Custom Linux Kernel and the EAGLE Board files associated with our two Project Kajitsu Pi Hats. Beta V0.1 is fully tested, V0.4 is being made for testing. Links are embedded in our original post here: freecade.org/project-kajitsu/

These files are provided as BETA files only. We are not responsible for any damage to your Pi, Pi-Hats, or SD Cards. We have used them with a lot of success so far. If you are interested in the schematic files for the Project Kajitsu Hats, we will make them available at a later date.

Part Lists:

3x 74HC245DW Buffers
2x 3.9K 0805 Resistors
1x 0805 LED
2x 1K 0805 Resistors
3x .1uF 0805 Capacitors
1x 100nF 0805 Capacitor
1x i2C EEPROM
1x 0805 Diode
4x 3pin .100 headers
2x 12 position .100 screw terminals
1x 2 position .100 screw terminals
4x Jumpers

1x Raspberry Pi B+
1x Micro USB Cable and Wall Wort

Can I just buy this preassembled?

We are doing a small batch of boards right now and should be ready in October. Pricing is to be determined.

project_kajitsu_1.jpg
project_kajitsu_2.jpg
project_kajitsu_3.jpg


**EDITED FOR PRECISION OF LANGUAGE WRT LAG**

USB Repair Tool - Solderless USB repair for emergencies

$
0
0
IMG_0700-300x225.jpg

The USB Repair Tool is a small, easy to use, and solderless repair and replacement tool. It is designed to be both an emergency repair kit in the field, and a way to revive old controllers/peripherals when you're out of plug and play options. Easy enough for the most novice of hand, it can also be used by those with a soldering skill set given the right circumstances.

Board Specs:
  • 4 x IDC terminals for solderless access
  • Completely solderless for basic applications
  • 1 x Mini USB connector standardized access
  • 1 x 2 position screw terminal for power
  • 1 x 4 position 0.1" solder row
  • 1.00x1.55 inches (25.48x39.27 mm)!
  • Notched for zip tie grip
  • #4 screw hole for easy mounting


Basic use cases:
Use-Cases-231x300.png

Other Use Cases:
  • Solderless swap to detachable cable setups with Neutrik USB Passthrough connectors. Crimp to stubbed USB cable, run mini B -> A to mounted neutrik.
  • Installing an optical or otherwise powered device. Install Repair Tool, use the screw terminals to leech power without soldering.
  • Non-USB crimp for other cable types/splices. All signals are matched end to end so just pay attention.


The USB Repair Tool is designed to be small an inexpensive enough for any player to pick up and toss into their bag for emergencies in the field. How many times have you or your friends run into issues with your USB cable finally being shredded by the plastic case of your arcade stick enough to become completely unreliable in play?

The real problem becomes when the local tournament modder is so swamped they can’t repair your stick in time for the next match. With the USB Repair Tool it’s a 10 minute fix, most of it being opening your case to get to the cable.

This isn’t just for arcade sticks though, as lots of pad users have these same problems with soldered cables being torn up from use. The board is safe to use externally as well, although it’s best if it’s put into an enclosure after the repair is done.

Let’s walk through it:

Step 1 – Locate the broken area of the cable.

If you find the damaged area is where the cable comes out of the stick, simply pull the cable back into the case a few inches so the damaged area can be repaired and fresh cable is then run out of the stick.
IMG_0703-300x225.jpg
IMG_0706-300x225.jpg
Damaged cable courtesy of the edge of my work bench


Step 2 – Cut out the bad area, and use a knife or strip tool to expose the USB wires.
IMG_0707-300x225.jpg
IMG_0708-300x225.jpg
You can expose this with a pair of scissors, a knife, or most anything sharp enough to cut the casing


Step 3 – With your forefinger and thumb, open up the IDC terminals.
IMG_0709-300x225.jpg

Step 4 – Insert the USB cables into the IDC terminals.

Make sure you push them all the way in and can see the colors of the wires in the little windows. Once you see them in the windows, take your thumb and forefinger and press quick and firm until the terminals close. It’s important that they close ALL THE WAY.
IMG_0710-300x225.jpg
IMG_0711-300x225.jpg

At this point you can test your cable to confirm it’s alive again.

Step 5 (optional) – Use a zip tie to act as a strain relief.

Once confirmed to be up and operational, you can use a zip tie anchor with zip tie, or a #4 screw to mount the board. Alternatively, if this is say… outside of the controller, such as a repair being done on a pad and not a stick, you can utilize a zip tie to act as strain relief so the board can be kept safely external.

Simply swing the cables underneath, and run the zip tie between the notches. This will keep the pressure away from the terminals while it moves.
IMG_0712-300x225.jpg
IMG_0713-300x225.jpg

Step 6 (optional #2) – Put the assembly into an enclosure to avoid damaging it.

I don’t have a box picked out just yet, but there are some small Hammond enclosures that will probably work great. Eventually I’ll probably design one you can have 3D printed.

PS360 and other some other USB sticks only reading analog instead of POV...

$
0
0
What's up all. I'm trying to configure some (and I do mean SOME) emulators, namely Kawaks and NeoRage to use the stick (direction), however, they seem to be read as an analog, which doesn't read on some emulators instead of being read as a dpad, which is extremely annoying. Heck, even my SNES9X and ZSNES work fine with analog or dpad, but not some emulators.

I'm trying to find out what I can do to address this issue. I have the PS360 with firmware 1.5 on a TE stick, a RAP3 PS3 stick, but my PS2 to USB converters work just fine, but I'd like all of them to work fine because I constantly switch between systems so I need them quick access adjusted. Although, my RAP3 has a stick function and I have to set it to analog, which I really do not trust. Doesn't work when set to DP, only LS.

Also, I do have one more smaller question, on my PS360 TE, I'd like to set Start and Select as home rather than just Select as home. I read the manual and it's confusing because it says to do one thing on one firmware, and completely ignores firmware 1.5. Currently as stated before, Home is on Select. I'd like it on start select together. Apparently, it has a long press home, too, which it says. I'd really like that function rather than one simple press.

In short:

Some USB sticks only read analog instead of POV, especially PS360 stick, I want POV for emulators
Trying to get Start and Select as home on PS360 TE stick with delayed press of SS.

Thanks a lot.

eTokki.com - The Shop for the Players by the Players

$
0
0
Hey guys,

This is Ryan, better known as LAUGH among fighting game players, and I have recently opened a new web store to better serve the needs of communities around the world.

As a serious gamer myself, I have been sharing and offering items and ideas within the community that I personally used to improve my gaming experience, and it has developed into what is now etokki.com.

My team will continue to offer products and services I have been offering for the community for years such as InPin converters & Xconverter 360 Plus's as well as Korean and Japanese arcade parts, and we hope to continue to bring out the best for all gamers looking for quality products and services.

The store is continuously being added with more products and deals, so be sure to sign up for the mailing list to get the latest news on groundbreaking new products as well as discounts and special deals on various products.

So check out the store and please let us know if there are any questions!

Ryan
www.etokki.com
Viewing all 8072 articles
Browse latest View live