Quantcast
Channel: Tech Talk — shoryuken
Viewing all 8072 articles
Browse latest View live

Dual Shock 4 PadHack Thread - If you thought the xb1 padhack was a pain, you don't know jack.

$
0
0
So you want to add PS4 functionality to your arcade stick? Well too bad. Just wait until there is a third party pcb that is cheap and easy to wire up. Maybe we'll get lucky and there will be a firmware update to any of the
custom ps3 pcb's that are out in the market. Oh, you don't want to wait? You really want it now? Well the only option right now is to padhack a Dual Shock 4 controller. Luckily for us the pcb is common ground. Unluckily for us
the pcb is a pain in the ass to wire up and is quite unforgiving if you mess up. You thought the Xbox One pad hack was hard? This pad hack shits all over it. You accidentally burn off or rip off a contact pad on the ds4 and
you've just wasted $60. The only option after that is to find a via that traces to the contact pad that you've just destroyed. They are not easy to find nor solder to.

So if you think you have the skills or are looking for a challenge you have been warned. Don't hold me responsible if you damage your DS4.

With that being said, let the padhack begin! We will start out with preparing the ds4 pcb.

To begin opening up the DS4 you must unscrew the four screws on the back of the pad.
IMG_0336_zps442ab332.jpg

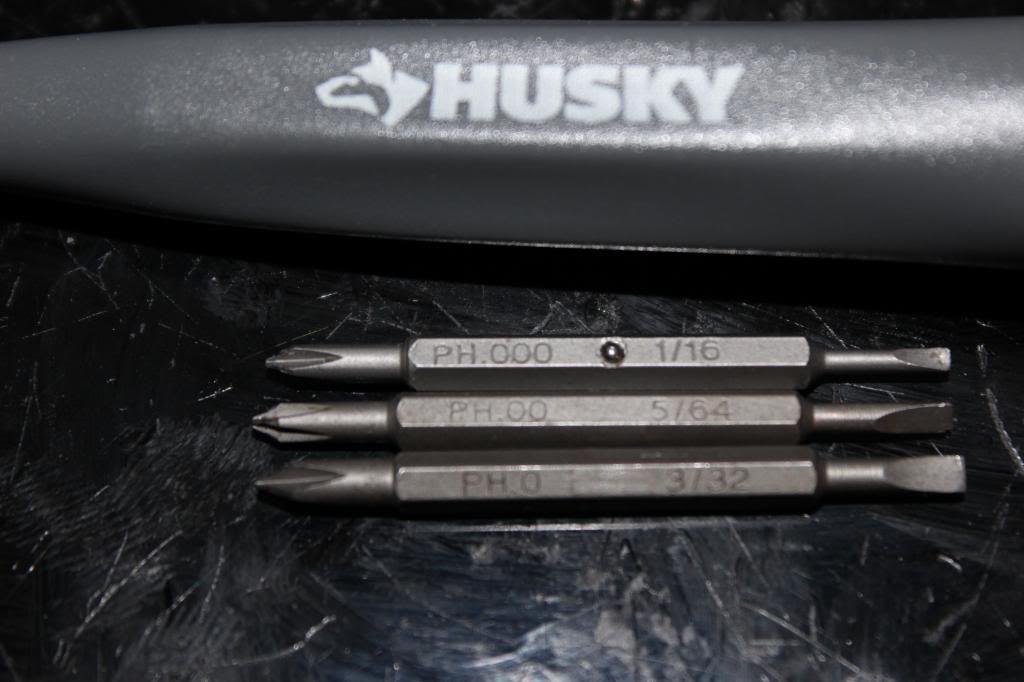
You'll need to use a size #0, #00, or #000 Phillips head screwdriver. If you don't own one then I suggest buying a Husky precision screwdriver set.
IMG_0337_zps65fe8af9.jpg

You'll need to use a little force to pull apart the shell, but don't pull the shells too far apart too fast. There is a ribbon cable connecting the usb jack to the ds4 pcb. Pull the ribbon cable out first. Then unplug the

lithium ion battery pack. Then cut off the rumble motor wires.
IMG_0338_zps823d7882.jpg

Circled is one more screw that holds the pcb to the shell.
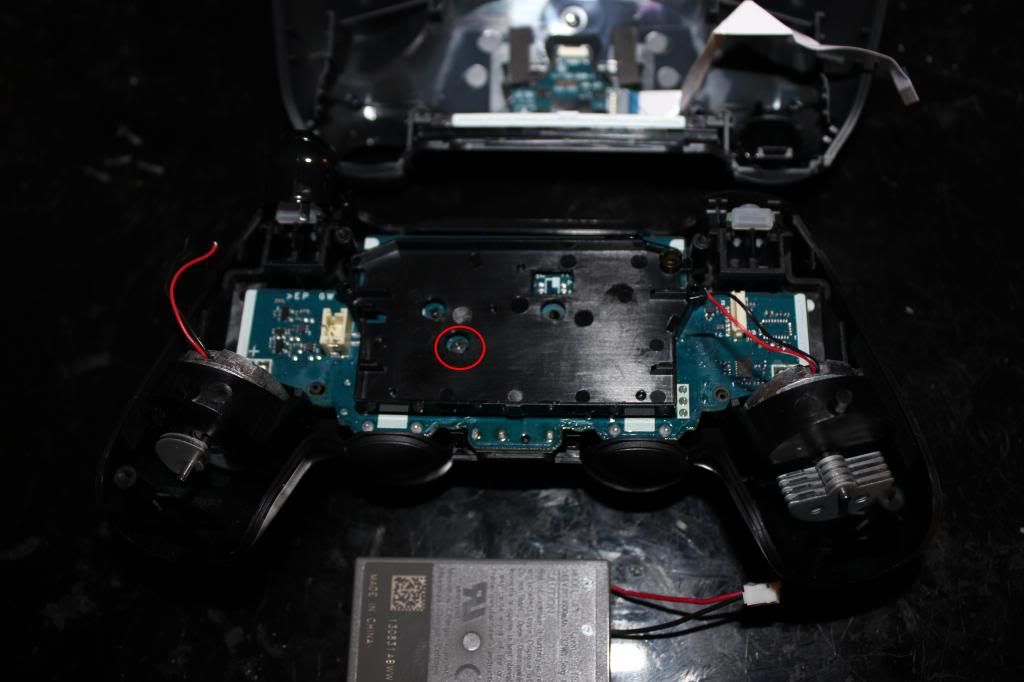
IMG_0339_zpsced0a56e.jpg

Be careful as you lift the pcb out. There is still one more ribbon cable left that needs to be unplugged. It might be a bit difficult to unplug with your finger so using tweezers or forceps will make things easier.
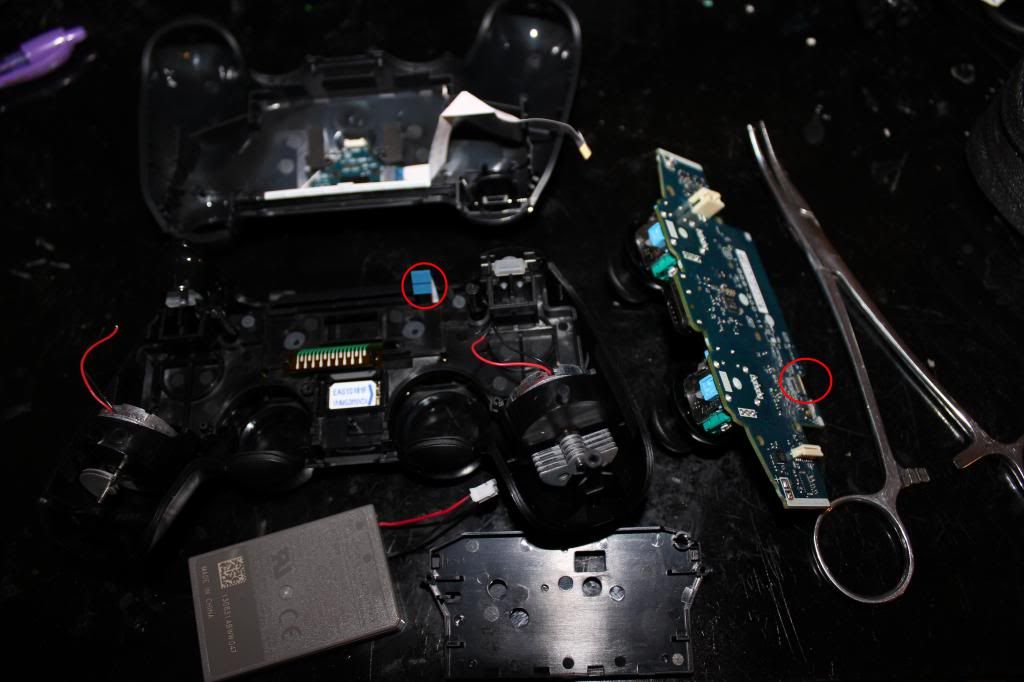
IMG_0340_zpsde1f7a4d.jpg

If you have very tight space limitations inside your case you'll probably will want to desolder the analog jacks and neutralize the axis with 10k ohm resistors. However, for most applications just cutting the stubs and gluing
the stick in place will suffice.
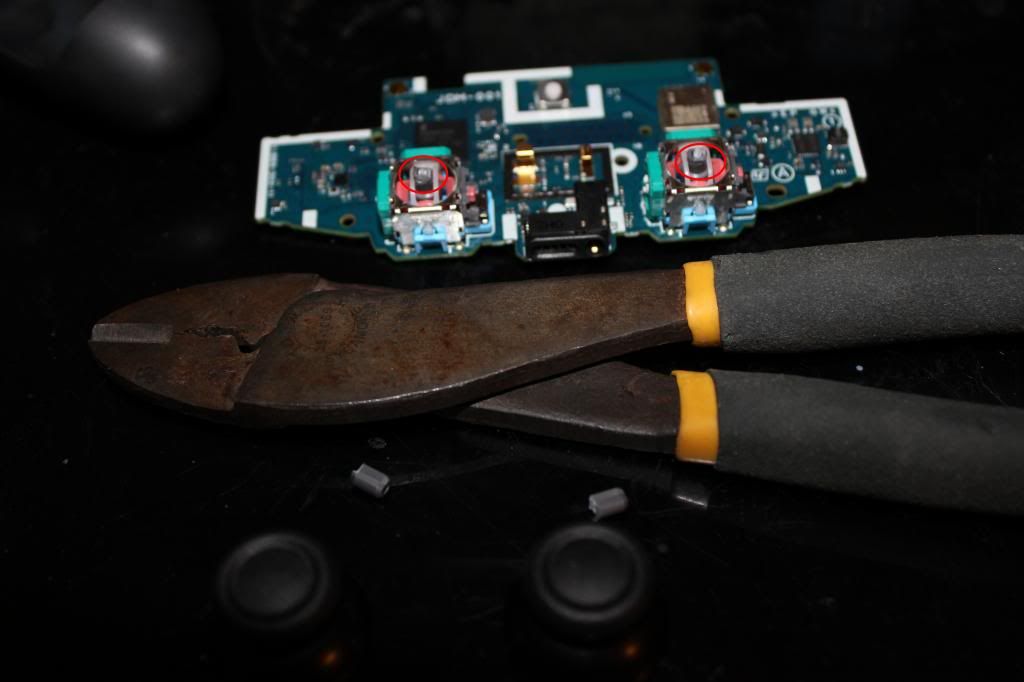
IMG_0341_zpsb1f0d7c5.jpg

If you want to use the micro usb jack, and I suggest you do, then you'll need to unscrew four screws that hold it in place. The top two have to be removed first. Then the led light thingy can be removed to gain access to the
bottom two screws.
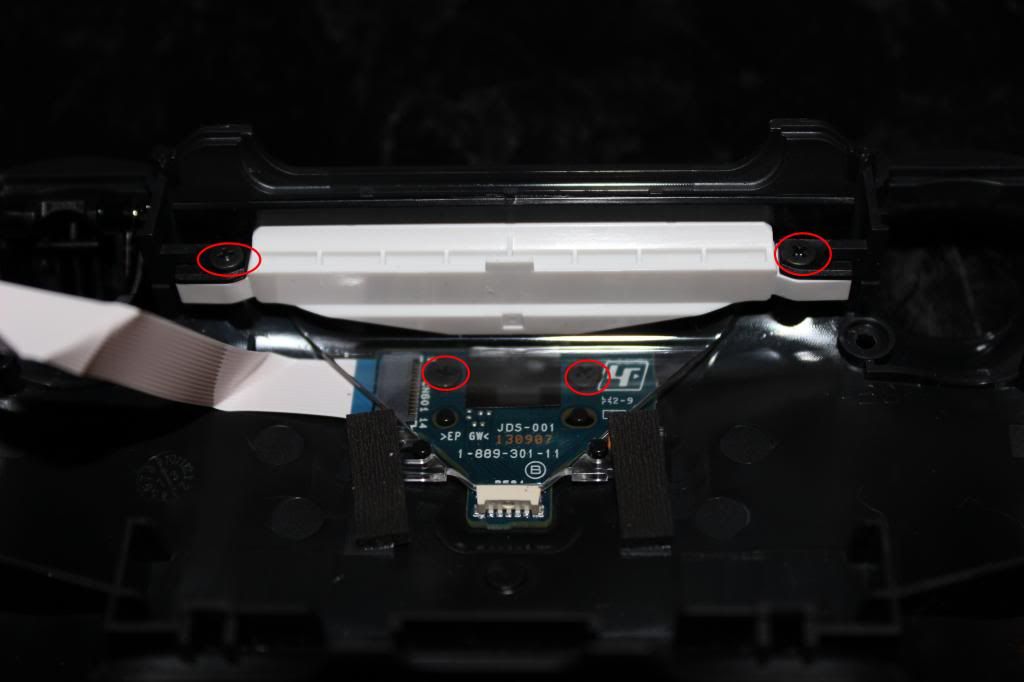
IMG_0342_zps8f1dea6e.jpg

Remove and set aside the micro usb jack.
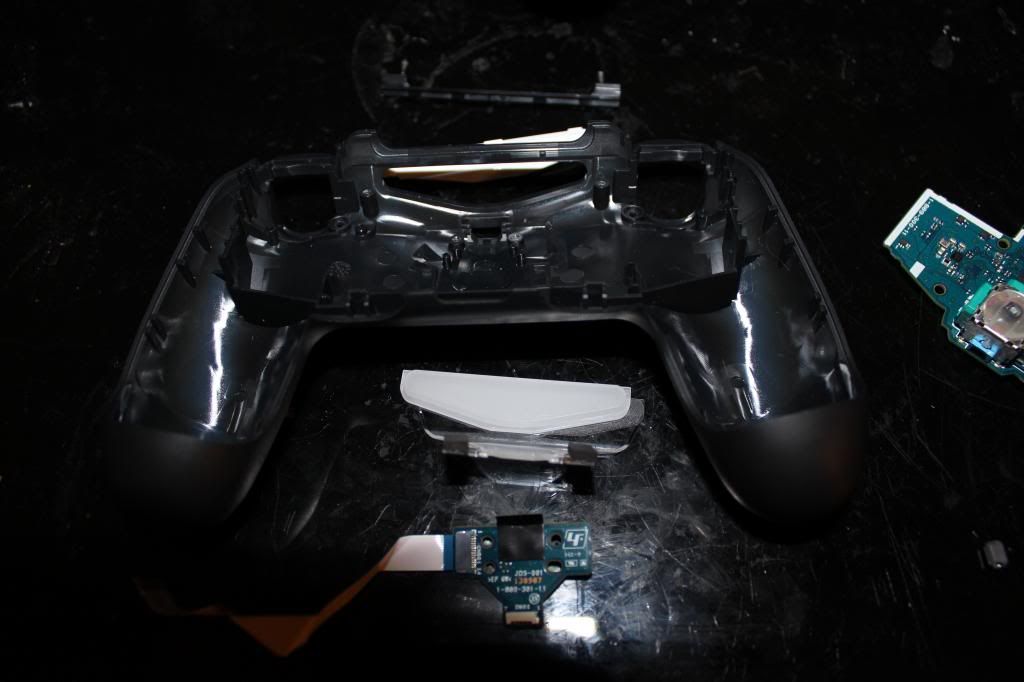
IMG_0343_zpsf0d6dec8.jpg

This is where you'll be wiring up the joystick and buttons to. Looks fun doesn't it?
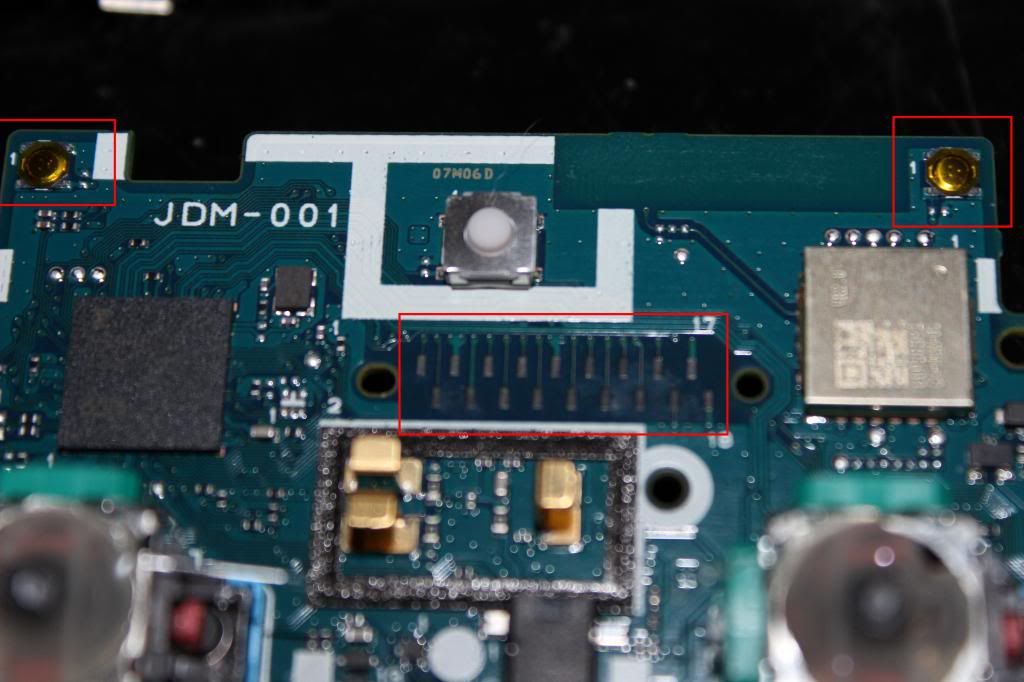
IMG_0345_zps3e268abe.jpg

To gain access to the copper contact pads the carbon residue has to be scraped off.
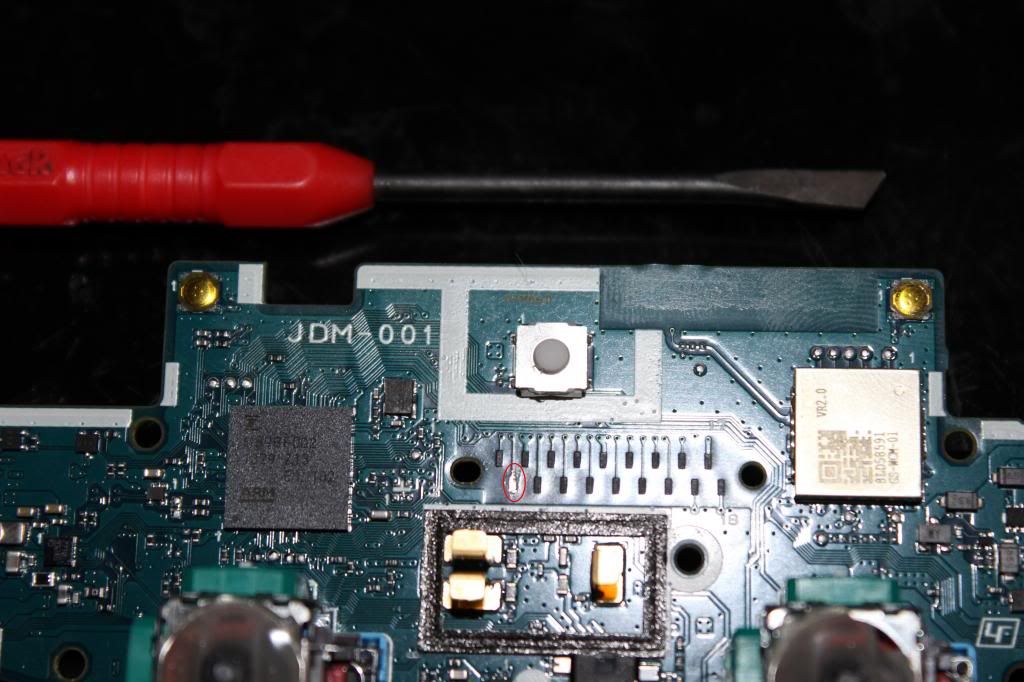
IMG_0346_zpse7c0faea.jpg

I have a pick set that I got from radio shack that I use to scrape off the carbon pads. The one on the left I accidentally broke in half from trying to pry something off. I suggest not using these picks to pry stuff off.
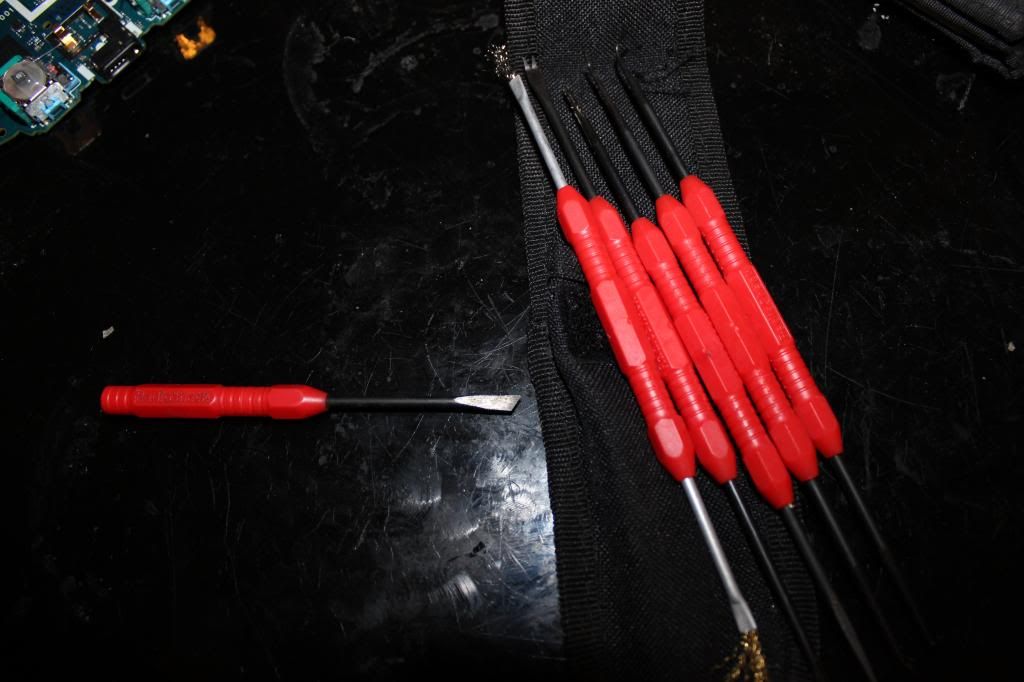
IMG_0348_zpsb592d658.jpg

Here's the pinout for the 18 contact pads and which need to be scraped. It is the same for all the model revisions 001, 011, and 020.
1-(Don't worry about me)
2-L1 (needs inverting)
3-10k ohm to pad4
4-L2
5-right
6-up
7-left
8-down
9-ground (Don't worry about scraping me either)
10-home
11-x
12-circle
13-triangle
14-square
15-(Don't worry about me too)
16-R1 (needs inverting)
17-10k ohm to pad18
18-R2
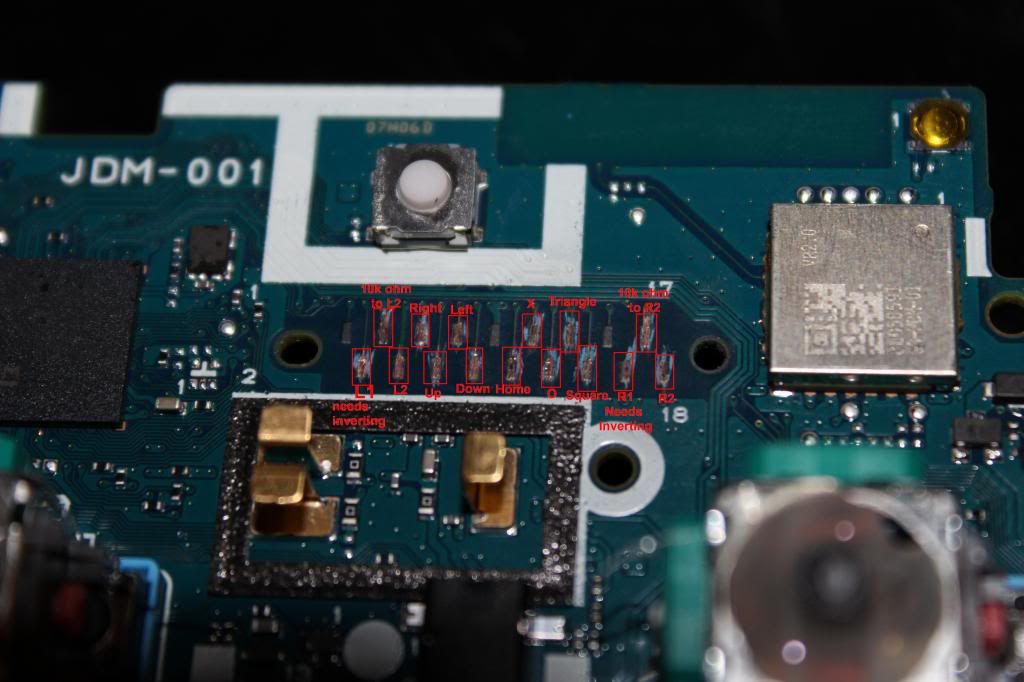
IMG_0349_zps2f5337b0.jpg

Tin the contact pads. Use flux as necessary.
IMG_0350_zps46ac45f6.jpg

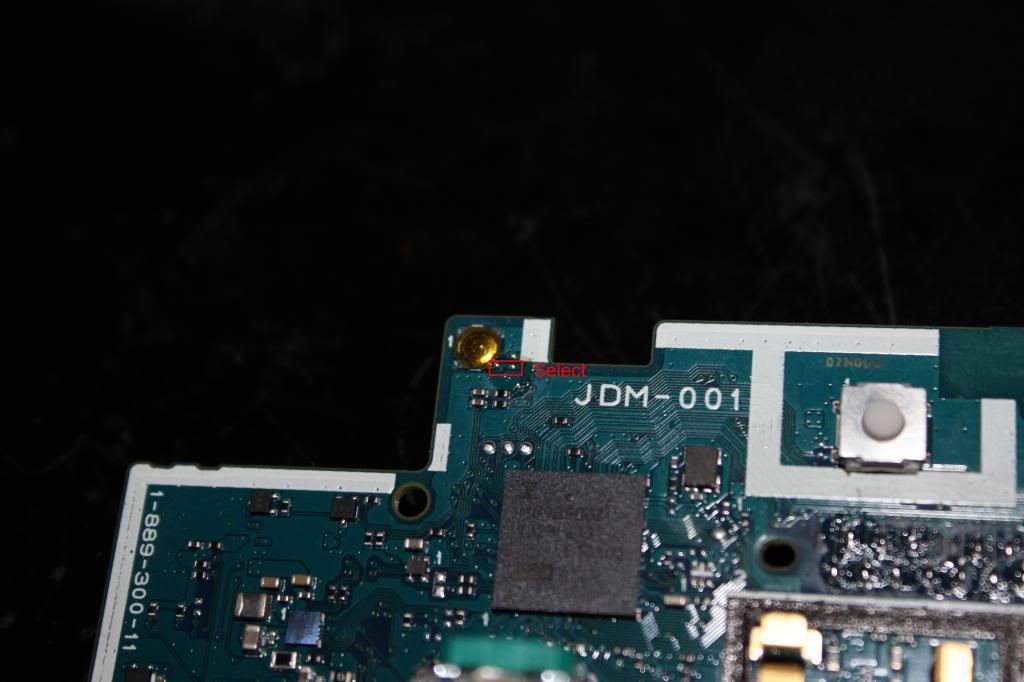
Tin the two very small contact spots in the rectangle for Select.
IMG_0351_zps5e8432e9.jpg

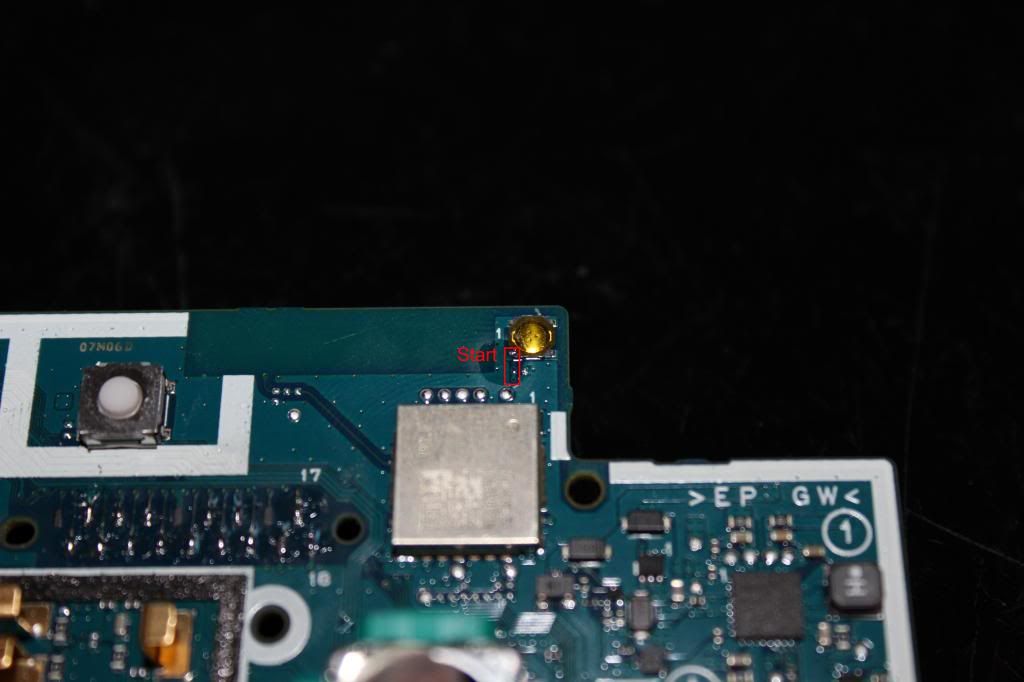
Tin the two very small contact spots in the rectangle for Start.
IMG_0352_zps4cd67d9f.jpg

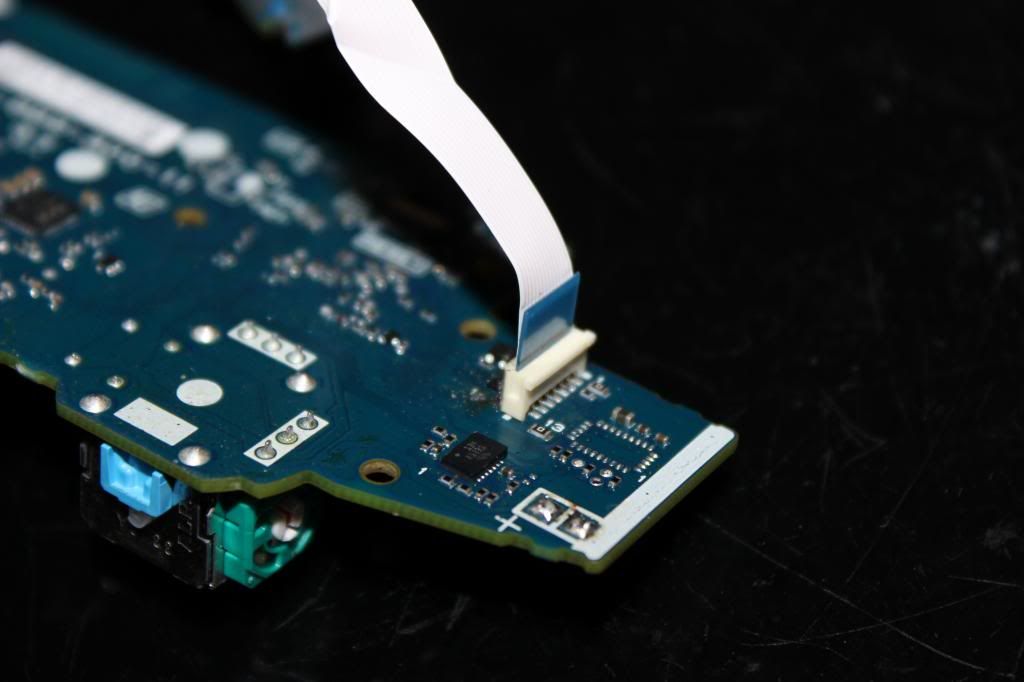
Look at this. This is the ribbon connector for the usb jack. See how simple this is? Want to see how hard your life will be if you don't use this? Just check out the next picture.
IMG_0354_zps133a474f.jpg

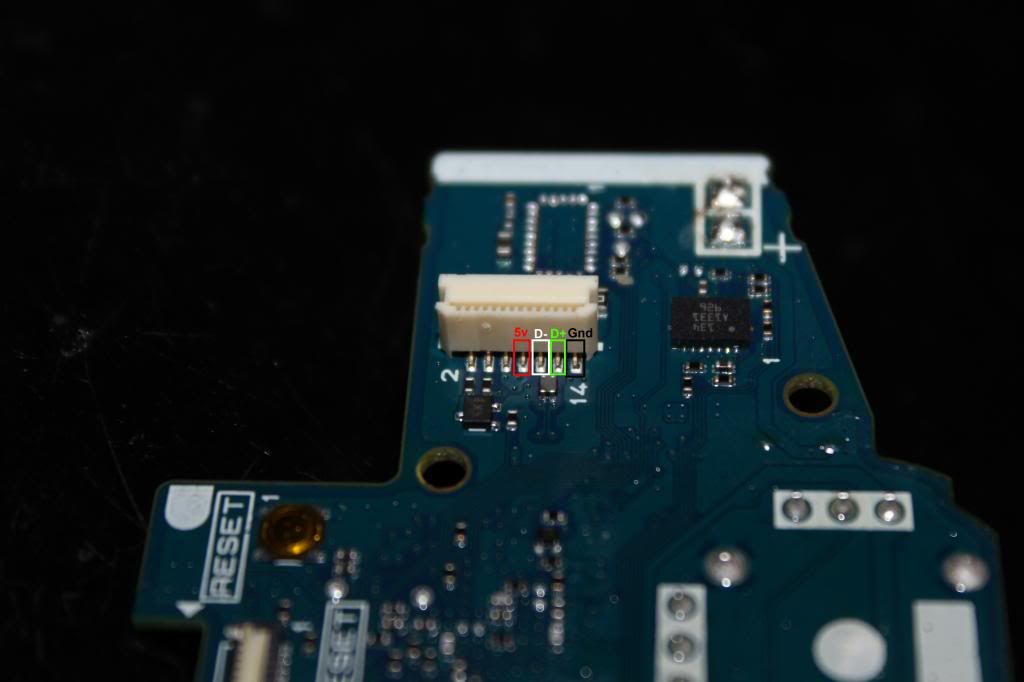
These are the four pins you will have to solder to if you don't want to use the micro usb jack. Pretty small and cramped there.
Note this pin out is for the JDM-001 model and the pictures will reference to that model.
8- Vcc
10- D-
12- D+
14- GND

Pin out for the 011 and 020:
7- Vcc
8- Vcc
9- Gnd
10- D-
11- D+
12- Gnd
IMG_0353_zpsdb05b9bc.jpg

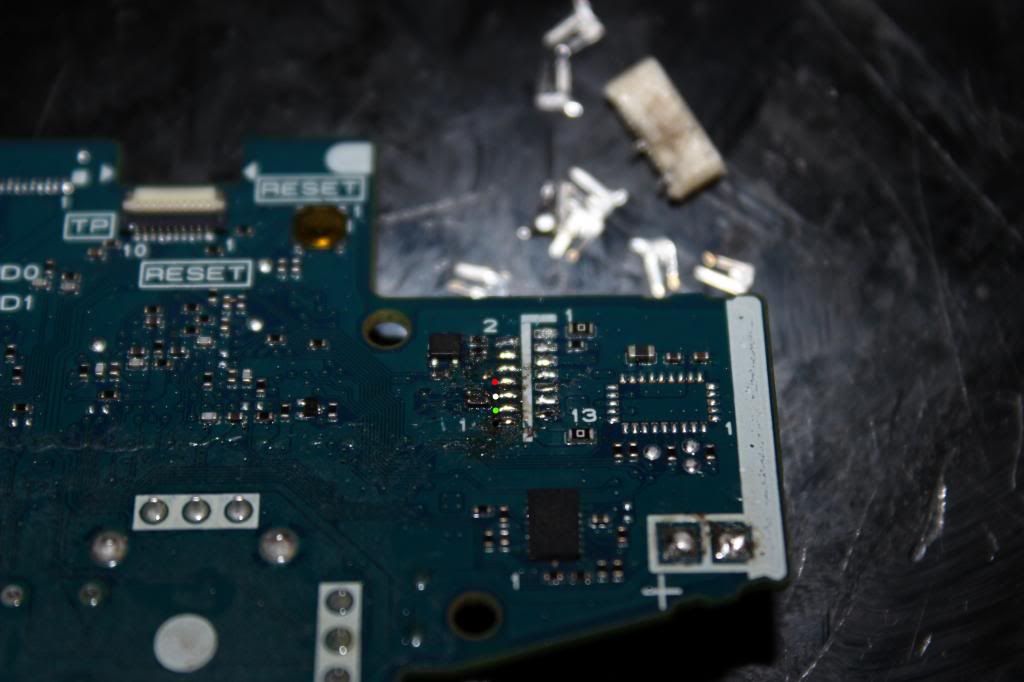
Of coarse removing the ribbon connector will make soldering to the contact pads much easier. This route might be necessary if you are limited in case space. In which case you'd have to remove the battery jack too.
IMG_0355_zps79565b7c.jpg


Now the DS4 pcb is all prepared to begin the wiring!

TUTORIAL - FrankCastleAZ's revitalization of 11 TE and 2 SE Madcatz sticks documented -IMAGE HEAVY-

$
0
0

IMPORTANT INFO

This project is not intended to make super wiring and was done in mass with the intention of quality, by the book wiring, that will be reliable over a long period of time.
The majority of this work was done in roughly 7 days. The remaining pieces of work spanned a rough estimate of 10 weeks.

If you have questions regarding any specifics I have done with this project, feel free to ask in reply. If you have basic questions like how to padhack a 360 Brawlpad or other questions that may have been answered a million times elsewhere on the forum, I suggest you read the stickies or visit the following thread:
Absolute Question and Answer Thread (ASK YOUR QUESTIONS HERE!)


INFO BASICS

Who: FrankCastleAZ (with the company of fellow SRKTT members in Google Hangout on occasion)

What: Revitalizes and Improves 11 Madcatz Tournament Edition and 2 Madcatz Special Edition arcade sticks

When: Tuesday, October 7th - Thursday, October 16th (first 7 days) and roughly 10 weeks for finishing touches

Where: Mostly my back patio at HQ in Phoenix

Why: The sticks have been heavily used over the last 3-4 years at events and conventions around the Southwest US with AZHP Gaming and were in desperate need of TLC. Two of the 11 TE sticks were previously padhacked with a PSX pad for PS2 support. Seven of the 11 TE sticks were stock PS3 TE PCBs or had a Toodles Cthulhu installed. The two SE sticks were TvC sticks previously modded with padhacked Gamecube controllers and Sanwa JLF and OBSF products. All of them needed a complete overhaul of cleaning, rewiring, new artwork etc.

GOAL: To take a 11 Madcatz TE arcade sticks and 2 Madcatz TvC/SE arcade sticks and revitalize them with a good clean, a rewire, new parts, new artwork and other general improvements. This will attract attention from event attendees to arcade sticks and fighting games who may not have normally been interested.


PREVIOUS ARTWORK
Art-Old-01.jpg
Art-Old-02.jpg
Art-Old-03.jpg
Art-Old-04.jpg

PREVIOUS FINAL PRODUCT
Old-Final-01.jpg


NEW ARTWORK CREATION

GOAL: To attract attention to arcade sticks and fighting games from attendees who may not have normally been interested by doing custom artwork from various popular pop-culture characters using whatever artistic skills I've learned over the years with Illustrator and Photoshop.

Art-01.jpg

Art-02.jpg

Art-03.jpg

Art-04.jpg

Art-05.jpg

Art-06.jpg

Art-07.jpg

Art-08.jpg

Art-09.jpg

Art-10.jpg

Art-12.jpg

Art-13.jpg


DISASSEMBLY FOR TE STICKS
01.jpg


REMOVED TOP BASE SHELLS FROM MIDDLE BASE SHELLS
02.jpg


REGLUING OF ALL TE NUTS
The fact that the nuts come loose on the TEs are the ONLY drawback of the TEs IMO. Nothing a little extra glue won't fix.
03.jpg

04.jpg


MODIFIED MIDDLE TE BASES
To fit Neutrik USB adapters inside the cord compartments
05.jpg


INSTALLED NEUTRIK USBs IN TE STICKS
Added Netruk USB adapters in cord compartments
06.jpg


INSTALLED TACTILE SWITCHES IN TE STICKS
Added a tactile switch in the cord compartment to use as a Home/Guide button on all TE sticks - Big thanks to @deserada for the idea for the tact switch! :-)
A simple small drilled hole allows the button to barely stick out and be noticeable, but the thickness of the plastic where the hole is drilled allowed that particular tact switch to be easily pressed without causing too much force on the switch itself which is only hot glued in. I chose to hot glue due to the lengthy cure time I would have had to deal with when it comes to resin or bondo or whatever. I'm not concerned about the strength and am fairly confident that they'll be just fine mainly due to the actuation point and force required to press.
07.jpg

08.jpg

09.jpg


REMOVED TURBO AREAS & PCBs
Removed the plastic encasing for the Turbo/Home areas on the sticks and removed the PCBs to use later
10.jpg


MODIFIED SE BASES
Dremeled out interior of SE bases and made holes in back in order to fit 24mm buttons for Start and Select and added small hole for tactile switch for Home/Guide button
11.jpg
12.jpg


USB NEUTRIK ADAPTER AND TACTILE BUTTON
Installed USB Neutrik Adapter and tactile switch for Home/Guide button
13.jpg


PADHACKING TIME!
Padhacked three Madcatz 360 WWE Brawlpads, two Official XB1 Pads, and two PDP RockCandy 360 Pads (one pictured)
14.jpg


INSERTED PS3 & 360 PCBs INTO TE BASES AND WIRED UP
Soldered to the home contact on each of the PS3 TE PCBs and mounted all Padhacked 360 PCBs and PS3 TE PCBs inside the cases.
Made individual short length USB wires to go into the interior of the Neutrik USB jack and soldered the ends on each PCB.
All button wires go from the PCB to the original Madcatz quick disconnect (QDC) terminals.
15.jpg


INSERTED XB1 PCBs INTO TvC/SE BASES AND WIRED UP
Mounted each XB1 padhacked PCB and soldered wires directly to screw terminals on buttons. Will likely switch to screw terminals in case of needed button swap or eventual artwork swap.
16.jpg


BUTTONS CAME IN (ALONG WITH OTHER PARTS FOR OTHER PROJECTS)
Buttons came in from PARADISE ARCADE SHOP alongside other various parts for other projects including our Sega Blast City cabinets. Link to that project coming soon

image


LED USB CABLES IN MULTIPLE COLORS FOR INSTALLED NEUTRIKS
Since all arcade sticks have Neutrik USB adapters (USB B to A), color coded LED USB cables that match the artwork were ordered.

17.jpg


TE SCREWS IN MULTIPLE COLORS
TE screws that use a 2.5mm hex key with slightly smaller profile than the stock Madcatz TE screws that used a 3mm Hex key
18.jpg


INSTALLED BALLTOP/BUTTONS & ART PROVIDED VIA @d3v ON TvC/SE STICKS
FINAL-12.jpg
FINAL-13.jpg


INSTALLED BALLTOP/BUTTONS & ART ON ALL TE STICKS

Coming soon. This is all I have left.


The Optical Joystick Discussion

$
0
0
I thought it would be pretty cool to start a thread dedicated to the discussion of optical joysticks. These include:

- The Happ/WICO Perfect 360 joystick
- The Sanwa JLHS-8Y FLASH 1 joystick
- The ASCII Answer (Optical) joystick

as well as recent reproductions:

- Toodles' Spark
- Rollie Electronics and Happ Controls' reproduction FLASH 1

What is an optical joystick and why should I care?

What's so great about optics? Well, the beauty of optical joysticks is that unlike their microswitch counterparts, there's not a single component on the PCB that moves. That means as long as you're not running these things out-of-spec, they'll last a really long time. The optical joysticks invented thus far have required +5V power to power their sensors and LEDs. All 5 sticks listed above have however been successfully installed onto PlayStation 1 and 2 era sticks without much of a hitch. This would normally be an issue since PS1 and PS2 PCBs output at only +3.3V.

All of the original joysticks been out of production for a long time. The Sanwa HS-ASSY FLASH 1 PCB was discontinued in 2006; the old WICO Perfect 360s have been out of production for maybe a decade (someone fact check me on this) and the ASCII optical joysticks were just hard to find to begin with. So, needless to say, if you want an original, you're going to have to prepare a chunk of cash to get it.

HOWEVER, do not be mistaken that just because they're reproductions that Toodles' Spark or Rolllie's FLASH 1 are any worse. They are reproductions, but they are based on the same design principles and standards that original optical joystick PCBs work on. They will work the exact same.


Where can I buy an optical joystick?

As stated, if you're looking to get an original optical joystick, be prepared to get some cash on hand because depending on which joystick you want, you're going to have to spend a LOT of cash. Here are some figures regarding the average going rate I've seen for these joysticks here on SRK's Trading Outlet:

WICO Perfect 360: $100.00 +/- $20.00
Sanwa JLHS-8Y FLASH 1: $200.00 (!) +/- $20.00
ASCII Answer (Optical): $120.00 +/- $20.00

And here's the price for the reproduction optical PCBs:

Toodles' Spark: $55.00 + shipping
Rollie's FLASH 1: To be determined

Except for the newer production Happ Perfect 360s, which you can get commonly from LizardLick for $39.95 plus shipping and handling, every other optical joystick ever made is out of production. Go figure why they're so sought after; the last time people were able to get an optical joystick for reasonable prices was around in 2006! :wasted:

If you are a fan of American parts you can still get a Happ Perfect 360 joystick from places like LizardLick. Just be aware that the newer Happ Perfect 360 joysticks are manufactured by Happ in their factories in China and the first batches of P360s have had issues with various aspects of the build; pivot grinding issues, diagonals not registering, and other issues have been noticed in the newer P360s (none of these reported issues have anything to do with the optics. If there were any optics issues, it's because you're not powering your joystick properly).

However, that was a few years ago when Happ first made the switch to their China factories. Today, their P360s are mostly issue free, though WICO P360 owners will tell you the new P360s "Just don't feel the same." You can get a newer Happ P360 for around $40.00 USD from LizardLick, but for a WICO P360, you're going to need to do a bit of hunting for them and shell out some more cash. I've seen WICO P360s go for around $120.00 here on SRK. The easiest way to tell if it was made by WICO or Happ is to look at the bottom of the joystick. If it was made by WICO, it will have "WICO" written on the bottom. If Happ, it will say "HAPP P360." There have been some cases where some people got a P360 without any writing on the bottom at all, and it's mostly been assumed that these are WICO P360s, but just be sure to ask.

If you are fan of Japanese parts and are looking to use an optical joystick, looking for an ASCII Answer (Optical) is probably your best bet. They're incredibly good in terms of build quality and you can find them for significantly cheaper than a Sanwa FLASH 1. Of course, you typically won't find them sold as just the joystick. The ASCII Answer is pretty elusive only because when you look for any possible ASCII joystick that might have them, people are worried about whether the stick they're buying actually has an optical joystick since ASCII did manufacture sticks with microswitch joysticks. This detailed post by jdm714 however helps us out a lot. It covers the 6 ASCII sticks ever produced that used an optical joystick along with giving us the Japanese katakana for the joystick so that if you're feeling ambitious, you can hunt for them on Japanese auction sites.
Spoiler:
For PlayStation
ASCII Stick 3 (?????????3)
?plugin=ref&serial=118

ASCII Stick Zero 3 (?????????ZERO3)
?plugin=ref&serial=154

ASCII Stick Justice (????????? ??????)
?plugin=ref&serial=146

For Dreamcast
ASCII Stick FT (?????????FT)
?plugin=ref&serial=80

ASCII Stick FT Special: SNK Version (?????????FT SP SNK?????)
?plugin=ref&serial=205

ASCII Stick FT Special: Capcom Version (?????????FT SP ?????????)
?plugin=ref&serial=204

Wiring up the ASCII Answer is a bit odd since it does not use a standard connector for its directions, voltage line, or ground. All we get with it is the wires that were attached to the original ASCII PCB. But courtesy of our encyclopedic resource, jdm714, we have a diagram for those who want to wire one up into another stick.

madcatzasciiwire.png

The colors correspond to each of the wires on the ASCII Answer PCB. Depending on whether you are using a Dreamcast or PlayStation 1 era ASCII Answer, your wire coloring may vary. This post by jdm714 tells of all the known color schemes so far:
Dreamcast has colors going Green, Brown, Gray, Yellow.
PlayStation has the colors going Green, Orange, Blue, Yellow.
The colors are different, but they are the same as diagrammed.

Alternatively, you can purchase a reproduction optical PCB to install into your Sanwa JLF in your stick of choice. The first contender is made by our resident PCB wizard, Toodles.

You might some PlayStation 1 era ASCII Answers had a purple wire (image courtesy of fujifilm, linked to by jdm714) instead of blue! But they wire up just the same. Bear in mind the diagram does not mean the ASCII Answer can exclusively be installed in a Mad Catz Arcade FightStick or with a Mad Catz PCB. It's just a reference diagram. It can be easily installed in any stick you want.

What about those reproductions? Resident PCB wizard Toodles has himself designed and manufactured an optical PCB designed for use in a Sanwa JLF joystick called the Spark. You can order one of these from his site. These are very reliable PCBs and are a very cost-effective solution if you want to try out an optical joystick for yourself.

Recently as well, Rollie Electronics in partnership with Happ Controls has begun reproducing the original FLASH 1 optical PCB designed for the Sanwa JLF joystick. I won't go into details, but you can find more information in their thread here:

http://shoryuken.com/forum/index.php?threads/the-original-flash1-is-back-a-product-review.151531/

Anyways, enough background information. I'd like to propose the following discussion question:

What should we dub the ASCII optical joystick?

The term "ASCII Optical" is certainly easy to remember and is definitely precise enough for people to understand what you're talking about, but (it might be just me) I feel that it's very boring sounding. Happ/Wico had their "Perfect 360" bit going, a name signifying the perfection in movement that their optical joystick gave to the player. Sanwa's FLASH 1 had a reference to light in the name, and is almost synonymous with the phrase "High-Speed Response."

So what about ASCII? I personally think that we should dub it the "ASCII Answer" for two reasons:

1) It was, after all, ASCII's own "answer" to Sanwa's optical joystick.
2) For the deep, psychological part of the name, the term "answer" refers to how the ASCII optical joystick shall always be there to "answer" to whatever request you may make of it.

I dunno though; I thought my own attempt was pretty lame so let's get talking about the ASCII's new name or anything else optical.


Have at it gentlemen! :tup:

Building a Hitbox (Stickless arcade stick), help?

$
0
0
Hey SRK, im not one for arcade sticks and im more of a pad player, but i plan on trying everything. My next venture is into the depths of stickless arcade "sticks".

Ive never built a stick before and i figured this would be a good place to start. Does anyone know of any good newbie proof tutorials on hitbox building? Atm i just own a TE2 which
i obviously didnt build myself, however i have modded it, but i know nothing about wiring or PCBs. i can woodwork to make the case.

Namco Stick Appreciation!

$
0
0
Are there 2 types of this stick? because I've seen two different stock joysticks inside and wondered if anyone knew the differences.

Streaming and Recording Guide/Research

$
0
0
I've recently been trying to move GYT into the streaming space and have come to learn a lot. I thought this would be useful information to the community as we see more and more events being streamed and matches being recorded. So I decided to document everything I have come to learn about streaming in the past month or so and share it.
MIND YOU THIS IS A WORK IN PROGRESS. I will update as I learn, and as I have time.

* Hardware *
* Capture Devices

Matrox MXO2 Mini - Compared to the other capture device solutions, the Matrox MXO2 Mini is a bit pricey for a consumer level product. It will cost you around the $450 - $500 range depending on where you chose to buy it. However, for it's price, I find it to be the most powerful and flexible of the devices I researched. It is also the device I opted to go with.

It's flexible in the sense that it can do both component and HDMI inputs and outputs and it can interface with both laptops via PCMCIA express card and PC/Macs through a PCI express card. Depending on which package you purchase it will either come with a PCMCIA express card or a PCI express card.

The Matrox site has a convincing list as to why to choose the MXO2 over the Black Magic Intensity Pro which also showcases why it's a powerful little device.

Of course it has it's own set of drawbacks. The device is very temperamental. While using it with my Macbook Pro, you can't have the device connected while you are booting or else the system will hang. Often times you will need to completely restart your system and power on the MXO2 in a specific order for the capture software to function properly with the device. Many of the restart issues have been documented in a review by Vade of "Create Digital Motion" I find that once I've set everything up correctly, so long as you don't touch anything or have a stream crash, the device runs smoothly.

Black Magic Intensity Pro - I've had mixed feedback when it comes to this device. Some have claimed this as the "Gold Standard" for video processing and video I/O; however when speaking to Cicada who runs the House of Cicada stream, he tells me that the windows version of the drivers are a bit "hokey" at best. He's had issues using the Black Magic Intensity Pro with streaming software such as VidBlaster.

DJWheat of Epileptic Gaming / LO3 has a resolution to Black Magic Intensity and Vidblaster issues.
The BM Intensity Pro works fine with VidBlaster, you just cannot use it directly into the program. I've done over 500 hours of streaming this year with the BM Intensity Pro + VidBlaster combo.

What you need to do is use a "catcher" program for VidBlaster.

VidBlaster is great program, but in reality it's optimization is pretty poor. So when you begin to pile more tasks into VidBlaster (recording, streaming, capturing cameras, etc) it really starts to take a beating (unless you are running a legit i7 core system).

I would suggest that you use VCam. VCam allows you to "capture" the signal from the BM Intensity Pro, and then you just fire it directly to VidBlaster. When you do this, you'll notice the quality of the BM Intensity Pro go from "totally shitty" to "Holy shit that looks awesome".

YOU ALSO WILL BYPASS ANY AND ALL ISSUES WITH AUDIO SYNC if you meet the following conditions... You must be using the Intensity Pro 2.1 drivers. Yeah I know, they are on like 3.4 now, but seriously, I played with about 12 versions of this driver and anything after 2.1 has some CRAZY audio de-sync going on (I think it has to do with locked framerates but BM has not confirmed this yet.

One drawback with the Black Magic Intensity Pro is that it's an internal PCI Express card. You will likely need a desktop PC to use it which is not as mobile as something like that Matrox MXO2 Mini and a laptop.

HDR Hauppauge - The Hauppauge is a powerful little device and is great for a cheap entry level recorder. It takes any HD input via component and records footage to your PC/Mac hard drive in h.264. It is important to point out that this device does hardware encoding straight into h.264, meaning your PC/Mac won't be spending precious CPU cycles encoding raw HD footage as the majority of the processing is being done by the box itself. This device quickly outputs game footage in h.264 format which many online video sites such as youtube or vimeo accept.

Where the Hauppauge really causes headaches is in post production. Since it encodes straight into h.264 which is a delivery format, it will take quite awhile to convert the footage back into a format used in editing programs such as Final Cut Pro. There are limited amount of programs that do simple cutting of footage but adding stuff like logos, player names, intros, background music may take awhile especially if you've recorded an entire 64 - 128 man tournament.

Some other drawbacks of the Hauppauge is that it does not have HDMI input.

Despite some of it's drawbacks, many people I have spoken to who own the device are generally happy with it. It's relatively cheap compared to some solutions, and there are not many people out there who are worried about adding logos, player names, commentary to their footage. They are much more worried about getting the footage out there and keeping a record of the match which this device can do quickly and easily.

Other things to note about this device is that there is limited OS X support right now. It does however unofficially work with Elgato's EyeTV video software.

Haunts from IPlayWinner.com discusses streaming with the Hauppauge
haunts wrote:
streaming from the Hauppauge is best suited for small gatherings and tournaments. It's not really the most reliable way to stream just due to the fact that if you try to do too much, Eye TV will slow down and you wont have the best framerate.

I'm running a MacBook with 4 gigs of ram and this method works fairly well but it does have many draw backs that I'll try to explain here.

The set up is as follows:

PS3/360 with component video cables connected to the Hauppauge.

PS3/360 Audio Cables running to a mixer of some sort.

A mic or two running to said mixer.

Master Out on Mixer connecting to the Hauppauge Audio in.

EyeTV with Preview Window Open

CamTwist with Desktop + capturing the EyeTV Window

Soundflower to route the sound for uStream.

So, it's been a while since I've had this set up so I'm sure I missed a detail or two, but the basic idea is you are routing the video to the EyeTV preview window and capturing that with CamTwist's Desktop +. You're then going to use Soundflower to route the audio through EyeTV to uStream (this is the part where screen shots would be handy.) You of course control audio levels via the mixer.

As far as the specific settings to get Soundflower to give you audio via uStream, I dont know off the top of my head.

The problem (besides the mess you have to go through to get it to work) here is that the video lags slightly ont he EyeTV preview window compared to what is happening real time. So if you have a camera set up and try to do a PIP with CamTwist, the footage of the game will be delayed. Not a huge deal but some may find it odd to see people jumping out of their seats before anything happens on screen.

Also, as I mentioned before, even though the preview window in EyeTV runs very smooth, if you try to do too much at once it will obviously start dropping frames.

Hava Titanium HD
I don't have much experience using the Hava series of capture devices but aggrastat has written about it in detail here.

* Signal Splitters - signal splitters are key for outputting footage from your source, whether it be a PS3 or Xbox 360, to both the television that players view and the capture device.

When dealing with splitters an issue that might come up is frame latency, in particular lag between input from the controllers and what is outputted to the television. It's the same issue that many have come across when dealing with "laggy" televisions. Some games such as Street Fighter IV require strict timing to up to 1 frame. One way to mitigate this problem is to make sure the splitter is powered with its own power source, that way the signal is amplified. There are unpowered splitters on the market, but I don't recommend them if the game you are recording/streaming requires strict input timing. Unpowered signal splitters can also lead to darkened picture quality since it's not being amplified.

Even if you do use the best powered splitter on the market, the splitter will still create some "lag"; however the delay created is in the microseconds which is unnoticeable. Humans can only discern delay when it gets to the millisecond range.

It is still important to use a non-laggy television or monitor, particularly the televisions or monitors that do not do post HD processing. If you use a splitter setup with known delay issues with a television that is laggy, you just compound the problem.

When dealing with streaming or recording gameplay from a PS3 or Xbox 360, there are two types of splitters to consider: component or HDMI. There are benefits and drawbacks to each type. Some devices, such as the PS3, encrypt HDMI signal in a protocol called HDCP. It's a protocol used to protect againsts pirates who attempt to capture or rip Bluray movies, for example. There are splitters and devices that decrypt HDCP signals, such as the HD Fury , but it is still inconclusive what kind of delay or lag is created from decrypting the signal. Component on the other hand is unencrypted. There are, however, been industry talks and rumors about locking component output during playback of protected content. It is certainly something to look out for in the future.

One other unfortunate aspect of choosing component is there are known monitors, such as the ASUS monitor used at Evolution 2009, that have no lag but only have HDMI inputs and no Component inputs. You should also consider that older generations of the Xbox 360 do not have HDMI out.

In speaking to Robb aka "Jedi Robb" of the Devastation group, he sent me a list of powered splitters, both component and HDMI, that have had no complaints from players who played on the systems at Devastation '09:

CE Labs AV501HDXi 1 to 4 Component Splitter - This is the component splitter I opted to go with.

CE Labs HA4-3 1 to 4 HDMI Splitter

Geffen 1 to 4 HDMI Splitter

* Get Your Tournament Streaming Setup Rev 2 *
GYT%20Streaming%20Setup%20small.png

* Software *
Telestream's Wirecast
I've used Wirecast now extensively for about 4 months, and I have to say that it is an impressive piece of software. It is very user friendly. It really makes incorporating professional style lower thirds, overlays, and logos into your broadcast simple. Having no prior broadcast production experience I was really expecting a steep learning curve -- something akin to learning photoshop or final cut pro for the first time -- instead I was surprised at how easy it was to use. Just from looking at it's user interface you'll notice that it almost takes a minimalist approach when compared to something like VidBlaster, a competing streaming software suite. There are not a lot of buttons to interact with yet it is deceptively powerful.
Wirecast.png

Pros
  • Really easy to use. If you understand the concept of layers from programs such as photoshop, GIMP, or premier then it will feel right at home.
  • Really simple to use chroma keying for green screen effects.
  • It comes preloaded with professional style shot-to-shot transitions and even a set of preloaded lower thirds. Adding your own lower thirds, graphics and video is as simple as dragging and dropping or importing them.
  • I had no issues so far with Wirecast detecting any of my connected hardware. It detected all my input sources, cameras, and audio devices right out of the box.
  • It has preloaded presets for streaming to your favorite streaming services including the two favorites Justin.tv and Ustream.
Cons
  • It has a slight chance of crashing the stream when you edit properties of shots during a broadcast.
  • It has no support for ip cameras or network cameras as of yet. They are working on this feature at the moment.
  • No easy way of queueing or adding playlist of shots. It does, however, have an scripting interface using various programming languages.
  • No integration with Adobe's Flash Media Live Encoder, though it does have it's own flash media encoder.
  • Its cost. This bad boy cost $449 plus $99 dollars for the HDV Camera plugin if you intend to use High Definition cameras. And yes for you people looking to Arrrrrrrquire :sweat: this software, just know that the registration process "dials home" meaning it checks the key with Telestream's servers.


Here is a sample clip of a stream we did using Telestream's Wirecast. This was recorded on 12/1/2009 of a Street Fighter 4 stream: Wednesday Night Fights

You can also check out our Justin.tv channel which has matches from our latest stream using Wirecast playing on loop.
* Other Useful Resources *
Current Get Your Tournament Streaming Setup Rev 2 - Here is a diagram I made using Dia that diagrams our current setup.

Universal PCB (eventually) thread

$
0
0
UPCBakishop.jpg

Version 2.5 released! Currently tested and supported systems:
-Xbox
-Gamecube
-PC USB
-PSX
-PS2
-PS3
-NeoGeo
-NES
-SNES
-Sega Saturn
-Sega Genesis (3 and 6 button)


Coded and believed to work, but not tested:

-Sega MasterSystem
-TurboGrafx-16 (2 and 6 button)
-Atari Jaguar
-3DO
-FM-Towns
-X68000 (2 button)
-Amiga CD32
-Most old DB-9 controller systems from the 80's like Commodore 64's.

Other features:
- On-the-Fly button remapping using a Programming button: Hold the button you want to remap, press the programming button, hold down the buttons you want the original button to be (or none if you want the button disabled), release the programming button.
- Ability to make your mappings permanent: Hold down the programming button, press start three times. Mappings are different for each system, so your NeoGeo mapping can be totally different from your PSX mapping.
- 'Tournament Mode' to disable or enable the Start button via keypress: Hold Select and Start, press Up to enable Tournament Mode. To disable Tournament Mode, hold Select and Start and press Down. Tournament mode settings are NOT saved, so Tournament Mode is always disabled when you first plug the stick in.
- 'Turbo', adjustable button rapid fire: Press Program by itself, and hold it. Press and hold the button you want to change the speed of. Press Up to make the speed faster, and Down to make the speed slower. 'No turbo' is the same as 'fastest turbo', so to turn it on initially, you'll need to go Down.

Imagine you buy a new Sega Saturn, and you've never had one before. You do already have a fighting stick with the UPCB in it that you play all the time on other systems. In order to use your stick on the new Saturn, you would need 1. A Saturn plug, either from an extension cable or a sacrificed or dead controller. 2. A DB-15 plug and hood. Total cost to play the stick on the new system, somewhere between $1 and $5. That's the goal of project, to support as many systems extremely cheaply.

Months down the road, a new game system, the XCube3, comes out and you want to play your stick on it. The XCube3 wasn't even out when your UPCB was made, so you think you're stuck. But, as soon as the controller protocol is supported in UPCB, here's what you have to do: 1. Plug the stick into your PC with the same cable you use to play PC games and mame. 2. Run a program that updates the UPCB 3. Make a cable just like above. UPCB can be updated anytime without even needing to open the stick, and with the same cable you've already got.


Here is the updated schematic. Sorry for the huge size of the image.
http://www.marcuspost.com/downloads/upcb/UPCB_Schematic_21.jpg
Here are the 'Gerber' files for the Rev 2.1 board. Any PCB fabrication service can use these to stamp out as many as you could possibly want.
http://marcuspost.com/downloads/upcb/Rev2.1.zip

The core is the 18LF4550 I/P 'PIC' microcontroller. The crystal is 20 MHz, and the unmarked resistors are just pull-ups, so any high resistance resistor will work (go with 4.7k ohms). C1 and C2 are just small ceramic caps; I've been using 0.1uf. Put them as close as possible to the two pairs of power pins on the PIC. The location and value of the C3 electrolytic cap is not too important; I've been using 33uF caps.

Here is the sourcecode using MPLAB and Microchip's C18 compiler : http://marcuspost.com/downloads/upcb/UPCB_25.zip
Procompiled .HEX files are in there under the '_output' directory.
I'm using a new naming structure for the .HEX files. Check the 'Which one do I use' file to make sure you use the one that matches your setup.

Instructables:
How to Assemble a UPCB: http://www.instructables.com/id/ETNJA2CF23Z33K8/
How to Create a Console Cable: http://www.instructables.com/id/E9SM77YF1Y7H1KH/
How to Create a USB Button Select Cable:http://www.instructables.com/id/EO5ISEYF2FRV8XH/
How to Upgrade the UPCB Firmware: http://www.instructables.com/id/E9A4ERZF2FRV8RG/
How to Install a UPCB in a HRAP2: http://www.instructables.com/id/EDZKJN6F2NOBR7S/
How to Piggyback a Dreamcast Controller:http://www.instructables.com/id/ELYFIVKF54HJ3K4/
How to Piggyback an Xbox360 controller:http://www.instructables.com/id/How-to-Piggyback-an-Xbox360-controller-on-a-Univer/

Q: So how does the UPCB know which system it's connected to?
A: Pins on the 15 pin connector that aren't used are tied either high or low. Based on which pins are tied where, the UPCB detects which system it is and acts accordingly. The pinouts must match what the UPCB expects exactly. The see the currently assigned values, check the systemselect.txt file in the ZIP.

Q: How would I make one of these?
A: Any way you like. You can make one one a breadboard, on some type of prototyping board like the one I've been testing with, etch your own PCB, have a PCB fab house make a PCB for you, whatever. Fabbed PCB's are available for sell: http://forums.shoryuken.com/showthread.php?p=3991373#post3991373 The files required to have your own manufactured are available here: http://www.marcuspost.com/downloads/upcb/Rev2.1.zip
I highly recommend having a professional fab house make them; doing that many vias by hand etching your own from those files would suck.

Q: How do I program the PIC in it?
A: Once the bootloader has been programmed on it, you use the USB cable to update the PIC.
In order to get the bootloader on it, that would require a PIC programmer of some sorts. Since it's only needed once, you just have to find someone to program it that first time. I'll happily program a PIC for anyone who sends them to me, as long as they send me postage for mailing it back.
Or you can get a PIC programmers and start learning microcontrollers. They're kinda fun.

Q: What's the deal with PS2 support?
A: The UPCB currently works marvelously for every Playstation 2 game I test it with. Previous problems have been eliminated. As of yet, I have not found any converters it works with, and since I've tested something like 4 different converters (old PSX->USB Radio Shack model, Pelican PS2->PS3, Innovation PS2->DC, and Magic Box PS2->Xbox) and none of them worked, I do not have high hopes for any other converters to work. [Side note: Magic Box and Innocation converters work just peachy with the UPCB's Saturn support.] This will be addressed in the future.

Q: You have USB. What about PS3 support?
A: PS3 support is in and working, including PSX button support. Tested successfully on 20GB, 40GB, and 60GB models, including backwards compatibility and PSX button.

Q: How is this different from a project box setup?
A: Good question. First of all, you can use project boxes with the UPCB. Just ground pin 9 so the UPCB thinks its connected to a Neo-Geo, and make sure the project box pinout matches. So, all of the advantage of a project box setup are there. Here's a short list of what makes the UPCB better.
1. If you do use project boxes, then any project box interface you make will have the benefit of programabilty (once I code programming into it)
2. Project box setups require a sacrifice controller, a project box, and a jack. For systems supported by the UPCB, you only require a cable (third party extension cables are tons cheaper than new controllers), a jack, and a hood (which are tons cheaper than project boxes).
3. Most project boxes can't really be securely attached. (GoPodular's IDC cable and velcro method is one exception) Using a D-Sub hood with thumbscrews means you can attach the cable very securely. If you tripped over an attached serial cable, you're PC would go flying. Project boxes have pressure and weight that can cause them to loosen.
4. Soldering wires into the D-Sub jacks is much cleaner and easier that some pad hacking.
5. If you do use project boxes and are using the optional Programming button, then any project box interface you make will also have the benefit of on-the-fly button remapping. These mappings can be permanently saved like every other system.
6. Tournament Mode is still usable with project box interfaces.

Q: What would this cost for me to make?
A: The most expensive item is easily the PIC. However, you can sample 3 of them for free from Microchip.com. The rest of the parts are pretty cheap. A Digikey shopping list is already in this thread; also kits with everything but the PIC are available to purchase: http://forums.shoryuken.com/showthread.php?p=3991373#post3991373

Q: What about Xbox360 support?
A: Unless someone cracks the protection Microsoft uses to make sure you use their controllers, it ain't gonna happen. You can still use a Xbox360 project box, or piggyback a Xbox360 PCB. More on the piggybacking in a bit.

Q: What about Dreamcast support?
A: Dreamcast is gonna be hard, but I havent given up hope on it. For a good while, Dreamcast won't be supported, but I hope to figure out how to do it eventually. You can still use a Dreamcast project box, piggyback a Dreamcast PCB, or use the working Saturn support with a Saturn->Dreamcast converter like the Innovation.

Q: So what's this about piggybacking?
A: Both of the main problem systems (DC and X360) use two wires for communication. So, it is possible to use an analog switch IC to ignore the wires from those controllers until we want them. What this means is that you can install the UPCB along side a DC or X360 PCB, connect them together all clean inside your stick, and have a Dreamcast or Xbox360 cable connecting to the jack on the back like normal. Unless they open the stick, it'll look just like the DC or Xbox360 was naturally supported.
Piggybacked systems can NOT take advantage of button remapping, however they CAN take advantage of Tournament Mode.

Q: What about the Xbox?
A: Xbox is now tested and working. There is not, nor will there likely ever be, support for Xbox memory cards or headsets.

Q: Gamecube? N64?
A: Gamecube support is in and works awesome. N64 should be dead easy to implement, but I don't have one to test with. As soon as I do, it'll be in.

Q: What's this about Smash Brothers working with a stick?
A: There are two Gamecube modes specifically for Smash Brothers: one simple mode that tries to capture the ease of the Wiimote-Only control scheme from Brawl, and another advanced mode that tries to make everything possible. Please read for more information, and feel free to suggest improvements. http://forums.shoryuken.com/showpost.php?p=5171213&postcount=477

Q: How big is the PCB itself?
A: 82.2mm x 67.3mm. Assembled, its about 14mm tall depending on the components. One of the connectors hangs over the edge a little, making the assembled length about 85mm.

Q: What is the option Programming button do?
A: Support for recording and playback is expected, but is not implemented yet. The current features of having a programming button are:
1. Using a USB Button Select cable, you can press this instead of Start & Select to go into bootloader mode for reprogramming the PIC.
2. On-the-fly button remapping. Press the button you want to remap, hold down the programming button, hold down the buttons you want the original buttons to press, or none at all if that's your taste, and release the programming button. You can make your mappings permanent for that system by holding the programming button and pressing Start 3 times.
3. Turbo mode. Press and hold Program, then press and hold the button you want to adjust the rapid fire speed of, and move the stick up or down to adjust the speed. 'Fastest' is the same as no turbo at all.

Q: I hear about this 'button select' stuff, like the 'button select USB cable'. What other options are there when plugging the UPCB in?
A:
Heh, I keep weird hours. Night owl by nature, and with classes out, I went straight to my 'up till 4 am' schedule.

The three kicks combination works with ANY cable, not just PC. Added in version 2.3, to every version including the ones that don't support button remapping. It resets all of the button mappings to default. I had a guy with his buttons mapped weird and no program button, so he couldn't change them back, and the newer code versions don't overwrite the EEPROM the mappings are set in.

As far as I can think of, that's the only button combination that does something on every cable and every code version.

The others that I can think of from memory:

Button Select USB cable:
Start+Select: Bootloader mode
Program: Bootloader mode
Start: Stick directions are reported to XY axis (PS3 left analog) instead of both XY axis and POV simultaneously
Select: Stick directions are report to POV hat (PS3 D-pad) instead of both XY axis and POV simultaneously (I may have these backwards)
Jab+Short: Xbox1 mode (just added in 2.5)
Fierce+Roundhouse: Use Xbox360 piggyback

Gamecube cable:
Start: Stick is reported to D-pad only instead of both D-pad and left analog
Select: Stick is reported to left analog only instead of both D-pad and left analog
Strong+Forward: Smash Brother Basic mode
Fierce+Roundhouse: Smash Brothers Advance mode

Genesis cable:
Select: Three button mode instead of default six button mode (just like the 'Mode' button on the original controller)

Q: I'm having a problem updating the firmware with Vista. I'm receiving an 'error 997'
A:
fluxcore wrote:
Just a quick note to anyone trying to run the PDFSUSB program under Vista and getting 'error 997', try the following:

Right click pdfsusb, properties, compatibility, set to XP or 2000 or so. Also check 'run as administrator' if you haven't disabled UAC.
In device manager, select the PIC18F4550 Family Device, right click properties, power management, uncheck 'allow the computer to turn off this device'
Run the program as admin (right click, run as admin [if this is available])

Should solve the problem. As seen at http://forum.microchip.com/tm.aspx?m=241830

For those who need help assembling the rev 2 board, here is the board with the resistors and capacitors labelled, and the pinout for each direction/button. Buttons are labeled in their usual Street Fighter name: JAB, STRong, FIErce, SHOrt, FORward, ROUndhouse, SELect, STArt. EX0 is the optional fourth punch button, EX1 is the optional fourth kick button.
labelledupcb21qx9.jpg

Paradise Arcade Shop, LED Joysticks, Buttons, Mods and more

$
0
0
logo.jpg
We have been floating around for a little while posting and received a recommendation to start a thread. Paradise Arcade Shop is based in Hawaii, working to bring a variety of controls to the arcade and fight stick market. We carry a number of different options for price points in both sticks and buttons, but we only sell products that we would use. That means, there is a difference between a Porsche and a Toyota, we see a place for both of those in the market, and we won't sell Toyota's at Porsche prices.

I say "we" as Ponyboy likes to harass me about, because the company is my wife and I. For those of you who have ordered already(thank you) she packs the orders and answers about 90% of the emails (mostly logisitics, but she is answering the "How to I light an LED" questions now) This is also her full time job and my part time job. She works hard to send out all stock items in 1-2 days, and rides my ass about the cutsom builds so they stay close to 1-3 days(We build LED sticks to order, and some of our game systems)

I have been an active membe of KLOV, Coinopspace, and BYOAC for sometime, and we sell on EBAY and Amazon. I will probably edit the intro down in the future, but I wanted just let people know who "we" are and who I am. Thank you for all the support and orders we already have received and now...it's time for the good stuff!

Mortal Kombat 9 Stick mod products!!!!! If you want new controls with the same forms to just upgrade your stick try some of these IL products and microswitch upgrades.

Translucent Concave IL buttons - A great upgrade to your stick, especially with...

IL-lumination LED pads - Available in RGB or single color
[media=youtube]P7zdGGsF2oI[/media]

IL Eurosticks provide "Happ Competition" Style with an upgrade in quality

And, for amazing light touch, upgrade any Happ or IL button to our 20 gram micros (Please note that these are 20 gram max spec and really are closer to 15 grams of actuation force)

We also carry JLF's, JLW's, LS-32, LS-32-01, LS-40, PS-14-KN pushbuttons, re-released PS-14-K Skeleton buttons, Paradise LED sticks, custom ball tops and a variety of hollow shafts(we also have 10 new custom hollow shafts on order, need a long JLF shaft or want to put a ball top on a Eurostick joystick?)

Finally... we have two new ball tops in, Pearls and Emerald Green that will be available shortly and were built to match the Rollie Buttons.
IMG_6424.JPG
And the answer is "Yes, the pearl will light up."
IMG_6432.JPG

Arcade Stick for both Xbox One and PC

$
0
0
I recently bought a Xbox One mainly for KI, and want to get a stick for it and USF4 on PC. I read the what stick should I buy thread but it does no mention much about getting one for both. I was looking at the TE2 but I hear about problems with the LT and RT buttons not working on PC (can anyone confirm or deny this?). Is there any other options for the usual budget of around the 200$ area?

The "Stickless Arcade Stick" Thread.

$
0
0
It seems wrong to discuss competing/custom products in the Hitbox thread.

This thread is dedicated to the use/discussion/learning of these controllers outside the realm of the Hitbox.

I've got a custom build on its way to me now. It's a 6 button instead of 8, but the left hand layout is nearly identical.

How have y'all been liking these? What do you think about their impact on The Scene?

What first interested me in them was precision. You won't end up trying for a dragon punch and getting a fireball because of a slight error on your part as long as you know how to operate the controller. Now, you could say the same about knowing how to use a joystick - you should get the DP if you go for it. That's fair, but you're still dealing with Operator Error even at the highest levels of execution. The "SAS" (I don't know what the preferred nomenclature is) seems like it will nearly eliminate this problem once you learn it well.

Thoughts?

Looking for someone to commission for arcade stick art. Will pay obviously.

$
0
0
If someone could just post some of their work, ive been working on my own because im in graphic design school atm, but i cant make myself happy with it. ill explain the commission after i find someone i like <3.

Modding SSF4AE for PC (NO DLC UNLOCKS!)

$
0
0
This thread is for discussing the technical aspects of modding SF4AE. It is not for submitting skins. Do that in this other thread, instead.

If you're just getting into modding, hit up the tutorials on the modding wiki. Most everything still functions similarly to vanilla SF4, but the engine doesn't use emz bundles for costumes/colors anymore.

I will update this first post with some frequently asked questions as they arise, so please read it before asking.

Solderless Audio Jack?

$
0
0
I see that the PC360+ has a place for audio. I'd like to mount a little headphone jack on the side of my controller, but am having a hard time finding something suitable. I've (obviously) Googled the hell out of this, looked on Focus Attack and other things. I'm looking for something that's solderless.

Wondering, what do you guys use?

Madcatz KI TE2 for Xbox One - $139

Hori Real Arcade PRO V3 "SA" Thread - (Available Now! Check OP!)

$
0
0
Hori Real Arcade PRO V3 "SA" (PS3)
4162447886_61d67e6a92_o.jpg
4198024481_f32fc54ccb_o.gif 4198024501_a37976368d_o.jpg

Features:
  • Taito Vewlix Button Layout
  • Sanwa JLF-TP-8YT-SK-W arcade stick
  • 8 Sanwa OBSF-30-W snap in buttons
  • OBSF-24-DH start button
  • Turbo button with three settings; Slow, Normal, Fast
  • Stick lever can be set as digital, left analog, or right analog
  • Quick disconnects on wiring for buttons
  • USB wired for PC and PS3 compatibility
  • PS/Home Button XMB(Cross Media Bar) navigation
  • Button layout:
[] /\ R1 L1
X O R2 L2
Additional Pictures:


4222118570_99f8e31fc0_s.jpg 4221356353_2eb71ac0f5_s.jpg 4222118516_f743196177_s.jpg 4221356233_6e5d472266_s.jpg
4221356257_6e5d472266_s.jpg 4222118470_8ac5e297f3_s.jpg


* Images courtesy of Impress Game Watch

Where to Buy:

Testimonials by SRK Members:

AVAILABLE NOW AT Play-Asia!

First wave of third party Xbox One padhack options

$
0
0
New options for adding XBox One to an arcade stick have emerged this month. There are 3 new xb1 third party controllers that were released this month. Two are made by PowerA: Xbox1 Spectra ($50) and Xbo1 mini ($40). One is made by PDP: Xbox1 Rockcandy ($40)

I will separate the info of each controller into the next three posts. I'll leave the first post as a summery and info for the trigger inversion.

20141029_215207.jpg


Rockcandy Pros
-Cheapest pad other than the mini.
- Comes with long white micro usb cable that has a breakaway end.
- Comes with 3 day Xbox Live Gold
- Comes with $10 PDP reward card...what that means IDK yet.
- Has an onboard micro usb jack.
Rockcandy Cons
- Triggers need inverting
- Size is in between the other two
- Much like the MS pad it has two pcbs that connect together. Better to remove the top pcb as you'll want to solder to the TP on the bottom.

Mini Pros
- Cheapest pad other than the rockcandy.
- Contact spots are easily read on front. Has alt TP on back, but labels aren't obvious
- Smallest pcb
- Can get cool colored usb cables
Mini Cons
- Triggers need inverting

Spectra Pros
- Can be hacked to also add led effects to clear buttons. Not as advanced as using a separate led controller board, but its better then nothing.
- Contact spots are labeled on front and for alt TP on the back
- Dpad pcb can be easily removed.
Spectra Cons
- Retail price is more expensive than the other two pads.
- Both sets of triggers and shoulder buttons need to be inverted. Not really that big an issue if using hex inverters though.
- Largest size pcb out of the three.

The winner is kind of a toss up between the mini and rockcandy. Pretty much the rockcandy has a better deal if you buy it new as you get the extra lil freebies plus the onboard micro usb jack is nice too. The mini might be easier for people to solder to though.


Trigger inversion:
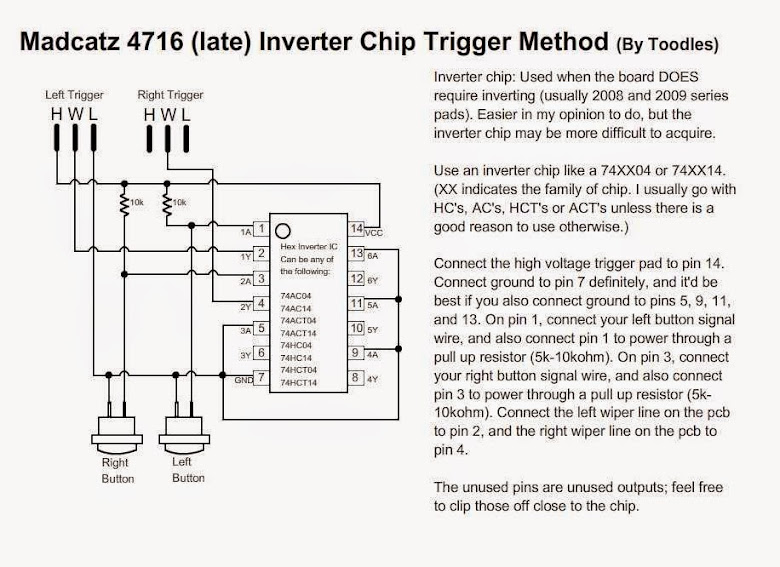
Since the triggers on all three pads are active high we will need to add a hex inverter to make them active low. We can reuse the same method that was used on the madcatz 360 pads that also had active high triggers. Note that in Toodle's schematic he used the A/Y pair 1 and 2. I will be using pair 1 and 6 to make wire routing easier.
schematicg.jpg%7Eoriginal.jpg

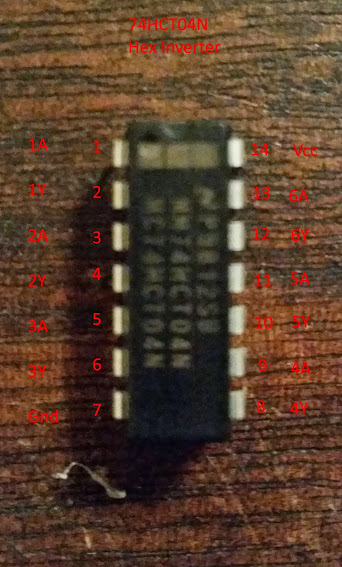
I'm using the 74HCT04N chip. Pins are labeled.
20141029_211653.jpg
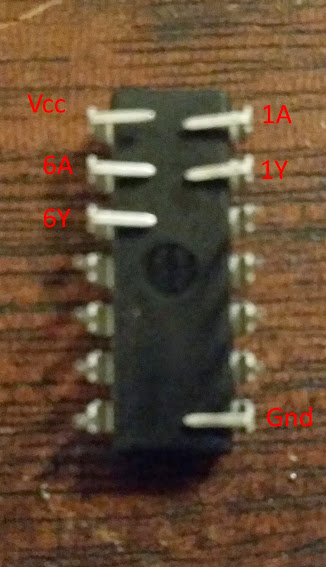
I'll be using the dead-bug setup. Since its on its back all the pins will be flipped. It is important to remember this.
20141029_211723.jpg
Here is an example of the 10k ohm resistors soldered to the pins.
20141029_212112.jpg
Her is an example of 10k ohm SMD resistors soldered instead.
20141029_212524.jpg
Example of how it would be wired up to a Rockcandy pad. 1A would be wired to the sticks RT button and 6A would be wired to the sticks LT button.
20141029_220059.jpg

Quarter-Circle forward inconsistencies: QCB works fine!

$
0
0
I'm actually not sure if it's my execution or my switches that are borked, but it looks like QCFs for me are inconsistent, having to ride my square gate to make it otherwise. I have zero issues doing QCBs. I've opened my stick a few times to install new buttons and put on stick art. It's weird, considering in training mode, I had spent more time practicing on the left screen.

It's a PS3 MadCatz Brawlstick.

Opinions?

Cleaning D2RV-G/Silent Sanwa Microswitches

$
0
0
Hey guys, my silent microswitches recently have been squeaking a bit, and I thought I could take apart the microswitch and clean it like a JLF, but for some reason I can't seem to take this apart. Does anyone know how to? And I searched on google for this, but nothing really came up.

Benq RL2460HT Monitor with PS3, USF4 and other games displayed in small window

$
0
0
I just recently got a Benq RL2460HT LED Monitor. I am using a PS3 on it and noticed that USF4 did not fill the screen. It seems to happen to some games and I get a message that says suggested monitor resolution 1920 x 1080. The picture is so small that it has about a 3 ½ in black border around the whole picture.

So I went into advanced picture options and changed it to full screen. They also have a option called overscan that increases the picture a bit but not as much as full screen. I wondered if making it full screen or overscan added any lag or picture problems to the game. I did some research but did not find much info on this problem but some say if you change the default video options you could add lag.

I have not noticed any problems so far but have not had much time to play. I need to make a decision if I will keep the monitor or return it in a few days.

Any info would be very much appreciated. Thanks

HORI Fighting EDGE

$
0
0
I hope you all caught the unveiling of the Fighting EDGE last Wednesday on Level Up's Wednesday Night Fights!! We've opened up this thread to answer any questions you may have regarding the Fighting EDGE. Hit us up with any questions or feedback you may have!!
Viewing all 8072 articles
Browse latest View live