Quantcast
Channel: Tech Talk — shoryuken
Viewing all 8072 articles
Browse latest View live

Need help building my first fightstick

$
0
0
I have 1/2 inch mahogany wood 1 feet by 2 feet that I intend to cut a little smaller. However it is not possible to get it thinner than1/2 inch besides the fact that I don't have a router and the saw mill guy was too lazy to do it, there is the chance of the panel flexing when I hit the buttons if its slimmer than 1/2 inch might even bend in over time aswell.

So the only option is IL Eurostick HAPP battop joystick as its considerably longer than sanwa and other japanese sticks. The reason japanese sticks are so short is because Asian people are generally small people and have small hands but western people put up with it because they THINK this is how its supposed to be since MadCatz and Hori popularized it here as thats all they use so people use it thinking its what they should be using.

So you can only imagine mounting a Japanese shaft onto a 1/2 inch wood? how short that would be? would even look stupid.

I am mounting it from under the top panel because I want the top to be pure Mahogany wood in all its natural glory no screws popping out no nothing just 6 buttons and 1 stick will be all thats visible with maybe clear epoxy smoothed like glass or some kinda of ultra glossy vanish or something. My one concern however is the happ euro IL is might be too short.

Is there a way to unscrew the bat top on the happ euro and put in something like a washer that will raise the bat a little bit?

Also what of the buttons will snap in seimitsu buttons work or sanwa? because my guess is screw in has no chance. So will snap ins work? in 1/2 inch thickness? will the spring tension get loose after a while? will screw in work?

This stick is for SF5 and Killer Instinct on PC I keep hearing about this square gate japanese stuff but I once used a ball top octagonal gate ascii stick on my PS1 and I tossed it out the window. The only sticks I feel like playing seems to be HAPP as I used those for 10 years from 1990 to 2000 in the arcades playing SF2 and xmen vs street fighter and last blade etc

HELP!! Will 1/2 inch Wood be an issue for my joystick height for my DIY fightstick?

$
0
0
So I ordered 1 slab of 1/2 inch Mahogany wood 2 feet by 1 feet but 1/2 inch thick. I cannot get it routed or anything like that because where I live is in the Caribbean and I don't think I ever saw a wood work shop here. lol only metal work shops.

So I wanna know if I put in a IL Eurostick HAPP joystick if it will be high enough? I am mounting it from the underside so the top will be perfectly flush with 6 button holes and 1 hole for a stick everything else will be flawless. My hands are kinda big and I am not a fan of small sticks which is why I HATE ball top japanese sticks. I like old school American HAPP sticks bat top. Shafts in Japanese sticks are also incredibly short by default because Asians have tiny hands. I am a big black man I have large hands so Japanese sticks will never work for me plus I want that sick insane American HAPP feel I wanna relive the 90's when Killer Instinct comes out end of this month for PC and I also am gonna buy SF5 for PC aswell.

Another issue I have is the buttons how do I mount buttons onto this thing that is 1/2 inch thick? I highly doubt screw on sanwa or seimitsu will work. Will snap in work? won't the tension on the snap spring get weak over time?

This is my dream stick I am building here its 100% Mahogany wood from the Caribbean with the exception of the bottom I am not sure what I will put there. Also the height of the side of this case is 2.5 inches I assume the Euro joy HAPP will fit and have enough room?

Art's Hobbies - DIY Acrylic Cases.

$
0
0
Cases are now available on my site: Art's Hobbies

!!! 3/27/11 NEW Updates regarding Diamond Joints and Hitbox! Jump to post #702


LOTS OF INFO AND TONS OF PICS INCOMING!

***** PLEASE CHECK THE 2ND POST OF THIS THREAD FOR Q&A and FUTURE UPDATES . READ THAT FIRST IF YOU HAVE QUESTIONS IN CASE YOUR QUESTION IS ALREADY ANSWERED! I WILL NO LONGER ANSWER QUESTIONS THAT ARE ALREADY ADDRESSED IN THAT POST. Please just take a moment to read the info...


These cases will be available on my website, Welcome to Art's Hobbies, in early September.
These are Cases ONLY. Not full fightsticks. Joysticks, Buttons, PCBs are not included

Hey guys! I would like to reveal a project I've been working on for the past few months, under the radar.

Some time late last year, parabellum asked:

"May I humbly suggest some additional services which you may wish to consider offering?

Simple plexi cases: If you offered a 'bolt it together yourself' case made from laser cut plexi, you could supply these with the screws, etc....and I think there would potentially be great demand for this. If the price could be kept down to around $50-$60, I think it would be a winner."


That suggestion has stuck with me and I haven't stopped thinking about it. Since working with plexiglass (acrylic) has its limitations, it took me some time to come up with a solution. Many months and lots of trial and errors later, finally... I believe I've found the solution and I bring you a completely modifiable DIY full acrylic case!

This case was designed with you, the modder, in mind with the ability to customize pretty much every aspect of the case... to make it your own! So lets take all these pieces...

pieces.jpg

And turn them into this! (Might be a tad hard to make out all the details at first, being that everything's clear and there's a lot of reflection in the pics. But the details will be more prominent as you scroll further down.

case1.jpg

case2.jpg

case5.jpg

Lets look at one of the unique things to personalize your case. The Name plates!

case3.jpg

case4.jpg

The Name Plates act as extra support for the case, and it's a great place to cut your name/handle/short phrase to really identify your case. These are "Cut" through the acrylic, not "etched".

Now it's a little hard to see, with everything being clear, but on the back of the case there is a PCB section which has a couple of PCB holders and a wire hook to help with PCB placement and organization.

pcb1.jpg

These holders can be adjusted/removed to fit your needs. While initially designed to fit the cthulhu boards, they can still hold hacked pads and other pcb's by a simple ziptie method or whatever you come up with. You don't have to use them, but they are there to help you out if you want them.

pcb2.jpg

Here are some pics with a JLF and some buttons in place .

casebut1.jpg

casebut2.jpg

casebut3.jpg

casebut4.jpg


The pics above only show a glimpse of what can be done. Let me try to get into more details and options with more pics =).

Lets say you want to replace the front panel now because you prefer a Neutrik Adapter rather than a cord opening. No problem, lets take a front panel with a Neutrik space...

replace1.jpg

now unscrew the four screws holding the front panel of the case...

replace2.jpg

place the buttons and Neutrik adapter on the new panel and screw back in...

replace3.jpg

and Done!

replace4.jpg


Or decided you no longer want buttons on the side panel? No prob, swap it.

replace6.jpg

Yep, it's that easy to change your mind.


Now lets look at some color options. Here's a Dark Blue theme.

Specs:
Top: Clear; Sega Blast City 6 Button
Top & Bottom Borders = Transparent Dark Blue
Name Plate & PCB Plate = Transparent Dark Blue
Front Panel = Clear; S/S Buttons and Neutrik
Back Panel = Clear
Left & Right side panel = Transparent Dark Blue
Bottom = Clear
JLF Mount = Transparent Dark Blue

blue1.jpg

The colors help distinguish some parts a little better, for instance the border design.

blue2.jpg

blue3.jpg

blue4.jpg

Lets try an Iron Man theme

Specs:
Top: Clear; Sega Blast City 6 Button
Top & Bottom Borders = Transparent Red
Name Plate & PCB plate = Transparent Red
Front Panel = Fluorescent Orange; S/S buttons and Neutrik
Back Panel = Fluorescent Orange
Left & Right side panel = Transparent Red
Bottom = Clear
Bottom Thin Plexi with 2 Artworks (one facing each side)
JLF Mount = Transparent Red

This shows Artwork placed on the bottom but facing top side to add a little background to future wiring. A thin bottom plexi is used to sandwich the artwork in place

im1.jpg

im2.jpg

The Fluorescent Orange reflected the flash so the front couldn't be seen. Below is without flash (ugly color turnout) but at least shows the Name Plate. Under regular light, you can see through to notice the name plate.

im2b.jpg

Flipping the case around, there's another artwork. Basically I place two artworks between a thin bottom plexi.

im3.jpg

Here are some pics without the artwork so the design is more clear.

im4.jpg

im5.jpg


Here's some closeups of the Name Plates in these examples:

nameplate1.jpg

nameplate2.jpg

View of the case frames. Showing Borders, Name Plate, and PCB Plate which forms the skeletal structure of the case.

frames1.jpg

frames2.jpg

Those are just some basic color combinations. But basically, the color combinations and setups are up to your imagination? and what color/material stock I can get, lol.


Oh and top artwork you ask? But of course! Optional thin top plexi's will be available.

art1.jpg

art2.jpg

The artwork is cut a little smaller than the full top of the case. This gives a natural border, particularly for dark and opaque top colors. For clear tops, this makes the artwork look like it's floating in a frame.

art3.jpg

Gotta show the popular Chun Li artwork by Stanley Lau.

chun1.jpg

chun2.jpg

chun3.jpg


Taking this even one step further, how about thin plexi options all around the case which essentially allows you to turn the entire case into swappable artwork.


Lets say I wanted to give my entire case a carbon fiber look with a high res print of a carbon fiber pattern. Then cut the image for the top and all four sides. Sandwich all pieces to all sides and...

carbon1.jpg

carbon2.jpg

carbon3.jpg

Obviously a full artwork case swap is all up to your imagination. I plan to make one with a large cast of either Marvel or SSF4 all around the sides.


Alright, almost done. Sorry if I'm tiring you out with all the pics, lol.

Here's my working, complete prototype from about a month ago. A few minor changes were made since these pics. (Fluorescent Orange Border, Name Plate, PCB Plate and Left/Right Sides. Using a salvaged 360 TE PCB)


proto1.jpg

proto2.jpg

proto3.jpg

Here's probably a better closeup of the PCB holders and wire hook in action. Just using zip ties to keep them in place.

proto4.jpg


And last, but not least, here are what I call "Side Decors". Here's a sample of Acrylic shapes that can be screwed on to the side panels to further express yourself.

sidedecor1.jpg


They will come in pairs so you can apply them corner to corner, or a piece per side. Or use two sets and have them corner to corner on opposite sides.

sidedecor2.jpg

Apply them anywhere on the sides of the case, where room permits. Obviously if the area has buttons, these won't fit that area.

sidedecor3.jpg

Other Side Decor colors and shapes will be made available.


Finally, those are all the pics I have so far =). I will post more pics of other various colors when I have time. (I want to take pics of the lighter colors, and when I restock Fluorescent Blue. Also with opaque colors, and etching samples).

Here are some more highlights and details:

* Size: L 13 1/2" x W 8 1/2" x H 2 1/4". Height is about 2 1/2" with feet.

* Weight: Just case is 2.35 lbs; With JLF, Buttons and TE PCB is about 3.5 lbs (will obviously vary)
* Everything is put together by screws and what I call "Diamond Joints". There is absolutely no "gluing" or acrylic bonding agents needed.

* Because no permanent bonding is used, all parts can be easily swapped and changed to fit your style. Also, if by some unfortunate accident a part of the case gets damaged, you can simply replace the damaged part with a new one rather than worrying about replacing the entire case.

* Your personal Name Plate, cut with a short text of your choice. Not etched, actual cut through the acrylic.

* Top and Bottom panels are extended out past the rectangular outline of the case with rounded corners. This prevents issues with sharp corners.

* Popular button configurations will be available (ie: Vewlix, Blast City, T5, Midway, Capcom, etc).

* Various button options for the left/right side panels, as well as front panel including neutrik setup.

* Most parts will have etching options.

* Thin plexi and Artwork options available for top, bottom and sides.

* All pieces (except for diamond joints) are made with 1/8" acrylic so more colors can be available. (Majority of colors are more readily available in 1/8" thickness)

* PCB holders and wire loops to help with PCB and Wire organization.


So that's it for now. Hope you guys are excited as I am =). I will showcase more on etching and other color combos when I get a chance. I will be working on an instructional video to show how everything is put together. Hopefully I'll get that up within a week or two.

I have also asked a few experienced modders to be testers and when they get the first cases they can share their personal experiences. But from my personal experience, and one other's, the results have been great!

Thanks again for everyone's support =). And shout out to parabellum, where ever you are buddy, thanks for giving me a challenge ;).

Got Questions? Look at the bottom post first.

display1.jpg

How much does your arcade stick lag? Arcade stick input lag testing & results thread

$
0
0
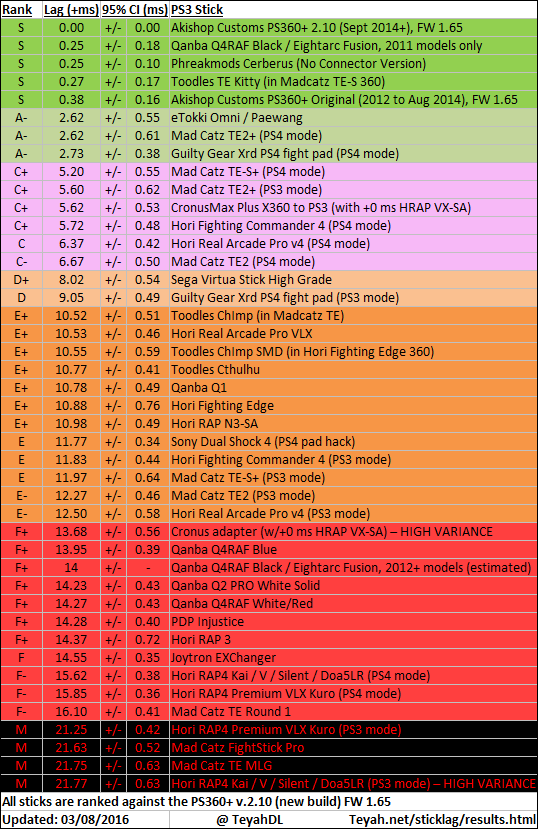
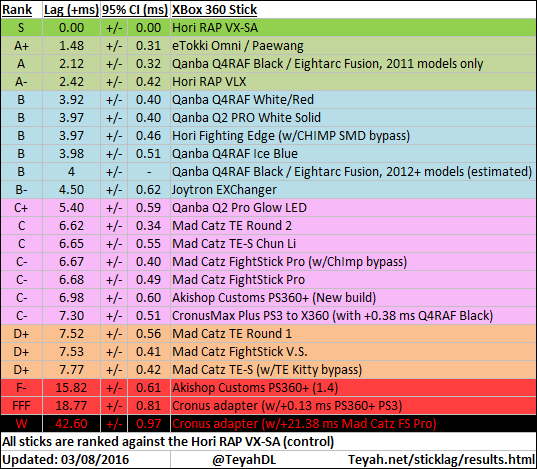
Hey guys, I wanted to share something I've been working on for the past half year or so. I've performed input lag tests for a large number of PS3, and XBox 360 sticks/PCBs and figured that I should post up what I've got done before these consoles become obsolete, lol. I'm now working on testing PS4 sticks.

All of the information on the tests can be found on my website including the methodology used, controls in place, and support for my testing method.
http://www.teyah.net/sticklag/overview.html

The results can be found here:
http://www.teyah.net/sticklag/results.html

And finally, the raw testing data can be viewed & downloaded from here:
http://www.teyah.net/sticklag/rawdata.html

Sticks/PCBs tested as of last update:
PS4: 17
PS3: 43
360: 22


Here are some quick results charts I made up for quick reference:

PS4 results:
PS4%20Arcade%20stick%20lag%20results

PS3 results:
PS3%20Arcade%20stick%20lag%20results

XBox 360 results:
360%20Arcade%20stick%20lag%20results


I'll be updating it as our group comes across more sticks. The PS3 results were certainly interesting, I didn't expect the unlicensed PCBs to have such a huge advantage over licensed PS3 sticks. Anyway, hope this helps out those of you who consider input lag to be an important factor in choosing which stick to use.

Custom Stick Setup?

$
0
0
Just put together this setup and was just curious if such a thing was possible/purchasable/makeable?

73e988.jpg

(Multifunction Ultimate Killer machine) My New Mini-Arcade Cabinet Design

$
0
0
Thank you guys for watching my lastest ultra mini-arcade cabinet designing. My very first post ever in SRK.
I am a PHD student in CU Boulder From China, a newbie in here but an old fighter, of course a miniac of Arcade Games since Street Fighter CE.
I start this plan in last December, and it was expected to be finished in about one month, but you know, Chinese New Year & all kinds of paper deadline just killed me, I just can post this until now.

Long story short, I just can not endure the all the other arcade cabinets with limited functionality and head-scratching installation any more, I bought one, but it's definitely not good, just several piece of wood and so many screw work, and most importantly, the appearance is not cool at all, so I need a real arcade cabinet which can satify all I need for the arcade games, that's why I planned this project. All the designing and building works of this arcade were done by me and my friend in China. The model and scale ratio refer to the Vewlix (Presented by Taito back in 2007, my favorite arcade cabinet model, and I love Sega's models such as G1 Astricity, G2 Blastcity and G3 Netcity etc. Street Fighter III The 3rd Strike used G2 model, classic game). I used the official size and did the math to calculate the ratio to scale down to a 14 inches monitor Compatible size. The fighting stick section is where to put into the computer mainboard so that it could become a real computer. Micro-ATX size 9.6'x9.6'. The screen board could be rotatable (adapt the STG games).

Model Name: VEWLX MAUS EDITION
At the beginning I called it "Elephant", and combined the name "Velixphant", sounds not that cool, then I changed it into "Maus", like "Mouse". Anyway, it doesn't really matter
LCD Screen: 14 inches, resolution 1366x768, LG/Samsung, performaces are close for different brands, can play new PC games, i.e. KOF13, USF4 etc.
Could be customizable, but the higher resolution would increase computer processing burden, which could be less cost-effective.
Stick & Buttons: Original SANWA (Best Peripheral manufacturers), PS2/3/4 & XB One USB Port, Native Support PC, XBO, PS1/2/3/4, and can be compatible with almost all the consoles through other converters/adapters.

Appearance & Size: 380cm x 350cm x 460cm (11.4'x 10.5'x 13.8')
Weight: About 25 kg, 55 lbs.
Interior: Can install Build-in HTPC OR connect to external PC & Consoles, TOTALLY CUSTOMIZABLE.
Build-in PC: Can build in computer inside it. AMD A3-7400 APU, matx FM2+ Mother Board (No WIFI, can use external USB WLAN Card), matx Power (250W), Memory slot x2, Hard Drive slots x2 (Would not recommend it because of the cramped space).
Other: 12 inches FANs x 2, LED Light x 1。

===============================================================================================================================================

We minimize the number of screws for the installation and mainly use bayonet structure, so the appearance is concise, and of course the installation process would no longer be the pain in the ass...

External View
Stylish Features: VX-Imitation edge modelling, mild and gentle coating appearance feels like the young girls' hips, Carriage Bolts and Non-slip Nuts completely follow Real Arcade Pro Standard, Buckle Structure makes Installation and Screen Rotation work SO EASY just like walking in the park...
Comparision between Real Machine photos and design drawing, we add a XB home button on the upper left corner.
10257944_209990542694823_2275261732757188051_o.jpg
10496180_209990546028156_9022511034257385808_o.jpg
12819213_209990539361490_5677493722408424652_o.jpg

Back IO Ports Close-up, including HDMI, VGA, 3.5 ,vga,3.5mm Audio, RGB, Power Jack and Switch, Start Button, and USB x2
980806_1678723225711489_4479051909210843968_o.jpg

Some PC Game Pictures
I imitate the VX, so it must be provided with the symbolic screen rotation feature...
12829427_1678727075711104_1544918112170211232_o.jpg

MAME Gaming
How can we ignore the sense of Arcade presence of MAME? At present we run it in Windows, will consider to put in a front-end software which can be directly manipulated by fighting stick. But Windows is good enough though, if the performace is enough for all the simulators. I prefer FTG, ACT and STG, don't have time to test all the games.
10496923_1678723332378145_3276500655778794538_o.jpg
10348795_1678723329044812_4005996353235035310_o.jpg

Slave Mode
That's totally fine if we get rid of all the computer components in it, then it can be used under Slave mode, everything will be almost the same. Just a little change-over work, i.e. HDMI, VGA, USB etc. are simple to understand, for atx power we need to jump two specific pins, then we can start it. Just remember first turn on the red power switch.
12829475_1678723362378142_5013590145181923178_o.jpg

We can treat Master Mode as a HTPC with a great Fighting Stick on it, and the Slave Mode could be considered as a Screen-Stick-Integrated universal Solution for Family Consoles.
I managed to work out all the video, audio and stick ports, so it can be connected to any consoles we can find in Market. But you know, the LCD Screens have their common problem when display the RGB signal (For the old consoles), but we can not ask for more, don't we? Here are some pictures of screen from xbox, 360, xbone, ps2/3/4, you name it.
There would not be any problems if you wanna play the newest STREET FIGHTER V if you connect it to a Powerful PC or PS4, online battle performs great with no doubt on this machine.
12795227_1678742229042922_1217758580216711097_o.jpg
10461889_1678723369044808_3401782467754310422_o.jpg
12794656_1678723359044809_8806942275116603891_o.jpg

PVP Mode
If you are smart enough, you would think that the other PCs could be considered as external host, then this Mini-arcade could be used in PVP mode with them with no doubt, right?
Fortunatly I made two mini arcade, then we can experience this Master-Slave sh*t
12593728_1678723405711471_4686939889024420600_o.jpg
We can try any position for our own Bad tastes, that's awesome.

Some playing video, can just use one hand.
https://youtube.com/watch?v=9-LNwZBRRr8
https://youtube.com/watch?v=DdfewYsnces
https://youtube.com/watch?v=euFodowVkzU

All right that's long enough, will update anytime it should, thanks for watching and enjoy!

FGW Converter Thread - Roll your own converters

$
0
0
Since On-The-Fly remapping has been implemented, I figured it was time for the FGW Converter to get its own thread.

Welcome Sheet: http://www.godlikecontrols.com/download/converterwelcome2.pdf

Q: What is it?
A: The FGWidget converter is a small micro-controller based circuit board that reads the status of a connected PlayStation, Super Nintendo, or Sega Saturn board. Based on the buttons or directions pressed on the controller, matching pins on the converter will either drop to a low output voltage (if the matching button or direction is pressed on the controller), or to a high impedance with pull up resistor state (if the matching button or direction is not pressed on the controller). This output from the converter can be connected directly to a female Neo-Geo connector, or used in conjunction with any common ground controller board. As an example, this board can be used to make your own PSX->NeoGeo converter, or used with an MC Cthulhu board to make your own SNES->PS3 converter, or with a common ground Xbox360 controller board to make your own Saturn->Xbox360 converter.

Q: Wait, I though this controlled LEDs?
A: No, that's the FGW LED Controller. The 'FGW' in the front is short for 'Fighting Game Widget', meaning its a small, cheap, Atmel controlled device. From a hardware standpoint, they are very similar, but the code on the two chips is WAY different. So, FGW LED Controller controls LEDs. FGW Converter is for making your own converters.

Q: Is it easy to use?
A: NO! Proper setup of an FGW Converter requires use of a multimeter, soldering iron, and most likely a dremel as well. It only comes in kit form that has to be soldered together. It will require a cord from a sacrificed controller or extension cord, using a multimeter to pin that cord out so you can properly solder it to the board. Using it in a project box will likely require dremelling out spots for the cords and connectors to go. This is a cheap tool meant for experienced tech heads. If you don't consider the work I've listed as fun, I would recommend contacted a tech in the Trading Outlet to bribe them to make the converter you want.

Q: Can it be used with Superguns?
A: Absolutely, it was designed with Superguns in mind.

Q: What's this about button remapping?
A: FGW Converter just had on the fly button remapping implemented. If you ordered your FGW Converter before 9/7/11, yours will NOT have the remapping code in it. All FGW Converters sold after that date will have the button remapping code in it.

Q: How do I do the button remapping?
A: This can get kind of complicated, so I'm gonna put the nuts and bolts into a spoiler tag.
Here's the order of the buttons you need to know:
1 - Square
2 - X
3 - Triangle
4 - Circle
5 - R1
6 - R2
7 - L1
8 - L2
You should notice that is the LP, LK, MP, MK, HP, HK, PPP, KKK order of most standard PSX arcade sticks.

To get into button remapping mode, hold down Start and Select on your controller if you are using a PSX or SNES controller, or hold down just Start if you're using a Saturn controller. You'll have to it down for about 10 full seconds. You can move the directional pad or stick during this time, and the directions will stop responding once the buttons have been held down long enough. Once that happens, let go of the buttons, and you're in remapping mode.

Now, your converter is waiting for to tell it what button(s) should activate the Square line, since it's first on the list. Press all of the buttons you want to activate the X line, and release them all. It's important that you have them held down at the same time. Once allof your buttons that activate X have been pressed, release them all. That setting will be saved, and it will then wait for you to tell it what button(s) should activate the next line on the list.

Once all 8 of the buttons have been set, the mapping will be permanently saved to the controller and the controller will return to normal operation.

If you do NOT want a button to activate the current line to set, either press and release Select(PSX, SNES), or hold down all eight buttons (Saturn) and release. That will make sure none of your buttons will activate that line.

Q: I have a FGW Converter, but it doesn't have the button remapping code. How can I get the button remapping code on my converter?
A: Easy option would be to by a new FGW Converter, pop out the older chip from your current one, and pop the new chip in. There's no option to buy the chip separately, since the chip costs way more than everything else in the kit put together. Next option would be to send me your old chip for me to reprogram it. I'll reprogram it for free, but you will need to ship it to me, and paypal for shipping. That shipping would be $2 for first class mail in the US. Please PM me to setup.

Q: I have a problem with buttons appearing the 'Turbo' on their own, going on and off even though they're held down.
A: Known compatability problem with FGW Converter kits sold in September, October, and November of 2011. Check the question above to get your chip reprogrammed.

Q: My Kitty based stick or MC Cthulhu based stick doesn't work on the FGW Converter using a PSX cable.
A:.Known compatability problem with FGW Converter kits sold in September, October, and November of 2011. Check the question above to get your chip reprogrammed.

More QA's to come.

How to order:
http://www.godlikecontrols.com

Looking for help with LED button modding.

$
0
0
Hello everyone,

I am extremely new to modding and I want to finally get some LED's in my buttons. I am looking to mod my Qanba Q4 with Seimitsu buttons and I am pretty much looking for which LED controller board I should get and which LEDs to purchase. I was leaning towards the Kaimana but I am undecided right now. Any help anyone can provide would be greatly appreciated. In depth tutorial videos and things of that nature. Please and thanks.

redundant thread - please close

Trying to make my own Hitbox Arcade Stick [Help]

$
0
0
Hi All,

I currently have the stock PS4 Venom arcade stick but I’m thinking of making my own Hitbox Arcade stickless stick.

I can make the casing relatively easy so that’s not necessarily the problem. My problem is understanding the wiring and components I’ll need.

I thought i may have a small shortcut so can I use the board from my PS4 Venom stick and use that to make a hitbox.. Plug wires into it to accept button inputs rather than stick movements?

I’m a level 0 amateur at this so I apologise if this is a silly question.

Any help would be greatly appreciated

Help with my Mad Catz BrawlStick

$
0
0
Hello. Finally i returned my mini fighting stick 4 and i bought the Mad Catz BrawlStick, all is okay, but i have a problem. When i press left goes up, when i press up goes right, when i press right goes down and when i press down goes left. It's so difficult play with this! How i can fix that? Thanks

I need a lag less solution to play my ps2 on EVO2k12 monitors

$
0
0
I'll be hosting money matches/Tournaments on various games one being cvs2 which I really need it to be literally lag free... I don't want to bring my own tv so I need some kind of adapter so I can play them on the ASUS LCD monitors without lag, thats if they are still supporting monitors again this year for byoc.

Reverse Engineering Mayflash PCB "MF002V"

$
0
0
This is a pretty nice little PCB that comes in the Venom Arcade Stick PS4, and has two daughter boards: MF-JOYSTICK001-KEY handles four push buttons and three switches, each switch with an on and an off position. MF-JOYSTICK001-LED handles up to six LEDs (player lights 1-4 and a turbo LED, as well as a macro LED which isn't used or populated in the Venom Stick).

In theory, the -LED and -KEY daughter boards are probably used in any stick with this mold, although the Mayflash F300 and Arcade Fighting Stick for Xbox360 / PS3 / PC almost certainly use different PCBs for their main board (no native PS4 functionality).

It's a nice PCB! But by working out the pin-out for the two daughter PCBs, we can either replace it with a Brook Universal PCB or another one - say, PS360+. I can't find any information on this, though.

I'm trying to reverse engineer this PCB using my limited skills - I'm using modified ribbon cables to try and work out what pins access which features. Am I right in assuming that the ground pin will be the pin which causes the entire board to stop working when disconnected?

Xbox 360 TE S Fightstick not being detected on my PC

$
0
0
Hello I'm having troubles with my Xbox 360 TE S I have tried to do a number of steps and nothing seems to be working..
I have tried to manually install the drivers from device manager did not work, I tried to download madcatz drivers, did not work I've tried to download a program called XBCD Nothing.
Nothing seems to be working when I was at my friends house it works fine on his pc so it's not the USB nor is my ports all my ports work perfectly fine.
I would really appreciate it if someone helps me me out cheers. Oh one thing to note is Is it a possible what's messing with the connection could be my Wireless xbox 360 Adapter?
I have a wireless adapter for my xbox controllers I'm thinking this could be the issue but i re in stalled xbox drivers.. Unless the wireless thing is differn't please help soon thanks.

https://gyazo.com/5fb15cbfae78c68415560376cf9bd2f6

https://gyazo.com/d0b813a2751f93e817e066cde94bcde5


need a simple wooden case, suggestions?

$
0
0
I managed to drop my bag and smash the hell out of my stick for like the third time. I just want to shove it's guts into a nice wooden case since apparently I'm too accident prone for acrylic. Lots of the builders seem to have gone inactive tho. The only one I can rly find that looks active is foehammer but I was wondering if there were other options available. Any suggestions?

Help my decide between these three sticks: RAP4 Kai, TE2, SFV TE S+

$
0
0
Hi guys,

I have been playing hundreds of hours of good old Street Fighter II back in the SNES days and I want to give the genre another try with the release of SFV and the latest Blaz Blu on PC.

While I had my fun on the 360 with SF IV and Soul Calibur, I was always put off by the awful D-Pad on the 360 controller (like all of them, not only the official MS one).

I am situated in Germany and importing is not an option for me since for whatever reason my stuff tends to get stuck at customs for months. So I am limited to the selection of the German Amazon store.

There is a sale on Warehouse Deals going on so prices are reasonable.

At first I got a Hori Real Arcade Pro V Hayabusa for Xbox One for 100 EUR, a real bargain. Love the stick, love the slanted wrist rests, hate the wobbly buttons. Unfortunately I was not able to get the Triggers working on PC, so I have to look for PS4 editions of the sticks.

I am not into modding but have no issue with swapping the buttons or the stick.

The following three sticks are available:

Hori Real Aracde Pro 4 Kai for 145 EUR.
Should be roughly the same as the RAPV. Artwork is awful and I might swap the buttons, which are easy to get in Germany and would set me back another 30 EURs. On he other hand the Hayabusa stick and especially the wrist rests are really nice.

Mad Catz Arcade FightStick Tournament Edition 2 for 165 EUR.
Huge, heavy and sturdy base which I like. There are reports about the top being too flexible. Nice Artwork.

MadCatz Street Fighter V Arcade FightStick Tournament Edition S+ for 185 EUR
Sturdy all around construction, touchpad and also the newest of the bunch. Could be a bit wider for comfortable lap play, though. Artwork is decent.

MadCatz Street Fighter V Arcade FightStick Tournament Edition 2 looks really nice, but is ridiculously expensive here in Germany (340 EUR+).

Thanks for any suggestions.

Do people still build custom HAPP (or similar) arcade joysticks?

$
0
0
I used to be able to find these online, but now there are only parts.

I'm looking for a way to revisit my MvC2 days and apparently when I type in the part names, I just get buttons and sticks with no case.

I just want a finished stick with case so I can beat people without using a wonky controller.

:)

Injustice: Gods Among Us Battle Edition Arcade Stick

$
0
0
**Read this first post thoroughly before asking/posting questions!**

Can't stress this enough...

It's great as a beginner stick due to the recent price drop IF you don't plan on modding it besides the simple stuff (swapping out the restrictor gate, changing out the balltop, shaft & buttons as long you're willing to lose the LED function) but I don't recommend it as your first stick if you want to do anything more.

EDIT: 4/15/13

Kaihong was nice enough to offer detailed pics & dissection starting with this post:

http://forums.shoryuken.com/discussion/comment/8091923/#Comment_8091923

EDIT: 6/5/13

FWIW, I ended up using it for a few hours wanting to really like it but ultimately unloaded mine on eBay a few weeks ago (yes, I'm the one that created this thread!). If it was the only stick I own then I probably wouldn't mind modding it. IMHO, it's a mid-tier stick at best but just too much work (dremeling the bottom of Sanwa buttons to make the OEM LED's fit in there with Sanwa SW-68 microswitches, using spacers to make a JLF fit, adding weights, etc.) to make it a quality top-tier stick (just not motivated enough to do all that easy yet tedious work). A little annoyed (I'm over it, ha!) WB didn't allow PDP to announce (before launch date) exactly what components (manufacturer) would be inside of it but I guess now we all know why though most of us suspected it wouldn't be top-tier components from Sanwa or Seimitsu anyway. Love the semi-grippy rubber texture (spray on?!?) of the case & LED lights...but that was it! I probably wouldn't pay no more than $75 for it but that's just me. Also wasn't feeling the Namco Noir/Astro City button layout.

EDIT: 1/10/14

Gamestop had a sale for $55 (after $5 off & free shipping codes) so I caved in & bought it since I couldn't resist the price for an all-LED stick. Also, I'm crossing my fingers the developers of Injustice (PS4) will implement a patch to allow the use of this stick but highly doubt it.

EDIT: 2/11/14

Price dropped to $40 but sold out for both consoles.

If you guys/gals don't care about the LED's, has a Vewlix button layout & a ball-top then for around $60 the Qanba Q1 is an alternative option. It includes a table mount/clamp, octo/circular gates, button plugs & a USB-cable storage compartment. It uses the same exact buttons & joystick lever as the Injustice stick.

Details:

Case material: Plastic with spray on (?!?) soft rubber matte black texture & thin foam bottom panel. Clear top panel is plastic. There are no metal panels. Also has a detachable 10-feet USB cable.

Artwork: Heavy duty cardstock underneath the top panel.

Button layout: There's no specific name for the stick/button layout on this arcade stick but the closes is the Sega Astro City Single Player layout found on the Hori Real Arcade Pro 2, 3 & EX.

Components: All Qanba-based (Omron microswitches for the joystick lever just like in a Sanwa JLF) with individual button & joystick lever LED's. Black bat-top with clear shaft cover & clear dust cover.

Weight: ~3.5 - 4.0 pounds.

Additional features: Two options for the LED's (on & pulse aka vibration as there are no vibrating motors). Lockout of Start, Select/Back & Home.

Modding: Hex screws on the top panel & Phillips screws on the bottom panel. Will fit both Sanwa & Seimitsu 30mm buttons as well as ball-tops. However, unless you plan on drilling holes into each button for the stock individual LED's, I don't recommend swapping buttons. Octo & circular gates (for the joystick lever) will swap easily. Sanwa JLF will fit BUT the mounting plate won't so swap everything over except for the plate. As for a Seimitsu LS-32-01, this won't fit unless you cut (dremel) plastic & add spacers.

FWIW, the game developers are the same one's that did MKvDCU & the MK-series. Just like the previous PDP MK sticks (TE & Klassic) surprisingly, it has excellent fit & finish. This Gamestop exclusive bundle is for the PS3 & 360 but not for the WiiU (the mention of this in their PR is an error they retracted).

http://www.joystiq.com/2013/01/15/injustice-gods-among-us-hits-april-16-batte-edition-revealed/

PS3:

http://www.gamestop.com/ps3/games/injustice-gods-among-us-battle-edition/107664

360:

http://www.gamestop.com/xbox-360/games/injustice-gods-among-us-battle-edition/107663

Credit goes to forum member, LiQuiD[EViL]:

dcbfrb.jpg

Newbie guide: Venom PS4 / Mayflash V2 Full Sanwa (/Seimitsu) Mod with Octo for £116 [UK Pricing]

$
0
0
Hi all,

A lot of information I've seen out there is useful, but sometimes it's quite technical, so I thought I'd make this beginners guide for a full Sanwa modded PS4 arcade stick on the cheap.

Background:
I've been playing fighters on and off for a while, but SFV re-ignited that passion. Shame about the beta. Anyway, I decided to rock an Arcade stick and the Venom was very cheap in comparison to the others. I'm getting used to it but found the square gate horrible, and the buttons were even worse. The stick was quite stiff but I kind of liked it! Either way, I have been reading up various posts and threads and people have been raving about this value setup, but I couldn't find a comprehensive guide (particularly for a noob like myself). So I decided to put this together, please let me know if it's useful and if any corrections are needed. As PresidentCamacho mentions below, the Venom is the same as the Mayflash V2, so the same guide should apply.


What you'll need (and pricing):

How to:
1. Open up your original stick and have a play with it so you can notice the difference afterwards. After all, it's what you prefer and not what everyone else says you should be using
DSC_0110.jpg


2. Flip it over and open the 6 screws on the back and take the backplate off to reveal (image taken part way through but effectively there's a bunch of cables and buttons and stuff):
DSC_0085.jpg


3. You will notice there are 6 buttons and corresponding colored wires going into them. To save time, I put a mark next to the ones that had duplicate colors and mapped them so I knew where they went (if you don't do this you can refer to the small board which they come out from). Here's a closeup of some helpful coloring :smile: (picture taken post assembly, but the principal is the same):
DSC_0108.jpg


4. Start taking all the wires from the buttons out, don't pinch all the way at the root, but a bit above:
DSC_0086.jpg


5. Remove the ball top by putting a screwdriver under the stick and rotate the ball top (image taken post assembly, but the principal is the same):
DSC_0106.jpg


6. & 7. Now remove the four screws holding the actual stick and lift it, then remove the 4 cables from the board it's connected to (these can just be pulled out). Cut the cabletie CAREFULLY so the cables aren't bound (in this picture the cabletie is not cut) and lift it out.
DSC_0090.jpg
DSC_0094.jpg


8. OPTIONAL: Take your JLF 8YT and pop out your gate (there are 4 clamps, just put minimal pressure lifting it out and pop each clamp gently:
DSC_0091.jpg
DSC_0092.jpg


9. OPTIONAL: Replace the square gate with your GT Y Octagonal gate (again, there are 4 clamps, just put minimal pressure and gently pop each on):
DSC_0093.jpg


10 & 11. If you have two washers, put one washer between the stick and the inside of the case, then screw the 4 screws back in place which hold the stick, ensuring the 5 pins are facing INWARDS. Then connect the 5 pin JST cable, however, ensure the teeth of the CABLE is FACING you when you put it on, otherwise only one direction will work. I was paranoid and I connected the cable then tested it out with the case option to ensure UP wasn't DOWN etc :smile: ...and I suggest you do the same if you're not certain. Once you've connected the JST cable, then connect the other end to the board, there's only one slot for it and one way it can go in. Don't be too forceful but do make sure it's all the way in (in my picture it's right above the bit that says MF002V). Do not connect the ball top yet!
DSC_0106.jpg
DSC_0099.jpg


12. Unless you've already done so, pop out all the stock buttons, you will notice they have two 'clamps' which extrude under the plexi and metal. The easiest way to do this is to push one side first, then the other. If you plan on re-using these buttons, please be careful as these clamps are fragile and can't be removed and inserted too many times as far as I understand it (picture post assemble but principal is the same):
DSC_0103.jpg


13. Once they're all popped out, you can lift the plexi where the USB cable resides:
DSC_0087.jpg
DSC_0088.jpg


14. Feel free to replace with your own art or get someone else to do it. Here's my placeholder, but I'm not entirely happy with the design so I'm going to change it (which would explain why my stick is naked!):
kYPnNaP.jpg
Yep, I know *that* Ken isn't from SFV :smiley:

Remember that the old models have the button scheme on the plexi. The new models do not have the button scheme on the plexi. As far as I understand, there are only cosmetic differences between the old and new model. This post has the template. The following youtube video from @johnnytoxic has details on how you edit it: https://youtube.com/watch?v=Y86PYBe4kjk


15. Put the plexi back on (it's magnetic, fancy!) then insert all the buttons to your liking:
DSC_0104.jpg


16. If you had two washers (see point 10.) put the other washer on, then screw the ball top back on the stick, and use a screw driver to gently tighten (this MAY not be necessary):
DSC_0089.jpg
DSC_0106.jpg


17. Remember the little diagram we did (perhaps it was just me...) - well this comes in handy now that you need to reconnect all the cables back. It doesn't matter which PIN you connect the respective PAIR of cables to:
DSC_0085.jpg
DSC_0108.jpg


18. Voila!
DSC_0107.jpg

19. Test it out in your favourite fighter
DSC_0111.jpg

I'm aware there are similar posts but I couldn't find one that quickly explained the steps for this specific arcade stick, and with the female to female JST cable, it was super easy! I hope this has been useful.

Peace,
SineTwo

seimitsu ls-62 joystick questions.

$
0
0
I was wondering if anyone knows what microswitches are used in the seimitsu ls 62? I wanted to see if anyone owns this joystick and has modified the microswitches and if so what microswitches did u use? Look forward to any feedback, thanks.
Viewing all 8072 articles
Browse latest View live