Quantcast
Channel: Tech Talk — shoryuken
Viewing all 8072 articles
Browse latest View live

Newbie want some help for a Arcade Stick

$
0
0
Hello everyone! Im new at this glorius group to have fun, help (If I can) and share some content.
Im 16 and Mexican, so I wanted some help because I dont have a Arcade Stick and I want some recommendations.

To Start I want it to be a PSX/PS2 Stick, because thats one of the main consoles I use (a PS2) and having converters will make it a little more ''universal''.
Im searching for cheap options but at the same time, modificable ones, my better choices (For now) are the Acteck Souji-1000 (Very unexpensive in my opinion here on Mexico), the Mayflash (This is a little more expensive for whatever reason, the Souji is 350 ~ 400 MX aprox. and the Mayflash is 1100 at minimun) or maybe just buy cheap controllers and sold them by myself (I explain this a little later)
One of the options that attract me is a stick called ''RoydsStick.EX'' is like the ''expensive'' version of the Souji but only for PSX/PS2 (not a problem considering the adapters) dont know how hard/expensive is but I dont think is that much.

As the cheap controllers, my father (I dont live with him now) promised me to give me a Arcade stick for PS1 (obviously it will work on the PS2) but the time it gave it to me it resulted to be a SNES Arcade stick...that dissapointed me a lot but at least I can use the bases to make a SNES arcade (with again adapters) could also work on GameCube/Wii, the case is costume for the SNES so I can moddify it, not to much but at least I can change the controllers.

a11snc.png

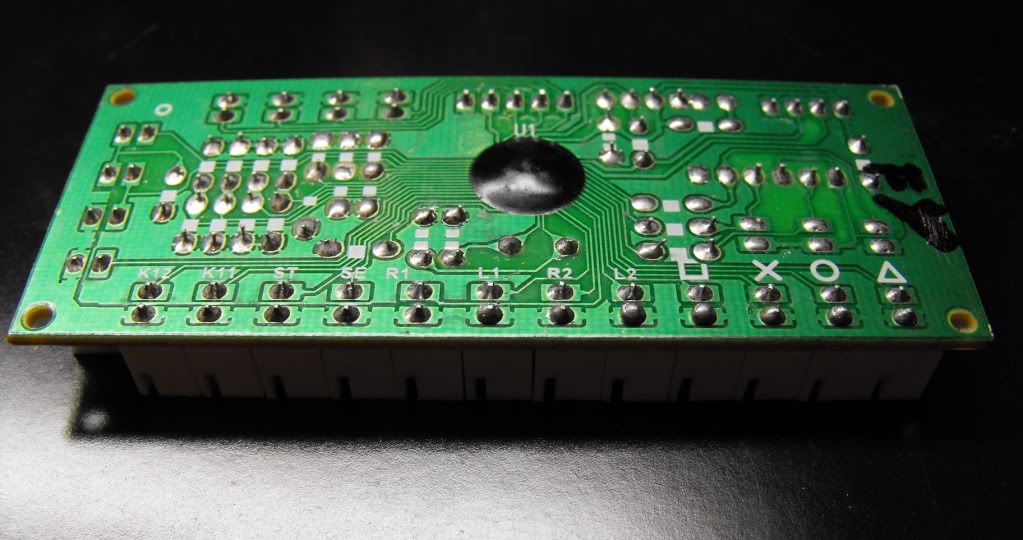
I dont want this option because I am so freaking newbie at soldering, and I dont know about the connections of a PS controller, I heard that they require one cable for connection and another for ground for each button, making the waste of absordly lot of cable.

So...any recommendation guys? I really want my first Arcade, then I can go a little more profesional with Sanwa/Seimitsu parts but I at least want something to start, and the PS2 doesnt have many options.

Thank you for reading and helping me, Hopefully my Awful English was not a problem!
Regards

Help sourcing down under

$
0
0
Hi I'm looking to mod a Brawl stick! I am completely new to console fight games and loving it but the buttons and stick are pretty shit.

I want to upgrade my stick and buttons but can't find anywhere that doesn't cost the same as the parts to ship down here!

Anyone know any stores that are more lenient on us people down under?

Cheers!

Brooks Super Converter (White) and Hori OG/Diamond VLX compatible?

$
0
0
Did a search on the forums but nothing came up wither or not a Brooks Super Converter (white) PS3 to PS4 was compatible with a Hori OG/Diamond VLX. So I was wondering if anyone can confirm if it's compatible or not.

Arcade stick button labels

Art's Hobbies - DIY Acrylic Cases How Bad is the Flexing and Quality?

$
0
0
I can get a Qanba Q1 stick complete with buttons and a stick for $80. The Art's hobbies stick will cost about that much I reckon just for the case alone

Its kinda ugly and the designed was never improved upon but my main concern is how solid and sturdy is it when you are hitting buttons? I like stuff rock solid as if you are hitting concrete. Sadly some sticks like the Razer Attrox while its steel it flexes a lot.

ZD Arcade Control Encoder And ZD ReMatch (PS3/PS2/PC) (The most cost efficient PCBs to date!)

$
0
0
I don't know if this is well known or not but i didnt see any threads mentioning this so ill just post everything here.
[copypasta]
Zero Delay Arcade Control Encoder
ZeroDelayEncoderBoardRev2.jpg
The Zero delay is the most cost effective encoder option available. It is plug and play, lag free and very compact. (8.5 cm X 3.5 cm X 1 cm)
The Zero Delay board comes with:
  • USB Cable
  • 4 Wire sets for joystick.
  • 8 Wire sets for 8 buttons, or 12 wire sets if you want to upgrade.
  • Instructions
The Zero Delay also has these additional features for those that wish to utilize them:
  • Hat switch for secondary joystick, POV controls, or console style gaming controls
  • Autofire option
  • Rapidfire option
  • 5 pin port for Japanese (Sanwa) ports
BoardFront.jpg
BoardBack.jpg

FAQ:

Q: What method does this board encode the controls?
A: Controls are encoded like a gamepad.

Q: How do I hook up the controls?
A: one end of the wire plugs right into the board port, the other end connectors into the joystick or button switch. The included instructions will let you know what each port maps to. The terminals will fit up to .187 size terminals, which is the most common size for arcade switches. If you have switches that take the larger .25 terminals, you can either soldier on the terminals or crimp on new connectors.

Q: Have these boards been inspected?
A: Each board was given QC initials. Also, I have personally plugged every board in my PC and determined that it registers correctly with the PC. I have also visually inspected all the wires and boards.

Q: How should payment be made?
A: I am set up for Paypal. If you are interested in purchasing, send me a PM.

Q: Is this compatible with PS3?
A: I have had a chance to try it out, yes, it worked great. It should be great for fighters!

Q: Does it need special software?
A: It uses the standard joystick drivers on the computer, no software needed!
[/copypasta'd]

I'm sure you all are dying to know the price by now, this thing only cost $14.75 SHIPPED!

I personally haven't had a chance to FULLY test these out myself but so far they're holding up as promised. The main thing i wanted to test out on this is to see if optical joysticks work with this thing. I haven't had much luck but they're several VCC points on the PCB so someone else who's more hella tech savvier can test that out themselves.

I also don't know how long these things hold out or last but for $14.75 shipped that really shouldn't even be an issue. And for all you skeptic ass niggas out there that think this is too good to be true:
101_0455.jpg 101_0458.jpg

Im not sure if im allowed to link to other forums to where you can buy it, so if you're interested in this and want to talk to the man himself thats selling these send me a convo and ill link you to his thread....or better yet just google it and and im sure you'll get a direct hit...lol

Again, this is compatible with PS3 and PC ONLY! sorry Xbox 360 heads. You lose out once again.........blame Micro$oft.

Just wanted to let those in the dark know whats up. If you have any question feel free to ask.
That is all.

EDIT:
Fuck it.
EncoderBanner.jpg
eb476b4dda56f9cfea44fcfcd91fa127.gif.....CLICK DAT!

Pokken Tournament Hori Controller

$
0
0
maxresdefault.jpg

Anyone know if it can be dualmod/Quadmodded into a stick? I intend on adding it into my TE. Any takers?

Real Arcade pro V kai xbox One dual mod problem.

$
0
0
I ended up Dual modding it with a Hori Mini 4 pcb using a dtdp switch (like I always do). The PS4 works great but now the Xbox one side gets all crazy as soon as I plug in the controller. It's like it activates a bunch of inputs and the just stops working. Everything on the PS4 works great. Does anyone know what it might be?

What has been your experience with Arts Hobbies Tek Innovation Cases?

$
0
0
So I am mainly interested in buying from tek innovation but is there issues with shipping? anyone ever paid and never got their case?

If I choose the Type B case with the support layer will the case flex? is it sturdy enough to take some jamming? is it shipped in a small box?

I can't buy a fightstick on Amazon because they always pack it in a fridge box and I pay $200 US for international shipping with it reaches my freightforwarder which is usually more than the price of the actual stick.

Street Fighter V Arcade FightStick TE S+ for PS4 not recognized in PC version of the game

$
0
0
Hi,

I using the TE S+ on my PC. It is immediately recognized as both a DirectInput and an XInput device.

- Control Panel Gamecontrollers - Fine
- Xinput Test Tool- Fine
- Blaz Blu - Fine

Street Fighter V - not working.

Third party PS4 padhack options

$
0
0
If my DS4 padhack thread scared you from padhacking the official sony dual shock 4 controller then your in luck... sorta. There are currently two third party pads at the moment that are usable in adding ps4 support. Those being the Hori Fighting Commander 4 and the Guilty Gear pad. Now while they are both very easy to padhack the only downside to them is obtaining them is not as easy as getting a DS4 pad.

www.JasensCustoms.com - More than just awesome Fight Stick Cases!

$
0
0
Good morning everyone! Wanted to throw launch the shop into the Tech Talk Community because why not... every other vendor has. I'll migrate over my SALES threads to here and ask the mods to close them out once I get everything moved over.

** About me and the Shop **

Some of you may know me, some of you may not... I am Jasen and I am a DIY-Aholic. I build Fight Sticks, SuperGuns, Print and Cut Custom Graphics, and Sell buttons, sticks, and tech to fuel my addiction. What started out as a minor hobby as a kid (pulling things apart to see how they worked and getting rocked at Street Fighter II and Samurai Showdown) turned into an obsession. Many things I make such as the Panzer Fight Sticks, SuperGun Cases, and graphics started out as something I needed for a project I was working on. Over the past two years it evolved into a "business", a term I use loosely because I'm not trying to make money... just trying to save it for my random projects and passing it along the best I can to the community. By night I may be an arcade/gaming enthusiast but by day I am a LCDR in the US Navy and drive Submarines for a living. Because of my day job I have been able to learn a lot of crazy stuff that has influenced my designs and projects. Thanks Navy for training me and testing me as a Nuclear Engineer!

I run this by myself so I know the quality of parts, prints, and builds... in my house. America was built from the home, I'm going to try and keep it that way. Plus it saves me money :-D

** Announcement Section / New Projects **

Panzer Fight Stick Korean Edition

Ok, enough of the touchy-feely stuff. Let's get onto some Tech Talk. I had a customer that really wanted a stick based around the Myoungshin Fanta Stick. It was interesting. His design was ideas were good and I really liked the case when it was done. Fast forward to April 2014 and my vacation to Seoul Korea... I went overboard and bought a crap-whack of Fantas. Also learned that "Crown" isn't the company name... it's actually Crowin. I digress...

I went to work designing a Panzer Fight Stick to house the new stick because it's completely different than everything else on the market. I wanted something new and unique as well as tough and worthy of the Panzer Fight Stick name. This is what I came up with:

- Panzer Fight Stick Korean Edition
- Crowin/Myoungshin Fanta Mounts
- 30mm Buttons Vewlix Layout
- 24mm Buttons Front (Home Start Select)
- Neutrik Interface for USB or RJ45
- Black Sandtex Top and Graphite Sandtex Bottom
- Low Profile Feet
- Digitally Printed Graphics
- PS360+

10275453_1610835362475813_4944993314178431891_o.jpg

I am going to do a limited run of these, only 10, and they will be completely built out ready for kicking ass when you receive it. So far, the facebook response has been very good. I don't expect these to last. Price point is being determined due to the limited number I am doing as well as the fact I plan on using GamerFinger buttons in the final product.

Silent JLFs - $69.95 (Harness and Balltops Included
https://jasenscustoms.com/Sanwa-Silent-JLF-Lever-JLF-TPRG-8AYT-SK.html

I was skeptical at the value and the bennies associated with the Silent JLF... until I got one. These are very quiet. I posted up in the SANWA JLF Thread my db findings and it's damn quiet. I think the max room dB was 106 with the standard JLF being clicked around and then 76 with the Silent JLF being clicked around. It wasn't the most scientific test, but it was the best was I could numerically represent the stick. All Sanwa really did was solder the quiet Omron D2RV-G switches to a standard JLF PCB and make the gate a single piece vs. one with a removable gate. It looks like the actuator may be a little larger than stock, but I haven't broken out the calipers to check it yet. Stock JLF gates/restrictors work with the silent stick as well as all of your original balltops and harnesses.


Buttons, Buttons, and more Buttons
https://jasenscustoms.com/Pushbuttons/

I have a stock of them now. I resisted for as long as I possibly could. It just made sense to start carrying a few so those buying Panzer Fight Sticks could include them with their orders. Nothing special or new about these buttons. They are just good OBSF-30s and PS-14-Gs. Ill be adding more as I get them photographed and uploaded. If I don't have it, I can get it or simply haven't added it yet.

Standard JLF - $19.95
https://jasenscustoms.com/Sanwa-JLF-Lever-JLF-TP-8YT.html

Playing nice with others has its benefits. Another shop and I teamed up to get a killer deal on Sanwa JLFs and have been able to bring the price down to $19.95. Same great stick, new lower price. Oh, did I mention it ships for $3.99?

Crossbone Kits - Launch 21 June!
@Phreakazoid‌ did a killer job coming up and implementing a slick pad-hack to use the XBONE with your current or future stick builds. We have been chatting since it's announcement on brining it to JasensCustoms.com and what the best way to implement it was. I have teamed up with @armi0024‌ from ParadiseArcadeShop.com to pool our braincells and release this on day one with a lot of great options!

PS360+ and Windows7 64-bit issues

$
0
0
I'm in the process of fitting my Madcatz SFxT stick with a PS360+. All's going well so far, just doing the most basic installation - got it hooked up to my PS3 and everything is working perfectly (I've not had a chance to test on an Xbox360 but I'm assuming that it will be likewise working as the PS3 mode is working). However, the board isn't registering at all when I hook it up to my PC.

I've tried connecting the stick and letting it auto-detect the platform, forcing PS3/PC mode, forcing Xbox360 mode, loading in Bootloader moded ... nothing registers on my PC. I'm running Windows 7 64-bit. I've tried installing the Atmel drivers but windows fails to actually install them, claiming they're not signed for 64-bit ... this is all a bit strange to me because if I plug in an actual 360 pad, it works perfectly. Yet connecting the PS360+ in force-Xbox360 mode doesn't work. It just shows up in device manager as an "Unknown Device"

Any ideas what might be wrong here?

Whatever I do or try, x360ce inverts the Y axis of my Hitbox for SFV

$
0
0
I'm using a Hitbox controller right now, but even if I change the Y axis into Iaxis or IHaxis my jump button becomes a crouch and my crouch button becomes a jump. When I try the seperate stick up/down option it doesn't even respond.

Anyone encountered this issue?

How stiff is Seimitsu buttons and stick?

$
0
0
Trying to decide between Sanwa or Seimitsu

I kinda like resting my fingers on buttons when I play cause I grew up playing on American happ buttons. But at the same time I don't want any stiff buttons or anything like that.

Whats your experience with Qanba Q2 fightstick?

$
0
0
How does it compare to Qanba Q1?

Is the Q2 stick and buttons bad or anything?

custom arcade stick research

$
0
0
Hello all, I've been lurking for awhile and decided to register. I decided to make my own arcade stick and been looking at some production ones, but none of the (aesthetic) styles really suit me. I have an industrial design degree (product design) so I figured, why not design my own? For now it is a personal one-off project.

Any ways, I'm treating this personal project as a potential limited production run (hand built). I know what I want, but it's important what others want as well. I guess that's why I started this thread.

The 1st question is: How important is it to customize the faceplate (artwork). If the overall product is nicely designed, will you still want to put a custom artwork over top of it?

I have some renderings I can show in a bit. Thanks! ~Nick

Hit Box - We so S Tier1!!

$
0
0
Welcome to the Hit Box community!

[media=youtube]dGU1d-cmtuQ[/media]
http://www.hitboxarcade.com
http://www.youtube.com/hitboxes


FAQ
1. What is the Hit Box?

The Hit Box all-button controller, AKA the "Stickless Stick," is a game controller specifically designed for fighting games. We replaced the joystick with directional buttons that are controlled by your fingers.

2. Why buttons?

By using 4 directional buttons controlled by 4 fingers, you gain:

- Increased input speed
- Consistent inputs yield fewer mistakes
- Exclusive control over your movement
- No travel time inputting directions
- Button techniques apply to movement and special inputs (plinking, piano, double tap, slide)
- Game-specific features such as SSFIV input shortcuts (such as walking dragon punches)
- No unintentional inputs such as accidental jumps
- No arm/wrist motion
- Stays put in your lap


3. Are those smaller buttons than normal?

Yes. We use 24mm Sanwa pushbuttons with exception to the 'Up' button, which is 30mm. They are highly sensitive buttons and work perfectly. 24 mm buttons are able to be brought closer together and fit the natural curve of the human hand. When the button spread is closer together, players find all buttons directly at their finger tips with no hand-hovering.

4. Can I still execute throws and focus attacks on this smaller layout?

Yes.

5. What about plinking and double tapping my combo links?

Of course.

6. Why have a shared jump button for your thumbs?

It is larger than the other buttons so both thumbs can access "Up" depending on player preference. By utilizing this, you can perform advanced "joystick" motions easily. Tri-jumps and Tiger Knee inputs are much faster and more accurate. It also makes many Just-Frame inputs incredibly easy.

8. Who is this for? Do I need keyboard experience?

While it appears to share the most common ground with a keyboard, Hit Box is a balance between Joystick, Pad, and Keyboard together. You dont need background in any controller to appreciate the Hit Box: Anyone can use it!

9. Can I still do everything I can do on my joystick?

Everything and more.

10. What about Hadokens and Dragon Punches and SPDs?

Yes. Quickly and accurately.

11. What about "______'s ________ combo"?

Yes.

12. Is there a learning curve?

The learning curve is creating fast, new memory in your fingers. It doesn't take long. This also gets rid of old bad habits too!

13. Are these for advanced players only?

No! The benefits of these boxes can be appreciated by everyone from the beginning player to the most advanced tournament player. The whole purpose of the Hit Box is to aide your fundamentals and build your foundation so that you can focus on what actually matters in a match: your opponent.

14. What happens when you hold the Left and Right buttons together?

Left + Right = Neutral. Your character will stand still. No charging or blocking occurs.

15. Can I hold Left and Right to block cross ups?

No. Left + Right = Neutral; you will get hit in the face.

18. Can I walk forward and charge a sonic boom?

No.

19. Can I hold Back and perform shoryuken motions?

No. Left + Right = Neutral.

20. Is "Left + Right = Neutral" useless?

No! Left + Right is the basis for many advanced techniques that will make your life easier! You get access to 3-frame dashes, 1-button FADCs, rapid dragon punches, new option selects, safe and easy Korean backdash cancelling, and much more! Left + Right will help your execution significantly. Check out all of the tech in our video section!

Combo Videos
How to Hit Box Tutorials

Interactive Learning Tools


N_Close_2_1024x1024.jpg?28


Interested in getting your Hit Box modded? Vickomods located nearby Hit Box HQ and offers his services for your Hit Box modding needs. Check him out at vickomods.com!!!
small-banner-transparent.png

Art's Hobbies - DIY Acrylic Cases.

$
0
0
Cases are now available on my site: Art's Hobbies

!!! 3/27/11 NEW Updates regarding Diamond Joints and Hitbox! Jump to post #702


LOTS OF INFO AND TONS OF PICS INCOMING!

***** PLEASE CHECK THE 2ND POST OF THIS THREAD FOR Q&A and FUTURE UPDATES . READ THAT FIRST IF YOU HAVE QUESTIONS IN CASE YOUR QUESTION IS ALREADY ANSWERED! I WILL NO LONGER ANSWER QUESTIONS THAT ARE ALREADY ADDRESSED IN THAT POST. Please just take a moment to read the info...


These cases will be available on my website, Welcome to Art's Hobbies, in early September.
These are Cases ONLY. Not full fightsticks. Joysticks, Buttons, PCBs are not included

Hey guys! I would like to reveal a project I've been working on for the past few months, under the radar.

Some time late last year, parabellum asked:

"May I humbly suggest some additional services which you may wish to consider offering?

Simple plexi cases: If you offered a 'bolt it together yourself' case made from laser cut plexi, you could supply these with the screws, etc....and I think there would potentially be great demand for this. If the price could be kept down to around $50-$60, I think it would be a winner."


That suggestion has stuck with me and I haven't stopped thinking about it. Since working with plexiglass (acrylic) has its limitations, it took me some time to come up with a solution. Many months and lots of trial and errors later, finally... I believe I've found the solution and I bring you a completely modifiable DIY full acrylic case!

This case was designed with you, the modder, in mind with the ability to customize pretty much every aspect of the case... to make it your own! So lets take all these pieces...

pieces.jpg

And turn them into this! (Might be a tad hard to make out all the details at first, being that everything's clear and there's a lot of reflection in the pics. But the details will be more prominent as you scroll further down.

case1.jpg

case2.jpg

case5.jpg

Lets look at one of the unique things to personalize your case. The Name plates!

case3.jpg

case4.jpg

The Name Plates act as extra support for the case, and it's a great place to cut your name/handle/short phrase to really identify your case. These are "Cut" through the acrylic, not "etched".

Now it's a little hard to see, with everything being clear, but on the back of the case there is a PCB section which has a couple of PCB holders and a wire hook to help with PCB placement and organization.

pcb1.jpg

These holders can be adjusted/removed to fit your needs. While initially designed to fit the cthulhu boards, they can still hold hacked pads and other pcb's by a simple ziptie method or whatever you come up with. You don't have to use them, but they are there to help you out if you want them.

pcb2.jpg

Here are some pics with a JLF and some buttons in place .

casebut1.jpg

casebut2.jpg

casebut3.jpg

casebut4.jpg


The pics above only show a glimpse of what can be done. Let me try to get into more details and options with more pics =).

Lets say you want to replace the front panel now because you prefer a Neutrik Adapter rather than a cord opening. No problem, lets take a front panel with a Neutrik space...

replace1.jpg

now unscrew the four screws holding the front panel of the case...

replace2.jpg

place the buttons and Neutrik adapter on the new panel and screw back in...

replace3.jpg

and Done!

replace4.jpg


Or decided you no longer want buttons on the side panel? No prob, swap it.

replace6.jpg

Yep, it's that easy to change your mind.


Now lets look at some color options. Here's a Dark Blue theme.

Specs:
Top: Clear; Sega Blast City 6 Button
Top & Bottom Borders = Transparent Dark Blue
Name Plate & PCB Plate = Transparent Dark Blue
Front Panel = Clear; S/S Buttons and Neutrik
Back Panel = Clear
Left & Right side panel = Transparent Dark Blue
Bottom = Clear
JLF Mount = Transparent Dark Blue

blue1.jpg

The colors help distinguish some parts a little better, for instance the border design.

blue2.jpg

blue3.jpg

blue4.jpg

Lets try an Iron Man theme

Specs:
Top: Clear; Sega Blast City 6 Button
Top & Bottom Borders = Transparent Red
Name Plate & PCB plate = Transparent Red
Front Panel = Fluorescent Orange; S/S buttons and Neutrik
Back Panel = Fluorescent Orange
Left & Right side panel = Transparent Red
Bottom = Clear
Bottom Thin Plexi with 2 Artworks (one facing each side)
JLF Mount = Transparent Red

This shows Artwork placed on the bottom but facing top side to add a little background to future wiring. A thin bottom plexi is used to sandwich the artwork in place

im1.jpg

im2.jpg

The Fluorescent Orange reflected the flash so the front couldn't be seen. Below is without flash (ugly color turnout) but at least shows the Name Plate. Under regular light, you can see through to notice the name plate.

im2b.jpg

Flipping the case around, there's another artwork. Basically I place two artworks between a thin bottom plexi.

im3.jpg

Here are some pics without the artwork so the design is more clear.

im4.jpg

im5.jpg


Here's some closeups of the Name Plates in these examples:

nameplate1.jpg

nameplate2.jpg

View of the case frames. Showing Borders, Name Plate, and PCB Plate which forms the skeletal structure of the case.

frames1.jpg

frames2.jpg

Those are just some basic color combinations. But basically, the color combinations and setups are up to your imagination? and what color/material stock I can get, lol.


Oh and top artwork you ask? But of course! Optional thin top plexi's will be available.

art1.jpg

art2.jpg

The artwork is cut a little smaller than the full top of the case. This gives a natural border, particularly for dark and opaque top colors. For clear tops, this makes the artwork look like it's floating in a frame.

art3.jpg

Gotta show the popular Chun Li artwork by Stanley Lau.

chun1.jpg

chun2.jpg

chun3.jpg


Taking this even one step further, how about thin plexi options all around the case which essentially allows you to turn the entire case into swappable artwork.


Lets say I wanted to give my entire case a carbon fiber look with a high res print of a carbon fiber pattern. Then cut the image for the top and all four sides. Sandwich all pieces to all sides and...

carbon1.jpg

carbon2.jpg

carbon3.jpg

Obviously a full artwork case swap is all up to your imagination. I plan to make one with a large cast of either Marvel or SSF4 all around the sides.


Alright, almost done. Sorry if I'm tiring you out with all the pics, lol.

Here's my working, complete prototype from about a month ago. A few minor changes were made since these pics. (Fluorescent Orange Border, Name Plate, PCB Plate and Left/Right Sides. Using a salvaged 360 TE PCB)


proto1.jpg

proto2.jpg

proto3.jpg

Here's probably a better closeup of the PCB holders and wire hook in action. Just using zip ties to keep them in place.

proto4.jpg


And last, but not least, here are what I call "Side Decors". Here's a sample of Acrylic shapes that can be screwed on to the side panels to further express yourself.

sidedecor1.jpg


They will come in pairs so you can apply them corner to corner, or a piece per side. Or use two sets and have them corner to corner on opposite sides.

sidedecor2.jpg

Apply them anywhere on the sides of the case, where room permits. Obviously if the area has buttons, these won't fit that area.

sidedecor3.jpg

Other Side Decor colors and shapes will be made available.


Finally, those are all the pics I have so far =). I will post more pics of other various colors when I have time. (I want to take pics of the lighter colors, and when I restock Fluorescent Blue. Also with opaque colors, and etching samples).

Here are some more highlights and details:

* Size: L 13 1/2" x W 8 1/2" x H 2 1/4". Height is about 2 1/2" with feet.

* Weight: Just case is 2.35 lbs; With JLF, Buttons and TE PCB is about 3.5 lbs (will obviously vary)
* Everything is put together by screws and what I call "Diamond Joints". There is absolutely no "gluing" or acrylic bonding agents needed.

* Because no permanent bonding is used, all parts can be easily swapped and changed to fit your style. Also, if by some unfortunate accident a part of the case gets damaged, you can simply replace the damaged part with a new one rather than worrying about replacing the entire case.

* Your personal Name Plate, cut with a short text of your choice. Not etched, actual cut through the acrylic.

* Top and Bottom panels are extended out past the rectangular outline of the case with rounded corners. This prevents issues with sharp corners.

* Popular button configurations will be available (ie: Vewlix, Blast City, T5, Midway, Capcom, etc).

* Various button options for the left/right side panels, as well as front panel including neutrik setup.

* Most parts will have etching options.

* Thin plexi and Artwork options available for top, bottom and sides.

* All pieces (except for diamond joints) are made with 1/8" acrylic so more colors can be available. (Majority of colors are more readily available in 1/8" thickness)

* PCB holders and wire loops to help with PCB and Wire organization.


So that's it for now. Hope you guys are excited as I am =). I will showcase more on etching and other color combos when I get a chance. I will be working on an instructional video to show how everything is put together. Hopefully I'll get that up within a week or two.

I have also asked a few experienced modders to be testers and when they get the first cases they can share their personal experiences. But from my personal experience, and one other's, the results have been great!

Thanks again for everyone's support =). And shout out to parabellum, where ever you are buddy, thanks for giving me a challenge ;).

Got Questions? Look at the bottom post first.

display1.jpg

Mad Catz Arcade FightStick Tournament Edition Parts & Accessories

$
0
0
Hi everyone. MarkMan from Mad Catz here!

If you didn't know, Mad Catz has a bunch of unique solutions for modding and customizing your Tournament Edition FightSticks! Today, we just announced our side panel availability in both the original TE style and the TE 'S' style.

8382119086_3200255b2e_o.jpg

8381036989_b67ffcbb56_o.jpg

Check out our parts store here: http://store.gameshark.com/listCategoriesAndProducts.asp?idCategory=328

If you have any questions, let me know!
Viewing all 8072 articles
Browse latest View live