↧
Stick vs Pad?

↧
How to Dual Mod Eightarc ISO 360 Onyx to use with PS3
I've been searching all over for a guide to dual mod the eightarc is 360 onyx. I've only been able to find info on how to dual mod TE's. Any info would be greatly appreciated, thanks!
↧
↧
IC: Tek-Case Mini
Good morning all! I have been speaking w/ Art of Tek-innovations.com about building mini portable tek-cases, and he is up to it if enough interest is gathered. Dimensions would be 9.5*7.33*2 which is the same as an Ipad2 vs the current 13.5*8.5*2.25.
![case3.jpg]()

↧
SFXT stick ground question
i got a SFXT stick,it's for xbox 360 and i dual modded it with a chimpSMD, now i'm wondering if it is necessary to connect ground from the buttons and from the joystick or only the signal wires..
↧
HORI Fighting EDGE
I hope you all caught the unveiling of the Fighting EDGE last Wednesday on Level Up's Wednesday Night Fights!! We've opened up this thread to answer any questions you may have regarding the Fighting EDGE. Hit us up with any questions or feedback you may have!!
↧
↧
Planning to be an entrepreneur for ggxrd
I really want to make a business out of ggxrd and I have the capital for it. I'm planning to buy a couple of machines then make a deal with some arcades or hobby shops here. Anyone with an idea how much does a playable set cost? I have a lot of experience with electronics and fighting games in general.
Any help is very appreciated.
Any help is very appreciated.
↧
Kaimana RGB LED Board thread, RGB animations and more! SRK Tech Talk 2013 Product of the Year!
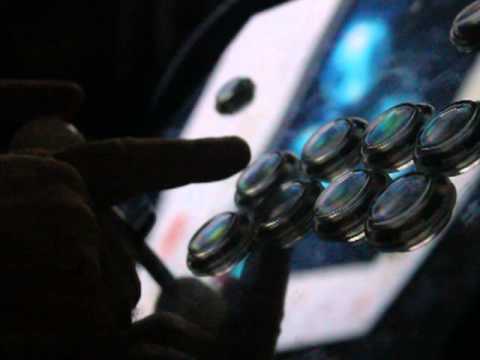
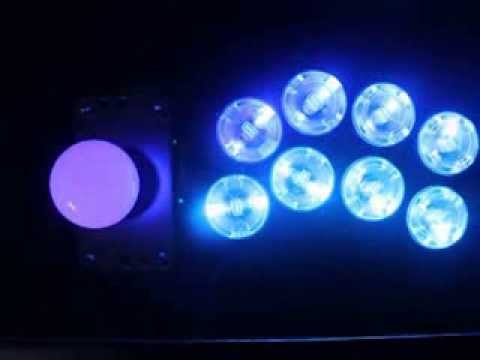
The Kaimana LED Controller is a powerful new tool for those looking to get the most out of their custom arcade stick or cabinet! This is the first board to used indexed LEDs in an arcade stick and allows for RGB control and animations. It is also the first fight stick RGB LED controller to provide full RGB control for joystick ball tops and hit box configurations.
![image]()
![image]()
The Kaimana can run conventional LEDs like the Pele's or Uila's with an adapter board or can be used to run the new Kaimana J's:
![paradise-kaimana-j-rgb-led.jpg]()
Unlike previous LED boards, the Kaimana uses indexed LEDs so they can be connected in series and you don't have to have multiple wires running from the controller board to each LED
Diagram:
![fetch.php?w=500&tok=633a2d&media=kaimana_led_chain_default.png]()
Example (jwyder's stick):
![KaimanaInstaled_zpsdfcceb65.jpg]()
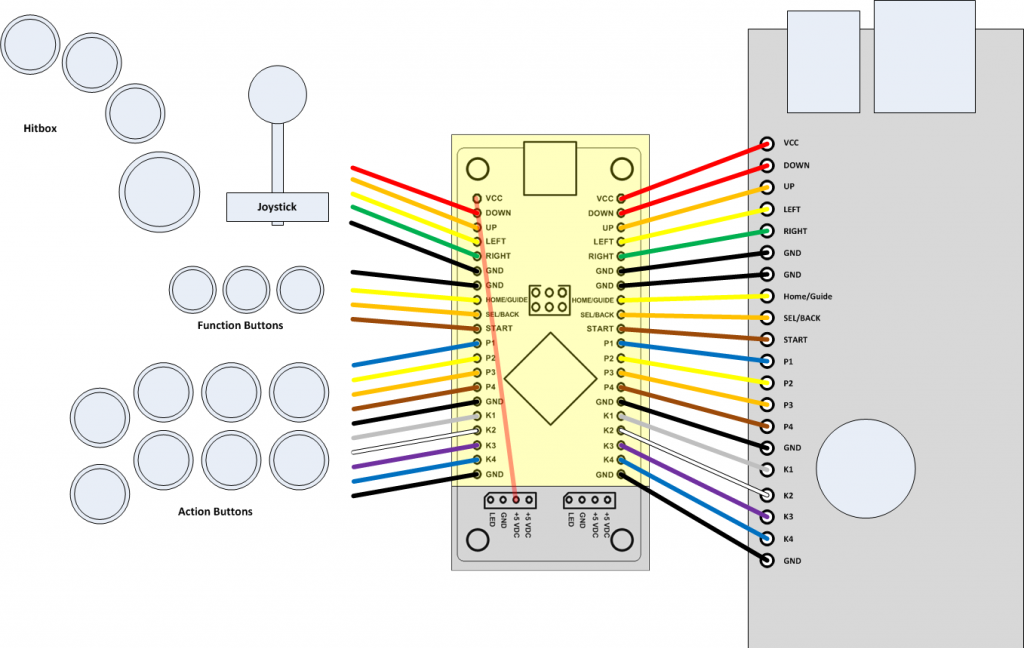
It is also designed for easy installation as a pass through board. The pinouts are the same as a PS360 so modding your dual mod stick could not get any easier!
Diagram:
![KaimanaWiringDiagram_zps1cfc4cc6.png]()
I have installed three of these systems, and total install time, including installing all the buttons and joystick ahs been less than 1 hour each time using the Kaimana J's
Based on the infinitely flexible Arduino, this board can do just about anything you can imagine. Because it uses the extremely simple to learn Arduino programming language, this board opens the gate for anyone to create their own light patterns and shows.
As people invent there own animations series we will be adding them to the store for download and people who contribute programs will be able to earn store credit! As of right now the entire Ryu special move set for SFIV has been coded with animations. The best part is that all you need is a USB cable and any of the programs created can be loaded in seconds!
Boards and accessories can be purchased here:
![paradise-kaimana-led-controller-pcb.jpg]()
The Kaimana can run conventional LEDs like the Pele's or Uila's with an adapter board or can be used to run the new Kaimana J's:

Unlike previous LED boards, the Kaimana uses indexed LEDs so they can be connected in series and you don't have to have multiple wires running from the controller board to each LED
Diagram:

Example (jwyder's stick):

It is also designed for easy installation as a pass through board. The pinouts are the same as a PS360 so modding your dual mod stick could not get any easier!
Diagram:
I have installed three of these systems, and total install time, including installing all the buttons and joystick ahs been less than 1 hour each time using the Kaimana J's
Based on the infinitely flexible Arduino, this board can do just about anything you can imagine. Because it uses the extremely simple to learn Arduino programming language, this board opens the gate for anyone to create their own light patterns and shows.
As people invent there own animations series we will be adding them to the store for download and people who contribute programs will be able to earn store credit! As of right now the entire Ryu special move set for SFIV has been coded with animations. The best part is that all you need is a USB cable and any of the programs created can be loaded in seconds!
Boards and accessories can be purchased here:

↧
PLEASE HELP!
I have recently downladed KAWAKS to play arcade roms. I have a HORI Tekken 6 PS3 Fight stick that I would like to use with it. KAWAKS detects the buttons but not the control stick. Can anyone help me with this issue?
↧
Have some questions for PS3 TE dual mod
I'm going to dual mod my ps3 te stick (round 2) with a madcatz 4716 and I'm going to use a DPDT switch.
My questions are:
1) If I'm going to solder to the points on the turbo PCB that says and gnd, vcc, etc to the dpdt do I need to desolder/cut the USB cable that is connected or can I leave it connected and solder the data lines to the DPDT switch?
2) How do I find out what revision my madcatz pad is? So if it is rev.e, rev.g, etc.
Thanks in advance for helping a n00b :)
↧
↧
Art's Hobbies Big Update! 1/32" Acrylic, V.S., Pro, Qanba, HRAP V3/VX, Custom Art Dustwashers.
Website: Welcome to Art's Hobbies
Big Update 3/4/2012
Hey guys! It's been a while since I've had the chance to be more active around here, and provide the occasional updates and question sessions. Long story short, I picked up consulting on a software project for the County. So between working on that and taking care of orders, I've been pretty beat up, trying to balance everything. Even with some added help in the business, I'm still the only one to answer emails and work on the more customized orders, so I have been a bit overwhelmed, particularly over the winter season and tournament seasons.
Now that my county project is at a phase where I can take a break, and after I had a little opportunity to relax, I'm refreshed and back with updates! And what timing too... with the V.S., Pro, and other new things coming out! Here's some things on the plate.
1/32" Acrylic!
This is one of the biggest things for me. For a while, I've had people ask me about 1/32" options, and I always had to turn them down because the only material that is normally available in that thickness, is Polycarbonate (Lexan). I've mentioned before that laser cutting Lexan can emit potentially toxic fumes and tends to discolor and burn the edges. So for a while I've been searching for an acrylic option in 1/32" thickness. Some places could make normal acrylic in that thickness, but it becomes way too brittle. Regardless, I continued to look for options.
Now, finally I have found a source that carries 1/32" Impact Modified Acrylic. This material is 10x stronger than normal acrylic, and is perfect for a thin alternative to Polycarbonate. It's incredibly flexible and more than durable enough for fight stick purposes, even for those times of pushing down hard to snap in buttons. Also, Acrylic has the advantage over Polycarbonate in that it is crystal clear (more clarity), less prone to scratches and will not yellow over time when exposed to UV (sunlight). Here are some images for you to compare.
![acry_1.jpg]()
Incredibly flexible and durable. (It can bend more than this)
![acry_3.jpg]()
Superior clarity. And this is after it was bent.
![acry_2.jpg]()
So I'm very excited to offer this new line of acrylics. This idea of 1/32" Impact Modified Acrylic is still so new, that most plastic businesses either haven't even heard of it, or still don't carry it in that thickness. Trust me, I've called like over 30 companies in California alone, and only one out of those 30 knew what I was talking about.
I'm aiming to make these available on my site in a few weeks. I just ordered a huge batch of them so I still need to wait for them to arrive, while also updating a lot of other products and the need to code in a lot of new options on my site.
Madcatz Street Fighter x Tekken V.S. Fightstick
As it's already mentioned in the V.S. thread, covers for the Top, Bottom, Sides and Corners have been worked on. The templates are currently available. That case is incredibly modifiable and easy to personalize. There's more that can be done and I'll continue looking at ways to offer more options to spice things up. More info and pictures in that thread:
V.S. Thread - Post 1
V.S. Thread - Post 2
Madcatz Street Fighter x Tekken Pro Fightstick
I've also got the Pro Top and Bottom covers. More info and pictures in the Pro thread here:
SFxT Pro Post
Qanba Plexi and Artwork
I've had a lot of requests for this but while working on my other projects, I really couldn't give an answer to working on a new stick. Now, I finally had a chance to complete the Qanba plexi. It also has Laser 3D engraved countersunk holes so you can use the existing screws. This method of countersinking can only be done on 1/8" or thicker material, otherwise it can cause thinner plexi to become too brittle and crack. So thank goodness Qanba plexi's are 1/8" thick.
I understand Qanba has their own plexis, but I was told it can some times be too large for some of the fightsticks and some sanded was necessary. Well, I modeled my template from the original Qanba plexi, and the person whom I've worked with (Motoyuki) has confirmed that everything fits perfectly without sanding (as he had to do with his replacement Qanba plexi from another source). Additionally, this will allow me to offer Artwork print and Cut services and other plexi color options for the many different colors Qanba has.
![qanba.jpg]()
HRAP V3/VX and Artwork.
Finally, I get a chance to work on the V3/VX. It's been on my plate for a while, and I finally got to it. One of the things that stalled this project were the issues with the countersunk screw holes that could put a lot of stress on regular acrylic. But with the 1/32" Impact Modified acrylic, it is no longer an issue!
Notice, like the MadCatz Pro, I did not cut the middle screw hole as the screw there would very likely cause discomfort with game play, since it's so close to the lower button.
The necessary screws to install the plexi/artwork, as well as giving you top access for modifications, will also be included. Will be coming in another week or two along with all the other new additions =).
Here is the VX/V3 Template.
( Taokaka design by Stoogie )
![vx.jpg]()
TE Soul Calibur V Covers. (In Madcatz TE Section, scroll down a little to see them)
![te_scv_1.jpg]()
![te_scv_2.jpg]()
HORI Soul Calibur V
![hscv_2.jpg]()
Custom Artwork Dustwashers Return!
![cdw_1.jpg]()
When I first introduced these, they were laminated by a clear acrylic laminate spray. Unfortunately, that spray produced some technical difficulties in its application and made it difficult to produce a consistent, good quality product. So for a while, I was trying to look for an alternative. It took some time because most laminates that were presented to me, usually had some type of vinyl, polycarbonate, or pvc element to it, all of which are bad for laser cutting.
Well, finally I found a great quality overlaminate that is safe for laser cutting. So now, I can bring back the custom artwork dustwashers that many have emailed me about, and with more consistent quality.
Here are some closeups of some SFxT Dustwasher samples.
![cdw_6.jpg]()
![cdw_5.jpg]()
![cdw_2.jpg]()
![cdw_4.jpg]()
Custom Artwork dustwashers will be available again this upcoming week.
Alright, that was a ton of stuff. Time to get some rest. Hopefully I get to talk to some of you guys again, and get a chance to check out everyone's stick posts. Been seeing great things! Thanks again for everyone's support! Have a good one!
-Arthur
Also, Shoutout to JDM. Thanks for all your help to answer questions while I wasn't around on my threads. You rock!
Please check my website for more details : Welcome to Art's Hobbies
Big Update 3/4/2012
Hey guys! It's been a while since I've had the chance to be more active around here, and provide the occasional updates and question sessions. Long story short, I picked up consulting on a software project for the County. So between working on that and taking care of orders, I've been pretty beat up, trying to balance everything. Even with some added help in the business, I'm still the only one to answer emails and work on the more customized orders, so I have been a bit overwhelmed, particularly over the winter season and tournament seasons.
Now that my county project is at a phase where I can take a break, and after I had a little opportunity to relax, I'm refreshed and back with updates! And what timing too... with the V.S., Pro, and other new things coming out! Here's some things on the plate.
1/32" Acrylic!
This is one of the biggest things for me. For a while, I've had people ask me about 1/32" options, and I always had to turn them down because the only material that is normally available in that thickness, is Polycarbonate (Lexan). I've mentioned before that laser cutting Lexan can emit potentially toxic fumes and tends to discolor and burn the edges. So for a while I've been searching for an acrylic option in 1/32" thickness. Some places could make normal acrylic in that thickness, but it becomes way too brittle. Regardless, I continued to look for options.
Now, finally I have found a source that carries 1/32" Impact Modified Acrylic. This material is 10x stronger than normal acrylic, and is perfect for a thin alternative to Polycarbonate. It's incredibly flexible and more than durable enough for fight stick purposes, even for those times of pushing down hard to snap in buttons. Also, Acrylic has the advantage over Polycarbonate in that it is crystal clear (more clarity), less prone to scratches and will not yellow over time when exposed to UV (sunlight). Here are some images for you to compare.

Incredibly flexible and durable. (It can bend more than this)

Superior clarity. And this is after it was bent.

So I'm very excited to offer this new line of acrylics. This idea of 1/32" Impact Modified Acrylic is still so new, that most plastic businesses either haven't even heard of it, or still don't carry it in that thickness. Trust me, I've called like over 30 companies in California alone, and only one out of those 30 knew what I was talking about.
I'm aiming to make these available on my site in a few weeks. I just ordered a huge batch of them so I still need to wait for them to arrive, while also updating a lot of other products and the need to code in a lot of new options on my site.
Madcatz Street Fighter x Tekken V.S. Fightstick
As it's already mentioned in the V.S. thread, covers for the Top, Bottom, Sides and Corners have been worked on. The templates are currently available. That case is incredibly modifiable and easy to personalize. There's more that can be done and I'll continue looking at ways to offer more options to spice things up. More info and pictures in that thread:
V.S. Thread - Post 1
V.S. Thread - Post 2
Madcatz Street Fighter x Tekken Pro Fightstick
I've also got the Pro Top and Bottom covers. More info and pictures in the Pro thread here:
SFxT Pro Post
Qanba Plexi and Artwork
I've had a lot of requests for this but while working on my other projects, I really couldn't give an answer to working on a new stick. Now, I finally had a chance to complete the Qanba plexi. It also has Laser 3D engraved countersunk holes so you can use the existing screws. This method of countersinking can only be done on 1/8" or thicker material, otherwise it can cause thinner plexi to become too brittle and crack. So thank goodness Qanba plexi's are 1/8" thick.
I understand Qanba has their own plexis, but I was told it can some times be too large for some of the fightsticks and some sanded was necessary. Well, I modeled my template from the original Qanba plexi, and the person whom I've worked with (Motoyuki) has confirmed that everything fits perfectly without sanding (as he had to do with his replacement Qanba plexi from another source). Additionally, this will allow me to offer Artwork print and Cut services and other plexi color options for the many different colors Qanba has.

HRAP V3/VX and Artwork.
Finally, I get a chance to work on the V3/VX. It's been on my plate for a while, and I finally got to it. One of the things that stalled this project were the issues with the countersunk screw holes that could put a lot of stress on regular acrylic. But with the 1/32" Impact Modified acrylic, it is no longer an issue!
Notice, like the MadCatz Pro, I did not cut the middle screw hole as the screw there would very likely cause discomfort with game play, since it's so close to the lower button.
The necessary screws to install the plexi/artwork, as well as giving you top access for modifications, will also be included. Will be coming in another week or two along with all the other new additions =).
Here is the VX/V3 Template.
( Taokaka design by Stoogie )

TE Soul Calibur V Covers. (In Madcatz TE Section, scroll down a little to see them)


HORI Soul Calibur V

Custom Artwork Dustwashers Return!

When I first introduced these, they were laminated by a clear acrylic laminate spray. Unfortunately, that spray produced some technical difficulties in its application and made it difficult to produce a consistent, good quality product. So for a while, I was trying to look for an alternative. It took some time because most laminates that were presented to me, usually had some type of vinyl, polycarbonate, or pvc element to it, all of which are bad for laser cutting.
Well, finally I found a great quality overlaminate that is safe for laser cutting. So now, I can bring back the custom artwork dustwashers that many have emailed me about, and with more consistent quality.
Here are some closeups of some SFxT Dustwasher samples.


Custom Artwork dustwashers will be available again this upcoming week.
Alright, that was a ton of stuff. Time to get some rest. Hopefully I get to talk to some of you guys again, and get a chance to check out everyone's stick posts. Been seeing great things! Thanks again for everyone's support! Have a good one!
-Arthur
Also, Shoutout to JDM. Thanks for all your help to answer questions while I wasn't around on my threads. You rock!
Please check my website for more details : Welcome to Art's Hobbies
↧
Select/Back Linking (plinking) with a Qanba Q4raf [is it possible]
Select/Back Linking (plinking) with a Qanba Q4raf [is it possible]?
I'm just curious if it can be done. I opened my stick and my inner thoughts say yes but my rationality says no.
Note: I dont know anything about modding sticks
I'm just curious if it can be done. I opened my stick and my inner thoughts say yes but my rationality says no.
Note: I dont know anything about modding sticks
↧
The Official PC/Computer Thread
This post is a work in progress. I need your help to complete this, and make it a better list. PM me any information that you think should go here.
Where to buy parts:
www.newegg.com
www.tigerdirect.com
www.microcenter.com (better selection and pricing if you have a local store)
Custom built machines:
www.clockworkit.net
www.pugetsystems.com
www.digitalstormonline.com
www.falcon-nw.com
Hardware benchmarks:
www.passmark.com
www.benchmarkreviews.com
www.tomshardware.com
↧
Post pictures of your SF/entertainment setup!
↧
↧
SE/Brawl Stick Art Test... Possible?
Hey guys, new guy here. Started getting back into fighting games recently and wanted to add some art work to a few Brawl sticks that I have laying around. Got them all torn down but every time I print off a custom art that I make (From the mad catz se template) It is smaller than the sticks!
I wanted to do this before going and paying money at a fedex/kinkos if it wont fit. Just looking for some confirmation.
Am I printing them incorrectly?
Will it look fine if I use the templates but save them as PDF and take them to a kinkos?
Thanks guys.
I wanted to do this before going and paying money at a fedex/kinkos if it wont fit. Just looking for some confirmation.
Am I printing them incorrectly?
Will it look fine if I use the templates but save them as PDF and take them to a kinkos?
Thanks guys.
↧
SDTECHIN.COM (Formerly SDTEKKEN.COM Tech Area) - 2014 Project
Hello all! My name is Mark 'MarkMan' Julio!
Some of you may know me for my antics at Mad Catz and our support of the fighting game community. Some of you may NOT know that I have a dark past... it was being the webmaster/owner of SDTEKKEN, which was my playground for all things Tekken news and arcade stick/controller info that related to the FGC.
I'm bringing it back. My old info is outdated and I want to help create a resource for today's community.
For reference, you can find the old site here: http://sdtekken.wordpress.com/tech-area/arcade-sticks/
The new site will live here: http://sdtechin.com
Some of the info is being populated right now. But it is still very early.
I'm looking for some staff members that I can trust with news content, reviews, etc.
Being in the position I'm in, I won't be able to review competing products. I can offer my insight/opinion however.
My goal is to have it become a hub for arcade stick technology/culture news (including gamepads/converters, etc) and have original content such as reviews, interviews and more.
This is the soft launch right now. The official relaunch is scheduled for Feb. 2014.
My question is! What do you want to see?
Let me know.
Hopefully I'll have a finalized staff on board very soon and I can work on getting this ready faster.
↧
Seimitsu buttons Lets talk
I own a ton of Sanwa buttons played on sanwa almost exclusively. I know what sanwa is like. Initially I had something like Sanwa vs Seimitsu buttons but I saw this turning into some type of battle between Sanwa vs Seimitsu what I want to know specifically from people who use seimitsu joystick and buttons why do they like it. What do they love about seimitsu buttons / joysticks.
↧
Which Seimitsu Joystick is best-suited for SSF4 AE?
I've been wanting to just experiment with other parts and get used to modding my TE.
I tried Seimitsu buttons the other day and actually didn't like them at all compared to the nice clicky feel I get from Sanwas. Maybe they had silencers on them or something, but they just didn't feel very good.
On the other hand, I have not yet tried a Seimitsu joystick. I've heard good things about the LS-32, 40, and 58 (with a 56 spring?) but apparently all of them have an issue with the deadzone? Not completely sure, read a few threads and people seemed to mention that...
I play Ryu and would like a stick that's sensitive so that I can input motions faster (for those FADC Ultra set ups that need to be executed quickly. Not DP FADC Ultra lol)
I think the JLF has a rather large throw distance which is really inconvenient when inputting down motions. I don't know why, but the grip I use just lends itself to taking extra effort to consistently input down accurately.
Anyone who has experience with the Seimitsu joysticks, please share your knowledge :) .
↧
↧
Main differences between Myoungshin Fanta and Crown 303-FK?
Hey I am looking to swap to a true korean lever now that I have compatibility but my one main question is, how much of a difference in feel and precision is the new Crown 303-FK to the traditional Fanta?
Thanks, Corey.
Thanks, Corey.
↧
Sega Naomi help
Hey guys. I got a problem with my Sega Naomi. It isn't giving me any picture or sound even when I plugged it in directly to a PC monitor. When I plug it into Jamma via Sega I/O, I get nothing. The dipswitches are set correctly when I plug it into the Jamma (1 up; 2,3,4 down). I know the Jamma is working fine because I plugged it into my SF2WW and it works.
I am using a ATX PSU with adapters to power on the Naomi. I check the voltage for each socket and its giving me the correct or very close to the correct voltage. I replaced the 0.1F supercap and check the continuity for the 8 pin bios chip and there is signal for every one of them.
I have 2 Naomi MoBo that actually does the same thing so it must be something in my end. Any suggestions?
↧
The Super Stick Art LEVEL UP! Challenge Game 2014: 2014 Edition! - Round 1: First Round!
What's up Photoshop All-Stars and weekend warriors, GIMP'd out guerillas, MSPaint Professionals and bitmap badasses?
Time to LEVEL UP! your stick art creation game. Tired of seeing/making the same old character with boring background templates? Tired of ripping off D3V's designs and feeling proud of yourself? Need a hot, wet, slimy injection of inspiration to help bring your creativity to the next level?
Well fear no more, because:
I CHALLENGE YOU!
This is not a contest, this is a challenge. You are encouraged to provide constructive and emotional feedback to your peers. Anything from a simple "This is great!" or "I don't like it for some reason" to "I think maybe you should bring the xyz layer into a clipping mask for the thing on the right and add a style to do blah blah blah" is encouraged. After we get a sufficient amount of arts and reactions, I'll try to post the most popular ones on the first page of this thread. Time to break out your magic wands folks:
LEEEETTTT'S GEEEEETTT BUSSSYYY!!
Time to LEVEL UP! your stick art creation game. Tired of seeing/making the same old character with boring background templates? Tired of ripping off D3V's designs and feeling proud of yourself? Need a hot, wet, slimy injection of inspiration to help bring your creativity to the next level?
Well fear no more, because:
I CHALLENGE YOU!
Round 1: Create a Stick Art from a template of your choosing using only the colors BLACK and WHITE. That means no gray, no purple, no goldenrod. Straight up black and white. Two-Tone. Bi-Polar. Night and Day. That's right. Leave those Photoshop FG/BG colors on default because you only have TWO options here.
This is not a contest, this is a challenge. You are encouraged to provide constructive and emotional feedback to your peers. Anything from a simple "This is great!" or "I don't like it for some reason" to "I think maybe you should bring the xyz layer into a clipping mask for the thing on the right and add a style to do blah blah blah" is encouraged. After we get a sufficient amount of arts and reactions, I'll try to post the most popular ones on the first page of this thread. Time to break out your magic wands folks:
LEEEETTTT'S GEEEEETTT BUSSSYYY!!
↧