Hey there I am fairly new to the fighting game scene and i just recently got a Q1 fightstick and I can;t seem to find any reliable place to get custom artwork from.Does anyone know where to get some?
↧
Qanba Q1 custom art
↧
Best PS2 pad for fightan? SSF4AE (360)
So, I was planning on making a stick for a friend, but it turns out that he doesn't even want to learn how to play on stick after playing for a few months on pad. Refuses to try out my TE when I bring it over. Luckily, I had only just started planning it out so I guess I'll drop that and look for a better pad than a standard 360 pad.
I thought I'd start with PS1/PS2 pads since the DS2 is considered one of the best overall controllers. The etokki converter is also widely used as well apparently
http://etokki.com/Xtokki360
so there's that as well. I was considering a SFxT fightpad until I read that they deteriorate after 2-3 months of usage, then stumbled upon this
http://www.amazon.com/Wired-HORI-Fighting-Commander-HP3-78-Import/dp/B0034G4NPK
which is unfortunately PS3 compatible since he plays on 360.
So, any PS1/PS2 or 360-compatible pads that anyone can recommend?
↧
↧
New 2014 Seimitsu joysticks on the horizon (updated)
Seimitsu addicts alert. 2ch thread reported~
![newseimitsu.JPG]()
source link from official seimitsu website: 2014年 新作販売予定
quick translation:
These will most likely be exhibited at JAEPO 2014
Obviously there is not pictures yet, since JAEPO hasn't even happened yet.
(My) Speculations about this "LS-60" seems to favor that they are going for the feeling of that 'other' joystick. hehe. Or maybe a silent variation? mite be cool.
The Shaftcover is one of the most wanted/complained about features regarding the LS-32, seems like the finally found time to produce one. The "LS-58" is just a simple conversion for those older style cabinets which doesn't use the 5-pin harness.
now let's avoid another "this joystick" vs "that joystick" thread. just giving yall heads up on news.

source link from official seimitsu website: 2014年 新作販売予定
quick translation:
LS-32-01-S = LS-32-01 but with dedicated shaftcover - 2014.3 release
LS-32-S = Similar to LS-32, non-5pin harness microswitches, but with shaftcover design - 2014.3 release
LS-58 = Similar to LS-58-01, but with non-5pin harness microswitches - 2014.2 release
LS-60 = New model joystick with softer input sense than LS-58. - 2014.4 release
These will most likely be exhibited at JAEPO 2014
Obviously there is not pictures yet, since JAEPO hasn't even happened yet.
(My) Speculations about this "LS-60" seems to favor that they are going for the feeling of that 'other' joystick. hehe. Or maybe a silent variation? mite be cool.
The Shaftcover is one of the most wanted/complained about features regarding the LS-32, seems like the finally found time to produce one. The "LS-58" is just a simple conversion for those older style cabinets which doesn't use the 5-pin harness.
now let's avoid another "this joystick" vs "that joystick" thread. just giving yall heads up on news.
↧
Saulabi modding tutorial
Sup everyone.
This is a guide that I've been asked about and meaning to upload for awhile by many people, and I finally got the time to post a guide for everyone trying to put in quality parts in their Saulabi sticks. I used a Saulabi 4K for the PS3/PC for this guide, but this modding tutorial applies to all Saulabi sticks. General Saulabi information can be found in the Saulabi thread.
In this guide, I will be replacing the stock stick with a Taeyoung Fanta stick and the stock buttons with Crown CWB203A buttons. The linked images are example pictures, and the actual stick and buttons I used for the mod are black.
It should be pointed out that Saulabi sticks follow the Korean universal joystick mounting specs, and thus any Korean stick can be used as the replacement just as easily as the Taeyoung Fanta stick that was used in the guide.
The guide can also be applied to the wooden sticks that can be found at stick.pe.kr, which is pretty much identical to Saulabi but just in a wooden case.
To start off the tutorial, here's a list of tools I recommend for this mod.
-Soldering iron
-Solder sucker (either the pump type or the bulb type is fine)
-Phillips screw driver
-Flathead screw driver
-Long nose plier
Now onto the photos
Fresh out of the box
![2455026931_050dff819a.jpg]()
The stock buttons, where most of the work is needed
![2455855056_3224267bbb.jpg]()
To open the case, you need to first turn the stick over
![2455027029_26a1bd7ed3.jpg]()
Use a flathead screw driver as leverage and remove the rubber feet
![2455027081_25f44e4a8e.jpg]()
Rubber feet pulled out
![2455027145_4db088f697.jpg]()
You now have access to the screws that hold the case together
![2455027185_4c6c9f80d2.jpg]()
Take off the bottom case and you'll see the guts of the stick
![2455027229_a24c636fe7.jpg]()
First thing you should do is to unscrew and disconnect the stock joystick so that you can lay the stick flat on a surface. Now would be a good time to plug in your soldering iron for the next step
![2455855362_c580f84a64.jpg]()
You will need to remove these solder blobs from the buttons
![2455027313_8989b35890.jpg]()
This is my solder sucker that I used to suck up those solder blobs
![2455027361_e9b8cbacda.jpg]()
1 button done. In order to remove solder blobs, you need to melt those solder blobs with the soldering iron and suck up the solder with the solder sucker. This requires both of your hands to be free, and that's why it's important to remove the joystick so that you can lay down the top panel of the stick flat on a surface.
![2455855518_ba08689ced.jpg]()
Do the same for the rest of the buttons. Be careful not to heat up those buttons' soldering spots for too long, as that can lift the soldering spot/trace from the PCB. 4 seconds from the moment of melt is a good limit
![2455027481_a9cb15e8e7.jpg]()
Now gently lift the PCB away from the buttons, and you will get this view. When you are trying to lift the PCB, there will be a couple of buttons that still have small amount of solder holding the button and the PCB together, so use your soldering iron to melt those points as you lift the PCB and you should be able to remove the PCB from the buttons in no time. Again, be gentle and don't try to use force to pull out the PCB since these are single sided PCBs and their traces can be lifted with forceful pulling.
![2455027531_ce00dab1ba.jpg]()
Take those stock buttons out!
![2455027575_b8690ffed9.jpg]()
The new parts that will occupy the Saulabi, Crown CWB203A buttons and Taeyoung Fanta stick
![2455027629_543288333b.jpg]()
Before you put in the Crown buttons into the top panel, you need to bend the Crown CWB203A's pins as shown in the photo by using a long nose plier to make them fit through the much more adjacent solder spots for the buttons on the PCB. Be slow and patient when you bend the pins and don't over bend them as you can break the pins off. The ends of the pins, once bent, should be as close to each other as the stock buttons. This does require some practice before you get good at it and not break off pins by bending too much too quickly, but I decided to do this method anyway, since it's the easiest way to mod the buttons by far and requires no wires. Once all the pins are bent, put in the buttons. The arrows on the bottom of the button should be pointing straight up and down.
![2455027663_a7cd9b9366.jpg]()
Align the Crown buttons' pins through the PCB like so
![2455855784_6cd3c2291e.jpg]()
Solder those buttons up. Again, don't heat up the solder spots/button pins for more than 4 seconds max. If you heat up the button pins for too long, you could melt the microswitch's mechanism inside.
![2455027773_ba505e0260.jpg]()
Check to make sure that you didn't accidentally desolder circuit components while working with the soldering iron
![2455855894_7b6251103d.jpg]()
Put in your new stick and screw it down with a phillips screw driver
![2455027889_20fd19da1b.jpg]()
Plug in the QDs for the stick. The ground chain (black wire) should be connected to 1 of the 2 tabs on each microswitch, and each directional wire should be connected to the other tab on its respective microswitch. The wire color for left is yellow, right is red, up is white, and down is orange.
![2455027939_bf5ef70d70.jpg]()
Screw the top panel and the bottom back together and it's done! Just in case someone confuses this shot with the unmodded default shot, this is the modded stick. I probably should've used a different color scheme from the stock parts to make it easier to distinguish, for Powerful Game.
![2455856034_919774b4ee.jpg]()
Finished shot from a different angle.
![2455028019_7651ab6926.jpg]()
These photos are originally 640x480, so if you wanna look at slightly bigger sizes of the same photos, you can see them at my Saulabi 4K mod flickr set.
The reason why I decided to mod the buttons the way I did above is because it doesn't require any wires, and offers the cleanest innards compared to other methods that could be used. The downside is that you can mess up perfectly good buttons if you break off the pins on the CWB203A buttons while bending them. On my first try out of the 10 buttons, I broke off a pin on 2 buttons (you can still solder wires to the broken pins and use them though).
Let me know if I'm missing anything and I'll add it to the tutorial.
I might add how to mod the wooden sticks as well. I just need to show how to open and close the case and the rest of the mod is the same.
I haven't figured out a clean and sturdy way to mod with CWB203C (screw-in type) buttons yet. It requires soldering wires to all the buttons, but I really don't like stripping and tinning wires, so this will have to wait a bit unless someone already has a good method.
I hope it helped. :-)
This is a guide that I've been asked about and meaning to upload for awhile by many people, and I finally got the time to post a guide for everyone trying to put in quality parts in their Saulabi sticks. I used a Saulabi 4K for the PS3/PC for this guide, but this modding tutorial applies to all Saulabi sticks. General Saulabi information can be found in the Saulabi thread.
In this guide, I will be replacing the stock stick with a Taeyoung Fanta stick and the stock buttons with Crown CWB203A buttons. The linked images are example pictures, and the actual stick and buttons I used for the mod are black.
It should be pointed out that Saulabi sticks follow the Korean universal joystick mounting specs, and thus any Korean stick can be used as the replacement just as easily as the Taeyoung Fanta stick that was used in the guide.
The guide can also be applied to the wooden sticks that can be found at stick.pe.kr, which is pretty much identical to Saulabi but just in a wooden case.
To start off the tutorial, here's a list of tools I recommend for this mod.
-Soldering iron
-Solder sucker (either the pump type or the bulb type is fine)
-Phillips screw driver
-Flathead screw driver
-Long nose plier
Now onto the photos
Fresh out of the box

The stock buttons, where most of the work is needed

To open the case, you need to first turn the stick over

Use a flathead screw driver as leverage and remove the rubber feet

Rubber feet pulled out

You now have access to the screws that hold the case together

Take off the bottom case and you'll see the guts of the stick

First thing you should do is to unscrew and disconnect the stock joystick so that you can lay the stick flat on a surface. Now would be a good time to plug in your soldering iron for the next step

You will need to remove these solder blobs from the buttons

This is my solder sucker that I used to suck up those solder blobs

1 button done. In order to remove solder blobs, you need to melt those solder blobs with the soldering iron and suck up the solder with the solder sucker. This requires both of your hands to be free, and that's why it's important to remove the joystick so that you can lay down the top panel of the stick flat on a surface.

Do the same for the rest of the buttons. Be careful not to heat up those buttons' soldering spots for too long, as that can lift the soldering spot/trace from the PCB. 4 seconds from the moment of melt is a good limit

Now gently lift the PCB away from the buttons, and you will get this view. When you are trying to lift the PCB, there will be a couple of buttons that still have small amount of solder holding the button and the PCB together, so use your soldering iron to melt those points as you lift the PCB and you should be able to remove the PCB from the buttons in no time. Again, be gentle and don't try to use force to pull out the PCB since these are single sided PCBs and their traces can be lifted with forceful pulling.

Take those stock buttons out!

The new parts that will occupy the Saulabi, Crown CWB203A buttons and Taeyoung Fanta stick

Before you put in the Crown buttons into the top panel, you need to bend the Crown CWB203A's pins as shown in the photo by using a long nose plier to make them fit through the much more adjacent solder spots for the buttons on the PCB. Be slow and patient when you bend the pins and don't over bend them as you can break the pins off. The ends of the pins, once bent, should be as close to each other as the stock buttons. This does require some practice before you get good at it and not break off pins by bending too much too quickly, but I decided to do this method anyway, since it's the easiest way to mod the buttons by far and requires no wires. Once all the pins are bent, put in the buttons. The arrows on the bottom of the button should be pointing straight up and down.

Align the Crown buttons' pins through the PCB like so

Solder those buttons up. Again, don't heat up the solder spots/button pins for more than 4 seconds max. If you heat up the button pins for too long, you could melt the microswitch's mechanism inside.

Check to make sure that you didn't accidentally desolder circuit components while working with the soldering iron

Put in your new stick and screw it down with a phillips screw driver

Plug in the QDs for the stick. The ground chain (black wire) should be connected to 1 of the 2 tabs on each microswitch, and each directional wire should be connected to the other tab on its respective microswitch. The wire color for left is yellow, right is red, up is white, and down is orange.

Screw the top panel and the bottom back together and it's done! Just in case someone confuses this shot with the unmodded default shot, this is the modded stick. I probably should've used a different color scheme from the stock parts to make it easier to distinguish, for Powerful Game.

Finished shot from a different angle.

These photos are originally 640x480, so if you wanna look at slightly bigger sizes of the same photos, you can see them at my Saulabi 4K mod flickr set.
The reason why I decided to mod the buttons the way I did above is because it doesn't require any wires, and offers the cleanest innards compared to other methods that could be used. The downside is that you can mess up perfectly good buttons if you break off the pins on the CWB203A buttons while bending them. On my first try out of the 10 buttons, I broke off a pin on 2 buttons (you can still solder wires to the broken pins and use them though).
Let me know if I'm missing anything and I'll add it to the tutorial.
I might add how to mod the wooden sticks as well. I just need to show how to open and close the case and the rest of the mod is the same.
I haven't figured out a clean and sturdy way to mod with CWB203C (screw-in type) buttons yet. It requires soldering wires to all the buttons, but I really don't like stripping and tinning wires, so this will have to wait a bit unless someone already has a good method.
I hope it helped. :-)
↧
Xbox One PadHack Thread - Calling the goons "Toodles, Gummowned, Phreak and You" Do it for the Kids
Making the thread so we can combine our efforts and do this as soon as we can. I am going to try to get my hands on a controller asap.
P.S. This may be a little early but..... the people need this. Also missed Team tech talk, sup. If you are a big dog around here, please reply below, I only know OG's
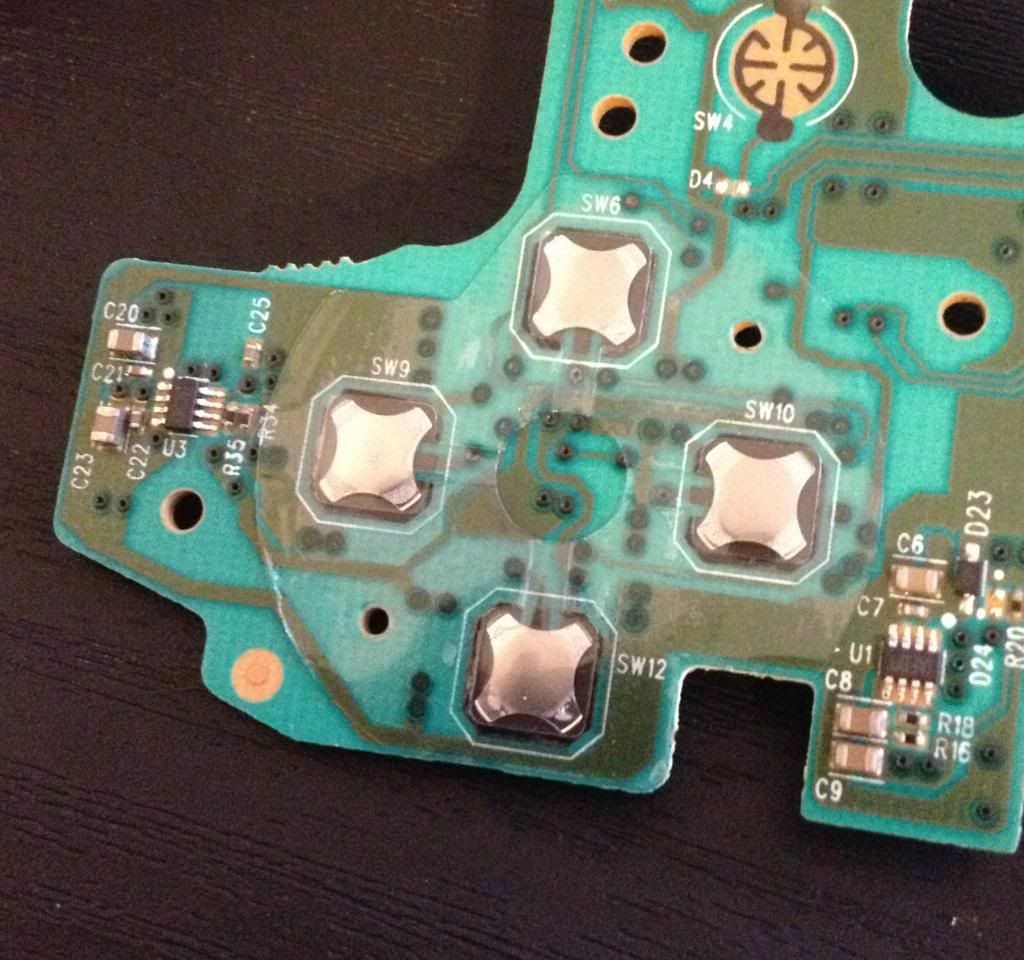
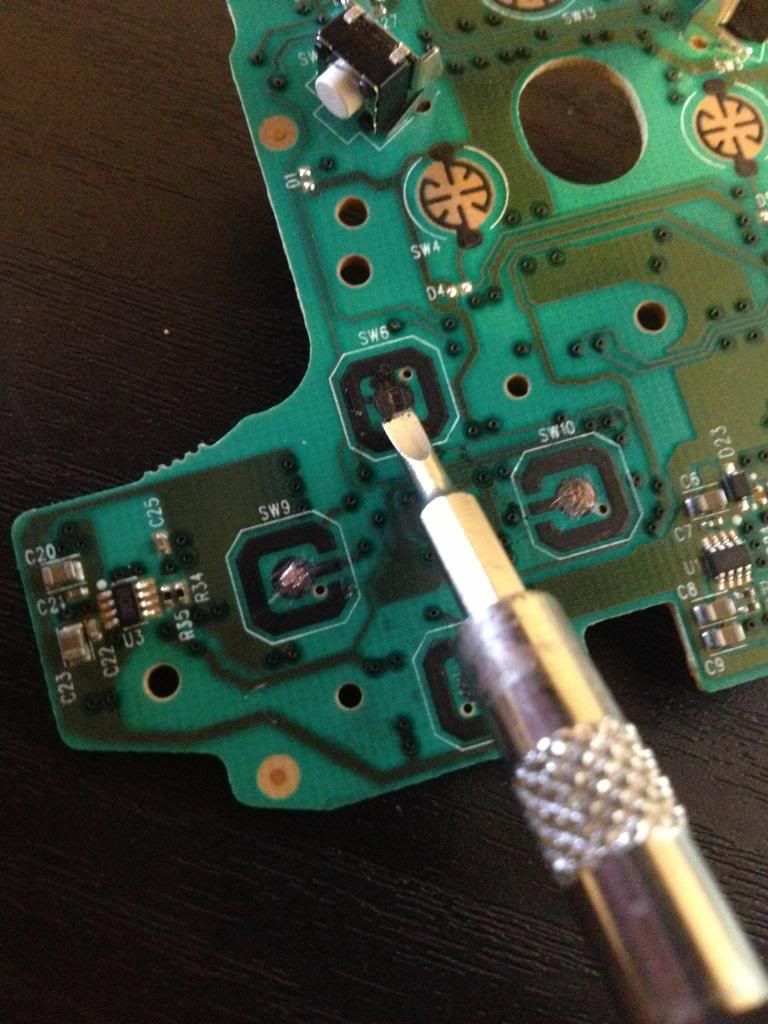
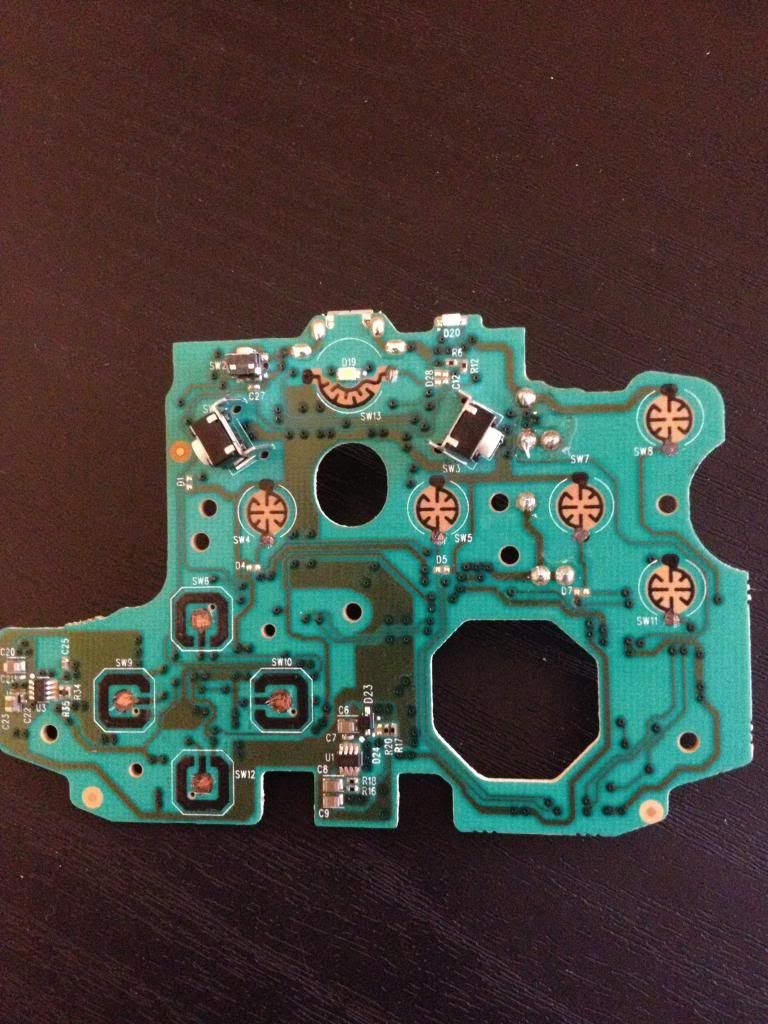
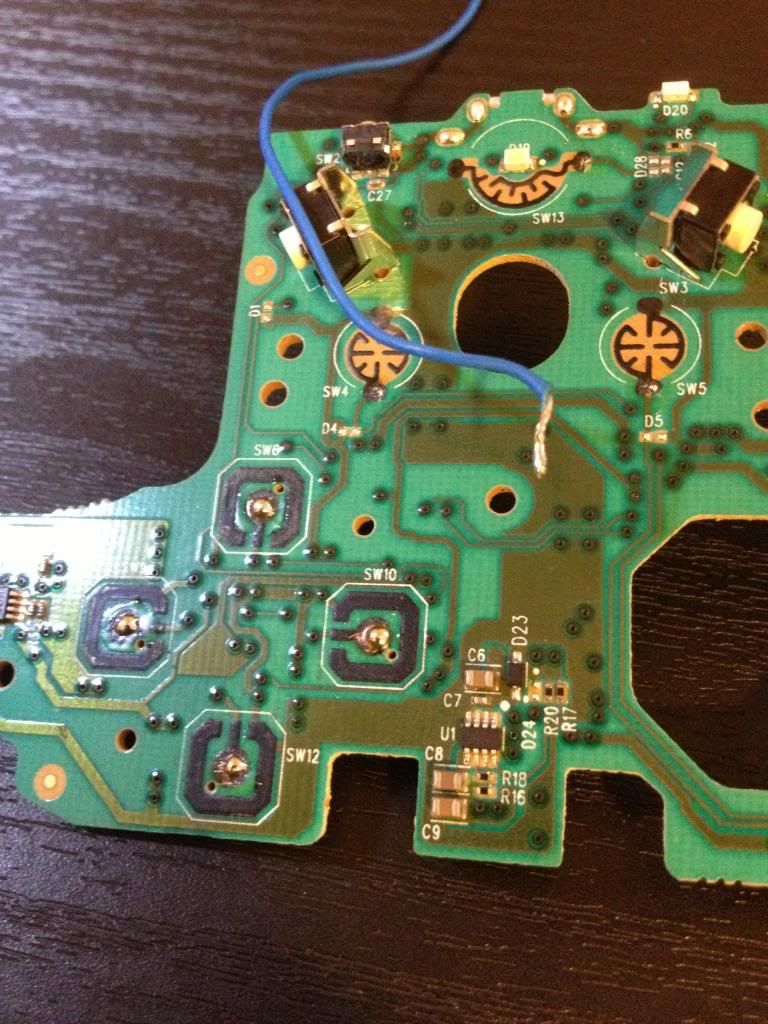
JUST WANT TO THANK EVERYONE FOR THEIR AWESOME WORK. HERE IS AN AWESOME PCB PINOUT GUIDE BY CHAOTIC MONK(Great Job!)
P.S. This may be a little early but..... the people need this. Also missed Team tech talk, sup. If you are a big dog around here, please reply below, I only know OG's
JUST WANT TO THANK EVERYONE FOR THEIR AWESOME WORK. HERE IS AN AWESOME PCB PINOUT GUIDE BY CHAOTIC MONK(Great Job!)
ChaoticMonk wrote: »Heres an attempt to consolidate the thread into a guide.
If your new to padhacking, highly recommend reading this as it goes over a lot of it http://www.slagcoin.com/joystick/pcb_wiring.html
Before you begin, test the controller out and make sure all the inputs work. Last thing you'd want to do is void it and later discover its a dud.
Start off by removing the boards from inside the pad as done in this vid (you can stop watching at 6:26).
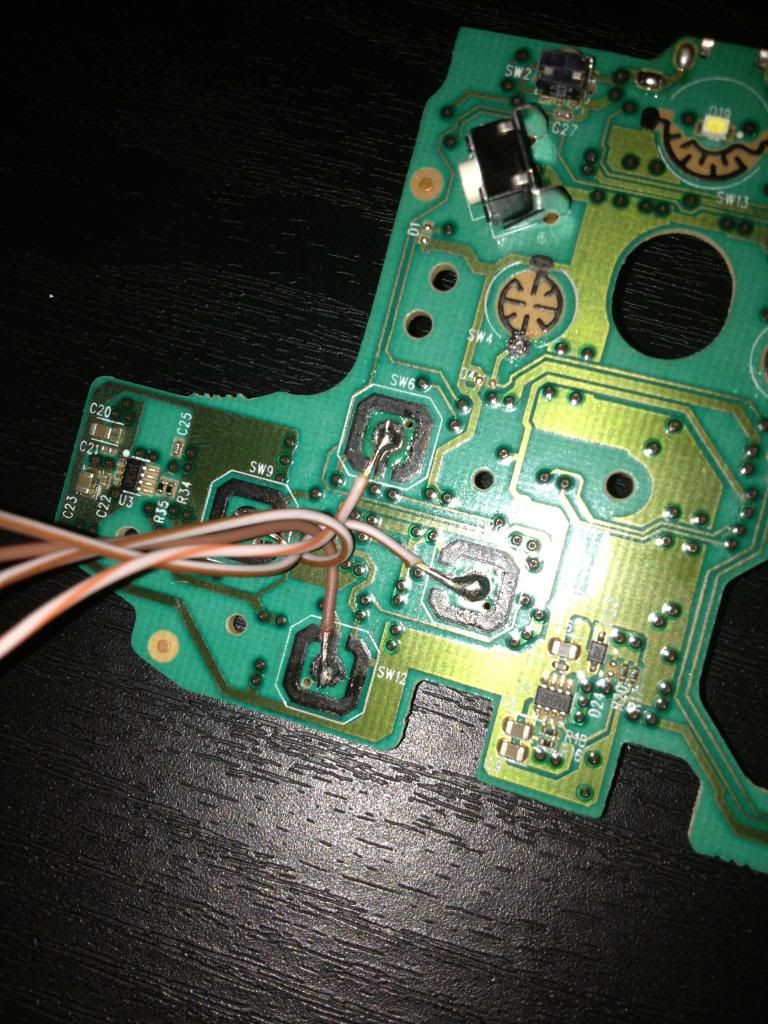
You'll be left with 2 PCBs shown below with the spots you'll be connecting too (optionally you could connect to the pins shown but can be difficult due to close proximity)
On Top Board Topside you'll notice a 'sticker' on the dpad.
You'll want to use something thin and sharp to lift an edge then you should be able to just peel it off.
Gently and carefully scrape off the black stuff at the signal points till you see shiny metal (careful not to scrap too much or you could take off the contact point).
keep going on all the signal points till you have shiny metal visible and ready for tinning.
Tin (apply small amount of solder) the signal points and wires. Can be made easier with the use of flux
Solder the wires to the signal points (put tinned wire against tinned signal point, apply heat and they should join together)
You'll want to apply a dab of hot glue to the wire next to each solder to stop it from moving around and potentially breaking off.
When connecting the triggers (RT & LT), you'll need to use a 100ohm resistor
(img credit MacabreMonster)
The two analog cubes can be left on the board or taken off and replaced with resistors.
If leaving on the board simply cut down the grey analog pole that sticks out of the cube and while making sure its centered, apply hot glue to keep it in place.
(img credit socks)
If removing, you'll need to replace with 4 resistors (10k ohm recommended).
There'll be 2 sets of 3 points. You'll need to connect a resistor from each of the outer points to the center point.
Once you have everything wired up your ready to add to your stick. The rest depends on what your setup is.
If your just doing an Xbone stick then its just a matter of connecting the wires to the button/stick and feeding a micro usb cable through.
(img credit MacabreMonster)
If adding to an existing setup with other boards you'll either want to use a seperate usb cable for xbone and leave the existing usb for your current setup
or you'll need to add a switch to determine where the usb should go (could be an actual switch or an Imp board).
Just make sure every board has power (VCC) and ground connected to it or you'll run into issues with buttons pressing by themselves.
Good luck!


 (img credit
  (img credit
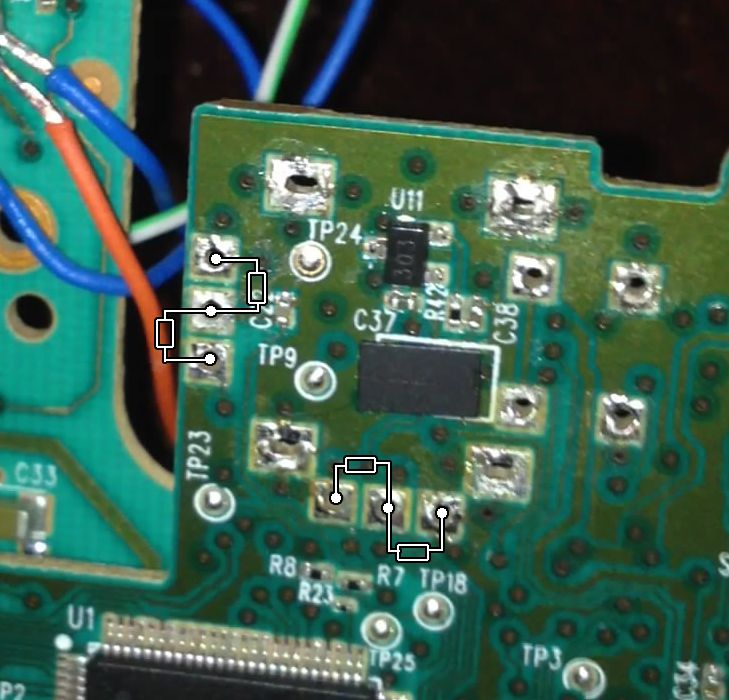
 (img credit
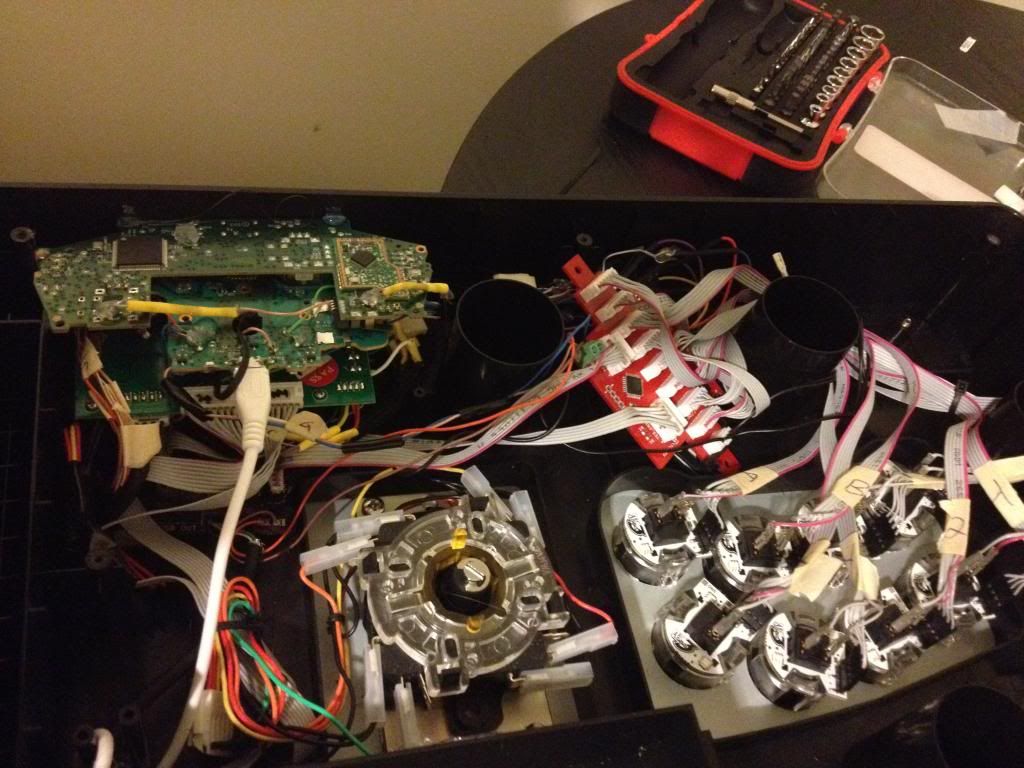
↧
↧
What octo gate should I buy for a Mad Catz Arcade FightStick PRO (Xbox 360)
I'm looking at this: http://www.amazon.com/gp/aw/d/B00FC1UHMI
I want to swap out the square gate for an octo, but I'm not sure which of to to get. Is this http://www.amazon.com/gp/aw/d/B004AU0H4U/ref=pd_aw_sims_1?pi=SY115 compatible?
If not, which one is? If it is compatible, will I have to do any drilling in order to make it fit? I'm pretty new at this.
I want to swap out the square gate for an octo, but I'm not sure which of to to get. Is this http://www.amazon.com/gp/aw/d/B004AU0H4U/ref=pd_aw_sims_1?pi=SY115 compatible?
If not, which one is? If it is compatible, will I have to do any drilling in order to make it fit? I'm pretty new at this.
↧
How do I customize my Soul Calibur V Hori Fightstick
I just got my fighstick & I want to change the art label. I seen a ton of websites but the stuff you have to do is way too complicated for me, they even expect you to change the stick & the buttons for it.
The art label that I want to customize is my main & favorite Skullgirls character, Cerebella. I love Skullgirls & Cerebella. (I also play Marvel vs Capcom 2, Ultimate Marvel vs Capcom 3 & Street Fighter 3 for the Xbox 360, I don't have BlazBlue: Continuum Shift Extend & I'm planning on getting Persona 4 Arena soon) All I want to do is remove the art template/label & replace that art label so that my fightstick will have Cerebella instead of the Soul Calibur V characters.
Please, is there an easier way for me to do this without having to do 20 steps or more. I just want to customize the art label, not the stick & the buttons.![photo.php?fbid=507954869221233&set=a.445019202181467.124911.100000201728510&type=3&theater]()
http://www.facebook.com/photo.php?fbid=507954869221233&set=a.445019202181467.124911.100000201728510&type=3&theater
The art label that I want to customize is my main & favorite Skullgirls character, Cerebella. I love Skullgirls & Cerebella. (I also play Marvel vs Capcom 2, Ultimate Marvel vs Capcom 3 & Street Fighter 3 for the Xbox 360, I don't have BlazBlue: Continuum Shift Extend & I'm planning on getting Persona 4 Arena soon) All I want to do is remove the art template/label & replace that art label so that my fightstick will have Cerebella instead of the Soul Calibur V characters.
Please, is there an easier way for me to do this without having to do 20 steps or more. I just want to customize the art label, not the stick & the buttons.
http://www.facebook.com/photo.php?fbid=507954869221233&set=a.445019202181467.124911.100000201728510&type=3&theater
↧
The Official Qanba Fightstick Thread (Page 60,"Defender" QanBa Fighting Stick backpack released now)
Hello everyone:
My name is Xianglong, QANBA's marketing manager. I'm making this thread the official QANBA thread. We will use this thread to release any new informations and to answer any questions regarding to our QANBA fightsticks. Mean while, any advices or complains can also be bosted at this thread. You are more than welcome to give us your valuable opinions.
In order to meet gamers' needs, we will constantly enhance and improve our fightsticks. Our goal is to provide extreme gaming enviroments to arcade gamers. Enjoy your game, Enjoy QANBA. We hope you like our fightsticks!
"Defender" QanBa Fighting Stick backpack
April 2013
•Fits most modern joystick models up to 19 inches long
•Hemp-style durable fabric
•Detachable plush felt interior liner
•Dual snap-buckles for easy access
•Triple auxiliary zipper pockets
•Dual water bottle stretch pockets
•25 x 15 x 8 inches
![2013415165213188.JPG]()
![2013415165221717.JPG]()
![2013415165232220.JPG]()
![201341516539435.JPG]()
![2013415165326671.JPG]()
![2013415165513845.JPG]()
QANBA New Q1
•Products compatible systems compatible PS3 console, computers, automatic identification procedures
•Computer, no drivers, computer systems automatically identify connection, plug and play
•Use QANBA latest motherboard, support firmware upgrade
•PC/PS3 mode to support joystick bursts bursts need to meet the specific game
•Product added hidden closing box design, increasing the portable performance
•Re-define the the START key bit position, and function keys are embedded design to prevent the occurrence of misuse
•The back of the product design a removable fixture kit, more accurate operation
•State have folders without folder, the stick provides two operating angle selection. On the table at the same time there folder (placed in use) angle can adjust their own size
![2012921153329996.JPG]()
![2012921153355711.JPG]()
![2012921153417495.JPG]()
![2012921183210843.JPG]()
QanBa Q2PRO
2012-5-18
Q2PRO Product Description:
The QanBa Q2pro is a quality arcade fight stick that uses top of the range Sanwa parts and is compatible with PlayStation 3 & PC. This QanBa Q2PRO is also compatible with left hand play joystick or right hand play joystick. Function control panel below buttons , Hidden carrying handle ,Firmware upgrade .It is very easy to mod, should you wish to change the joystick/buttons etc.
Q2PRO standard edition:Straight layout
Q2PRO Professional edition :Vewlix layout
![201251817361550.jpg]()
![201251817378186.jpg]()
· Hidden carrying handle
![2012518174013385.jpg]()
· USB Port (support PS3 USB Headset ,PS3 USB Keyboard)
![201251817386129.jpg]()
· compatible with left hand play joystick or right hand play joystick
![201251817396183.jpg]()
QanBa Q4
2012-2-28
QanBa Q4 eLivePro|Kindevu
![2012222172312964.jpg]()
QanBa Q4 eLivepro|RF
![2012222172348656.jpg]()
QanBa Q4 eLivepro|D44BAS
![2012222173712769.jpg]()
2011-11-25
Q4 RAF ICE RED 3in1 coming
clear red case
![20111119144451225.jpg]()
clear red handle
![20111119144846407.jpg]()
sanwa clear buttons
![20111119144952149.jpg]()
2011-11-12
Qanba stick Bag
![201111317124458.jpg]()
![2011113171230450.jpg]()
2011-8-28
Q4 RAF 3in1 (white)
![2011811174921632.jpg]()
Q4 RAF 3in1 ice blue 6 button( Artwork design: MINSK, Germany )
![2011811175232583.jpg]()
2011-7-10
Q4 RAF ICE-BLUE FOR PC release 10th July 2011 in China
![20117914279519.jpg]()
clear plexi
easy replace artwork
![201179141054759.jpg]()
sanwa joystick and sanwa buttons(OBSF-30DB,OBSF-24DB)
![201179181525196.jpg]()
Seimitsu joystick and PS-14-KN,OBSF-24
![201179181543603.jpg]()
blue translucent case
easy change joystick or buttons
![201179141027639.jpg]()
Sample 3D Artwork
![20117914170643.gif]()
2011-3-18
Q4 RAF 3in1 will release 28th March 2011 in China
![201131818311224.jpg]()
![2011318183152551.jpg]()
2011-2-21
![37380_1298105390KT3z.jpg]()
2011-1-18
![201111801713477.jpg]()
![20101227173410629.jpg]()
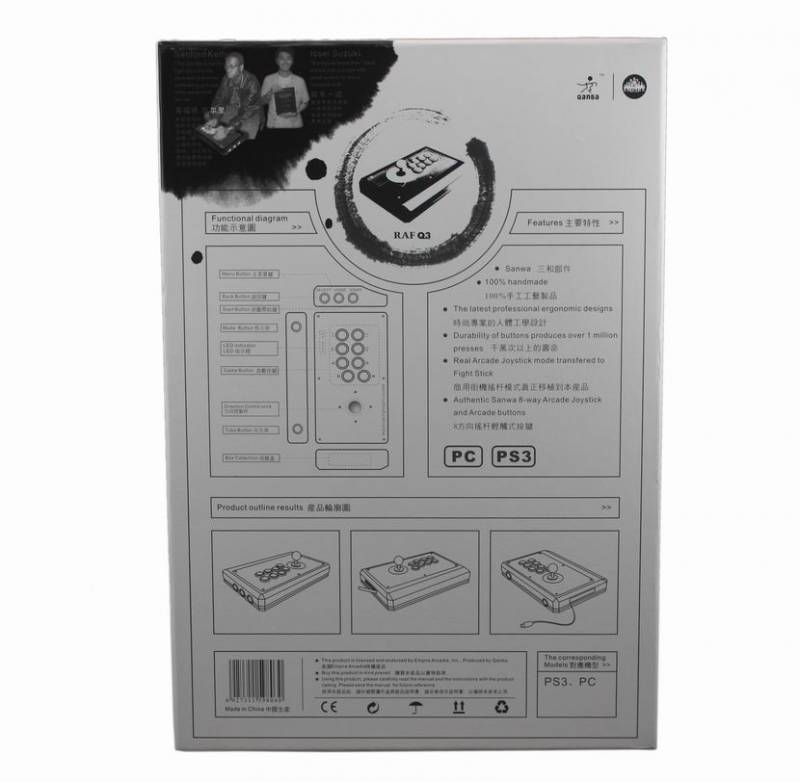
Q3 Wired Fightstick Q3 QanBa-Empire(For PS3/PC 2in1) Will Listing
![IMG_4248.jpg]()
![IMG_4238.jpg]()
![IMG_4241.jpg]()
![IMG_4240.jpg]()
![IMG_4216.jpg]()
![IMG_4214.jpg]()
Q3 Wired Fightstick Q3-XS(For XBOX360) Will Listing
Q3 Wired Fightstick Q3-XS(For XBOX360)
![201062701043964.jpg]()
![201062701215585.jpg]()
![IMG_4225.JPG]()
![201062702425642.jpg]()
QanBa 3 PS3/PC 2in1 wireless joystick will listing
Sample Pics
![IMG_3738.jpg]()
![IMG_3732.jpg]()
![IMG_3723.jpg]()
![IMG_3728.jpg]()
![IMG_3735.jpg]()
My name is Xianglong, QANBA's marketing manager. I'm making this thread the official QANBA thread. We will use this thread to release any new informations and to answer any questions regarding to our QANBA fightsticks. Mean while, any advices or complains can also be bosted at this thread. You are more than welcome to give us your valuable opinions.
In order to meet gamers' needs, we will constantly enhance and improve our fightsticks. Our goal is to provide extreme gaming enviroments to arcade gamers. Enjoy your game, Enjoy QANBA. We hope you like our fightsticks!
"Defender" QanBa Fighting Stick backpack
April 2013
•Fits most modern joystick models up to 19 inches long
•Hemp-style durable fabric
•Detachable plush felt interior liner
•Dual snap-buckles for easy access
•Triple auxiliary zipper pockets
•Dual water bottle stretch pockets
•25 x 15 x 8 inches


QANBA New Q1
•Products compatible systems compatible PS3 console, computers, automatic identification procedures
•Computer, no drivers, computer systems automatically identify connection, plug and play
•Use QANBA latest motherboard, support firmware upgrade
•PC/PS3 mode to support joystick bursts bursts need to meet the specific game
•Product added hidden closing box design, increasing the portable performance
•Re-define the the START key bit position, and function keys are embedded design to prevent the occurrence of misuse
•The back of the product design a removable fixture kit, more accurate operation
•State have folders without folder, the stick provides two operating angle selection. On the table at the same time there folder (placed in use) angle can adjust their own size


QanBa Q2PRO
2012-5-18
Q2PRO Product Description:
The QanBa Q2pro is a quality arcade fight stick that uses top of the range Sanwa parts and is compatible with PlayStation 3 & PC. This QanBa Q2PRO is also compatible with left hand play joystick or right hand play joystick. Function control panel below buttons , Hidden carrying handle ,Firmware upgrade .It is very easy to mod, should you wish to change the joystick/buttons etc.
Q2PRO standard edition:Straight layout
Q2PRO Professional edition :Vewlix layout


· Hidden carrying handle

· USB Port (support PS3 USB Headset ,PS3 USB Keyboard)

· compatible with left hand play joystick or right hand play joystick

QanBa Q4
2012-2-28
QanBa Q4 eLivePro|Kindevu

QanBa Q4 eLivepro|RF

QanBa Q4 eLivepro|D44BAS

2011-11-25
Q4 RAF ICE RED 3in1 coming
clear red case

clear red handle

sanwa clear buttons

2011-11-12
Qanba stick Bag


2011-8-28
Q4 RAF 3in1 (white)

Q4 RAF 3in1 ice blue 6 button( Artwork design: MINSK, Germany )

2011-7-10
Q4 RAF ICE-BLUE FOR PC release 10th July 2011 in China

clear plexi
easy replace artwork

sanwa joystick and sanwa buttons(OBSF-30DB,OBSF-24DB)

Seimitsu joystick and PS-14-KN,OBSF-24

blue translucent case
easy change joystick or buttons

Sample 3D Artwork

2011-3-18
Q4 RAF 3in1 will release 28th March 2011 in China


2011-2-21

2011-1-18


Q3 Wired Fightstick Q3 QanBa-Empire(For PS3/PC 2in1) Will Listing


Q3 Wired Fightstick Q3-XS(For XBOX360) Will Listing
Q3 Wired Fightstick Q3-XS(For XBOX360)


QanBa 3 PS3/PC 2in1 wireless joystick will listing
Sample Pics


↧
Help please, TE2 for xbone to ps3...
I did some searching, but what exactly do I need to get my xbone te2 to be compatible on my PS3?
Thanks guys
Thanks guys
↧
↧
Sanwa JLF with Link installed Problem
Hey guys, I recently installed a Link on my stock TE and I noticed that it now has a huge deadzone. I've tried it with and without the 2nd dust washer, and it feels the same.
I can move the stick quite bit before it engages any of the switches. I'm not sure what the problem is... it's beginning to get really frustrating. If it makes a difference, I'm using a bat top (sacrilege, I know).
Please help!
I can move the stick quite bit before it engages any of the switches. I'm not sure what the problem is... it's beginning to get really frustrating. If it makes a difference, I'm using a bat top (sacrilege, I know).
Please help!
↧
looking for a shop to buy Push Buttons , Sticks , Panels etc..........
hi srk members , i am looking for a online shop to get Push Buttons , Sticks , Panels etc..........
i am currently a AkihabaraShop.jp customer but im unhappy lately as ive read some others mentioning on shmups forum the same situation im having that is late shipping after ordering , i have a order atm that hasnt been shipped in over 7 weeks.
so yeah im looking to move on to something with better service , also i want something that has great shipping options like EMS/DHL/FEDEX/UPS and no fake parts !
chat soon
↧
MadCatZ PS3 TE FightStick: PC - Xp- vista- win7 32-64bit (read 1st post)
guide for users having trouble with The PS3 TE/SE and there PC's
tips
also if you run into problems try disconnecting other usb devices and try plug the stick in to the actual usb port.
if using a hub try plugging it in directly onto your computer
Note:
please play around with your usb connections do not plug the TE into any sort of hub.
having discovered not all chipsets support the ps3 TE/Se this is what you can do if your PS3 TE/SE does not work.
the PS3 TE is only compatible with UHCI (Universal Host Controller Interface), which is an Intel originated proprietary standard and far from universal. Any knowledgeable and experienced engineer developing a USB device knows and fully understands the differences between the various USB standards:
UHCI - USB 1.1 Proprietary Intel Standard
OHCI - USB 1.1 Open Standard
EHCI - USB 2.0 Open Standard
inorder to use you have to have a UHCI (Universal Host Controller Interface), i can personally recommend via chipsets as this was my solution and all that has bought pci cards with the via chipset have reported that it works.
ok guys,
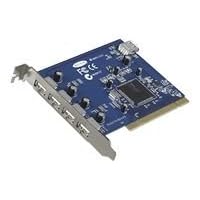
i bought 2 pci cards because my nvidia chipset on my motherboard , was not registering button presses, or joystick movement, however it sees the stick.
pci card 1, belkin 4 5 port pci, nec chip on the board (presumming its a nec chipset), same as before sees the stick does not register.
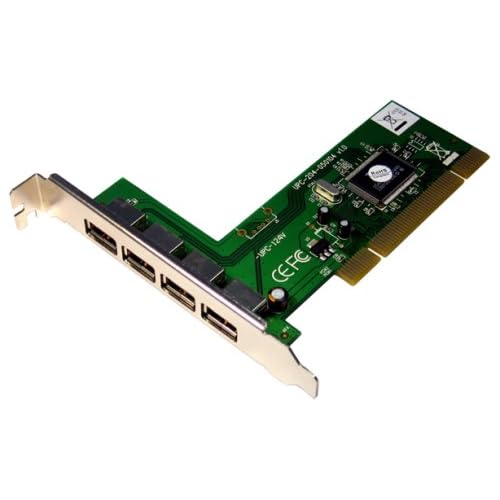
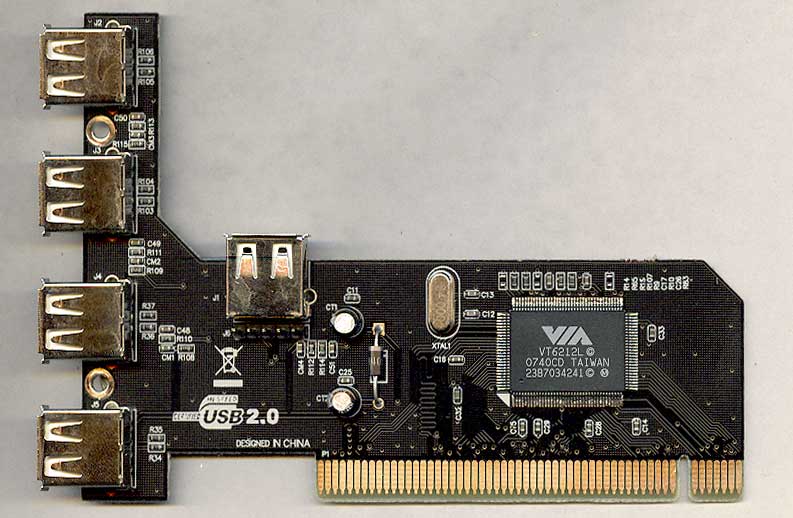
![21h3jb94BKL._SL500_AA200_.jpg]()
Pci card 2, cheap brand (maxvalue), via chip on the board (presumming its a via chipset), sees the stick and yes the buttons work ok.
![41yR9j5gMXL._SS500_.jpg]()
so i have got it working at last and yes the problem lays within what chipset you are trying to plug the stick into, nvidia is not working from what users have posted before, i can say that the belkin nec chip PCI usb card is also not working, and possibly ati chipsets also.
this is the pci card that is working for me
http://www.amazon.co.uk/Max-Value-Port-Card-Only/dp/B000TV7GFC/ref=cm_cr_pr_product_top
and it is cheap
unlucky for me i boght a more exspensive brand and it didnt work
http://www.amazon.co.uk/Belkin-USB-Hi-Speed-5-Port-Card/dp/B000K7UN82/ref=cm_cr_pr_product_top
please also note, that the stick while working does not like a USB hub i have and needs to be plugged into the socket directly,as it dont register inputs through the hub i have.
[
![teworking.jpg]()
Good luck guys
updated to cut alot of the confusion here is the solution
also works with SFIV for pc, no need to configure keys everything is mapped just fine.
tip for all look at the via chipset, make sure this chip is on what ever usb device you purchase
![VIA-VT6212L.jpg]()
tips
also if you run into problems try disconnecting other usb devices and try plug the stick in to the actual usb port.
if using a hub try plugging it in directly onto your computer
Note:
please play around with your usb connections do not plug the TE into any sort of hub.
having discovered not all chipsets support the ps3 TE/Se this is what you can do if your PS3 TE/SE does not work.
the PS3 TE is only compatible with UHCI (Universal Host Controller Interface), which is an Intel originated proprietary standard and far from universal. Any knowledgeable and experienced engineer developing a USB device knows and fully understands the differences between the various USB standards:
UHCI - USB 1.1 Proprietary Intel Standard
OHCI - USB 1.1 Open Standard
EHCI - USB 2.0 Open Standard
inorder to use you have to have a UHCI (Universal Host Controller Interface), i can personally recommend via chipsets as this was my solution and all that has bought pci cards with the via chipset have reported that it works.
ok guys,
i bought 2 pci cards because my nvidia chipset on my motherboard , was not registering button presses, or joystick movement, however it sees the stick.
pci card 1, belkin 4 5 port pci, nec chip on the board (presumming its a nec chipset), same as before sees the stick does not register.
Pci card 2, cheap brand (maxvalue), via chip on the board (presumming its a via chipset), sees the stick and yes the buttons work ok.
so i have got it working at last and yes the problem lays within what chipset you are trying to plug the stick into, nvidia is not working from what users have posted before, i can say that the belkin nec chip PCI usb card is also not working, and possibly ati chipsets also.
this is the pci card that is working for me
http://www.amazon.co.uk/Max-Value-Port-Card-Only/dp/B000TV7GFC/ref=cm_cr_pr_product_top
and it is cheap
unlucky for me i boght a more exspensive brand and it didnt work
http://www.amazon.co.uk/Belkin-USB-Hi-Speed-5-Port-Card/dp/B000K7UN82/ref=cm_cr_pr_product_top
please also note, that the stick while working does not like a USB hub i have and needs to be plugged into the socket directly,as it dont register inputs through the hub i have.
[

Good luck guys
updated to cut alot of the confusion here is the solution
also works with SFIV for pc, no need to configure keys everything is mapped just fine.
tip for all look at the via chipset, make sure this chip is on what ever usb device you purchase
↧
Astro City due to arrive!
Hi guys,
im pretty new here and have been reading various posts for info for some time.
im approx 3 weeks from receiving a reconditioned astro city. im 37 but feel like a 10 year old on christmas eve! I am buying it from Neo Legend in france - seem pretty cool guys who answered any question i threw at them (although pretty basic questions it was refreshingly assuring!)
my question is..... is there anything i should be aware of when i receive this system? things i need to double check?
(im going to have to dismantle it due to it being around 3cm too wide for the upstairs door - not good, so any tips on this are very much welcome!)
cant wait - after around 25 years of playing various versions of street fighter and always striving for the best set-up, im about to have the ultimate! (IMO)
Gary
↧
↧
UD-CPS2: Fully Consolized Capcom Play System 2
Introduction -
Alright, folks, here it is, a fully consolized CPS2. And when I say fully consolized I don't mean with some monstrous external power supply and DB 15 connectors that require custom joysticks or adapters. I'm talking about a setup where everything is "off the shelf."
The core elements of this project are: Power, Video, and Controls:
Power - Internal DC/DC converter. An off the shelf laptop charger supplies this board with power which is then converted to proper voltages necessary to run everything inside.
Video - [NTSC] Composite, S-Video, and low resolution RGB+S (no Component). Uses a standard off the shelf Playstation A/V port cable.
Controls - 2 Player XBOX 360 and PS3 controller support. Yes, you just plug and play.
Photos of one of my prototypes:
![th_DSC07928.jpg]()
![th_DSC07925.jpg]()
![th_DSC07923.jpg]()
![th_DSC08337.jpg]()
![th_DSC08335.jpg]()
Location Tests -
Devastation 2011 - Phoenix, AZ (early prototype, hard-wired controls)
![th_DSC07913.jpg]()
EVO 2012 - Las Vegas, NV (prototype, XBOX 360 support)
![th_DSC08205.jpg]()
AIAB This is It! 2012 - Tucson, AZ (prototype, PS3 & XBOX 360 support)
![th_DSC08316.jpg]()
ST Games @ EVO 2013 - Las Vegas, NV (production, PS3 & XBOX 360 support)
![th_DSCF0417_zpsb1535561.jpg]()
F.A.Q. -
Ordering:
General:
Video Related:
Controller Related:
Spinoff Products -
For those of you looking to add XBOX 360 and PS3 controller support to your own superguns, I will be making discrete USB Decoders, soon. There's a dedicated thread for those here:
http://forums.shoryuken.com/discussion/186701/undamned-s-usb-decoders-usb-to-jamma-etc/p1
I will also be making available the internal DC/DC converter used in the UD-CPS2 so people can use those in their own consolization/supergun projects! When those are available, I will update this post with a link to a separate thread.
The rest of this thread is a work log from early in the project up to the present...
Alright, folks, here it is, a fully consolized CPS2. And when I say fully consolized I don't mean with some monstrous external power supply and DB 15 connectors that require custom joysticks or adapters. I'm talking about a setup where everything is "off the shelf."
The core elements of this project are: Power, Video, and Controls:
Power - Internal DC/DC converter. An off the shelf laptop charger supplies this board with power which is then converted to proper voltages necessary to run everything inside.
Video - [NTSC] Composite, S-Video, and low resolution RGB+S (no Component). Uses a standard off the shelf Playstation A/V port cable.
Controls - 2 Player XBOX 360 and PS3 controller support. Yes, you just plug and play.
Photos of one of my prototypes:


Location Tests -
Devastation 2011 - Phoenix, AZ (early prototype, hard-wired controls)
EVO 2012 - Las Vegas, NV (prototype, XBOX 360 support)

AIAB This is It! 2012 - Tucson, AZ (prototype, PS3 & XBOX 360 support)

ST Games @ EVO 2013 - Las Vegas, NV (production, PS3 & XBOX 360 support)

F.A.Q. -
Ordering:
Spoiler:
Q: What am I getting exactly?
A: You will receive a modified system (CPS2 A Board), power adapter (100-240V AC), video cable (Composite & S-Video), and USB cable for future firmware updates to the controller interface. You will still need a game (CPS2 B Board), TV (CRT with S-Video recommended), and controller (X360 or PS3).
Q: Can I pre-order one of these now?
A: Yes! I have not opened an official sales thread, but for the time being you can send me a PM or e-mail me: udgametech [AT] gmail.com
Q: So, how does ordering work, exactly?
A: Just let me know that you want to order a system and I will respond with an order number and an estimated time to complete it. When your order is being built, I will send you a payment request, after which you will have 2 weeks to make payment or forfeit your order position.
Q: How much does shipping cost?
A: It depends on which country you live in. USA is $20. Other countries vary.
Q: What forms of payment do you take?
A: This also depends on which country you live in. USA: PayPal (shipping only to verified address), money order, bank transfer, or personal check. Other countries: bank transfer or money order.
Q: I already have an A Board. Can I save money on my order and just send you mine?
A: Yes. You can receive $30 off of your order for each A-board sent (you can send multiple). However, you are not guaranteed to receive the exact board you sent (it is difficult to keep track of who sent what when they are disassembled in batches). Two other reasons to send me an A Board would be 1.) you would like an ASIA/Grey or SA/Orange compatible system, or 2.) you want an absolutely mint condition A Board and you happen to have one.
Q: I already have a laptop power supply. Can I save money on my order and just use mine?
A: No. I'd rather you start with a setup that has already been guaranteed to work than spend any time trying to figure out why power supply x isn't working properly.
General:
Spoiler:
Q: What region/color B Board (Game Cartridge) will run on the UD-CPS2?
A: The standard compatibility for the UD-CPS2 is US/Blue and JP/Green (and RENTAL/Yellow, as far as I know). If one desires to play ASIA/Grey or SA/Orange games, a custom order can be placed for a unit which is compatible with (only!) one of those.
Q: Will this still work on an arcade cabinet?
A: No. Even if the JAMMA connector were exposed, there are still technical reasons for it not being able to run both ways.
Video Related:
Spoiler:
Q: I'm tired of lugging around a heavy CRT TV to gatherings/tournaments. Being able to hook this up to a monitor would be a huge convenience. Is there any way to have Component Video available for this?
A: Not natively. You could run the UD-CPS2's RGBS output through an RGB to Component transcoder (like this) to output 240p Component Video, but any HD monitor (that actually supports 240p) must upscale that resolution in order to display it. Upscaling inevitably adds lag to your setup, therefore (non-HD) CRTs are the lag free display of choice for this system.
Q: I would like to stream/capture video from this unit. Do you have a recommended setup?
A: In the realm of standard resolution, the highest video quality for the least amount of hardware headache is certainly S-Video. By simply running S-Video and Stereo Audio to a distribution amplifier (like this or CE Labs AV 400SV) you can run both the player setup and stream/capture setup at excellent quality with fairly little extra hardware/cabling.
Q: Will this output PAL video?
A: No. There are no immediate plans to add PAL support.
Controller Related:
Spoiler:
Q: Will all PS3 and XBOX 360 controllers work with UD-CPS2?
A: This cannot be guaranteed, but based on location testing, it certainly works with the majority. Also, the controller interface firmware can be updated via USB, so future firmware updates may expand controller support as more data is gathered.
Q: Can USB controllers other than XBOX 360 & PS3 be used?
A: No. I'd like to add support for other controller types in the future, though.
Q: Can buttons be re-mapped?
A: Yes, all buttons except for START and SELECT are able to be mapped to any one of the 6 Punch/Kick buttons.
Q: Can directions be re-mapped?
A: No.
Spinoff Products -
For those of you looking to add XBOX 360 and PS3 controller support to your own superguns, I will be making discrete USB Decoders, soon. There's a dedicated thread for those here:
http://forums.shoryuken.com/discussion/186701/undamned-s-usb-decoders-usb-to-jamma-etc/p1
I will also be making available the internal DC/DC converter used in the UD-CPS2 so people can use those in their own consolization/supergun projects! When those are available, I will update this post with a link to a separate thread.
The rest of this thread is a work log from early in the project up to the present...
↧
How much is the FightStick Tournament Edition S - Black worth?
I got this like 4 years ago and am wondering how much it's worth. I haven't played fighters in a long ass time. I want to sell this locally. It seems like sellers are asking for prices higher than the original price.
Condition is lightly used, probably used less than 20 times. Box is in acceptable condition signs of wearing. Unfortunately, I don't have any pictures at the moment because I'm not at home.
http://www.amazon.com/Street-Fighter-Arcade-FightStick-Tournament-Edition/dp/B0038KL292
THANKS!
Condition is lightly used, probably used less than 20 times. Box is in acceptable condition signs of wearing. Unfortunately, I don't have any pictures at the moment because I'm not at home.
http://www.amazon.com/Street-Fighter-Arcade-FightStick-Tournament-Edition/dp/B0038KL292
THANKS!
↧
Chimp smd+ supergun controller.
I want to wire my xbox stick that's dual modded with a chimp smd for use with my supergun. I initially thought the original modder soldered the wires to the chimp, but he didn't. He used the screw terminals. Will it be fine run wires for the db15 port into the screw terminal along side the wires already in there?
↧
The Optical Joystick Discussion
I thought it would be pretty cool to start a thread dedicated to the discussion of optical joysticks. These include:
- The Happ/WICO Perfect 360 joystick
- The Sanwa JLHS-8Y FLASH 1 joystick
- The ASCII Answer (Optical) joystick
as well as recent reproductions:
- Toodles' Spark
- Rollie Electronics and Happ Controls' reproduction FLASH 1
What is an optical joystick and why should I care?
What's so great about optics? Well, the beauty of optical joysticks is that unlike their microswitch counterparts, there's not a single component on the PCB that moves. That means as long as you're not running these things out-of-spec, they'll last a really long time. The optical joysticks invented thus far have required +5V power to power their sensors and LEDs. All 5 sticks listed above have however been successfully installed onto PlayStation 1 and 2 era sticks without much of a hitch. This would normally be an issue since PS1 and PS2 PCBs output at only +3.3V.
All of the original joysticks been out of production for a long time. The Sanwa HS-ASSY FLASH 1 PCB was discontinued in 2006; the old WICO Perfect 360s have been out of production for maybe a decade (someone fact check me on this) and the ASCII optical joysticks were just hard to find to begin with. So, needless to say, if you want an original, you're going to have to prepare a chunk of cash to get it.
HOWEVER, do not be mistaken that just because they're reproductions that Toodles' Spark or Rolllie's FLASH 1 are any worse. They are reproductions, but they are based on the same design principles and standards that original optical joystick PCBs work on. They will work the exact same.
Where can I buy an optical joystick?
As stated, if you're looking to get an original optical joystick, be prepared to get some cash on hand because depending on which joystick you want, you're going to have to spend a LOT of cash. Here are some figures regarding the average going rate I've seen for these joysticks here on SRK's Trading Outlet:
WICO Perfect 360: $100.00 +/- $20.00
Sanwa JLHS-8Y FLASH 1: $200.00 (!) +/- $20.00
ASCII Answer (Optical): $120.00 +/- $20.00
And here's the price for the reproduction optical PCBs:
Toodles' Spark: $55.00 + shipping
Rollie's FLASH 1: To be determined
Except for the newer production Happ Perfect 360s, which you can get commonly from LizardLick for $39.95 plus shipping and handling, every other optical joystick ever made is out of production. Go figure why they're so sought after; the last time people were able to get an optical joystick for reasonable prices was around in 2006!
If you are a fan of American parts you can still get a Happ Perfect 360 joystick from places like LizardLick. Just be aware that the newer Happ Perfect 360 joysticks are manufactured by Happ in their factories in China and the first batches of P360s have had issues with various aspects of the build; pivot grinding issues, diagonals not registering, and other issues have been noticed in the newer P360s (none of these reported issues have anything to do with the optics. If there were any optics issues, it's because you're not powering your joystick properly).
However, that was a few years ago when Happ first made the switch to their China factories. Today, their P360s are mostly issue free, though WICO P360 owners will tell you the new P360s "Just don't feel the same." You can get a newer Happ P360 for around $40.00 USD from LizardLick, but for a WICO P360, you're going to need to do a bit of hunting for them and shell out some more cash. I've seen WICO P360s go for around $120.00 here on SRK. The easiest way to tell if it was made by WICO or Happ is to look at the bottom of the joystick. If it was made by WICO, it will have "WICO" written on the bottom. If Happ, it will say "HAPP P360." There have been some cases where some people got a P360 without any writing on the bottom at all, and it's mostly been assumed that these are WICO P360s, but just be sure to ask.
If you are fan of Japanese parts and are looking to use an optical joystick, looking for an ASCII Answer (Optical) is probably your best bet. They're incredibly good in terms of build quality and you can find them for significantly cheaper than a Sanwa FLASH 1. Of course, you typically won't find them sold as just the joystick. The ASCII Answer is pretty elusive only because when you look for any possible ASCII joystick that might have them, people are worried about whether the stick they're buying actually has an optical joystick since ASCII did manufacture sticks with microswitch joysticks. This detailed post by jdm714 however helps us out a lot. It covers the 6 ASCII sticks ever produced that used an optical joystick along with giving us the Japanese katakana for the joystick so that if you're feeling ambitious, you can hunt for them on Japanese auction sites.
Wiring up the ASCII Answer is a bit odd since it does not use a standard connector for its directions, voltage line, or ground. All we get with it is the wires that were attached to the original ASCII PCB. But courtesy of our encyclopedic resource, jdm714, we have a diagram for those who want to wire one up into another stick.
![madcatzasciiwire.png]()
The colors correspond to each of the wires on the ASCII Answer PCB. Depending on whether you are using a Dreamcast or PlayStation 1 era ASCII Answer, your wire coloring may vary. This post by jdm714 tells of all the known color schemes so far:
Alternatively, you can purchase a reproduction optical PCB to install into your Sanwa JLF in your stick of choice. The first contender is made by our resident PCB wizard, Toodles.
You might some PlayStation 1 era ASCII Answers had a purple wire (image courtesy of fujifilm, linked to by jdm714) instead of blue! But they wire up just the same. Bear in mind the diagram does not mean the ASCII Answer can exclusively be installed in a Mad Catz Arcade FightStick or with a Mad Catz PCB. It's just a reference diagram. It can be easily installed in any stick you want.
What about those reproductions? Resident PCB wizard Toodles has himself designed and manufactured an optical PCB designed for use in a Sanwa JLF joystick called the Spark. You can order one of these from his site. These are very reliable PCBs and are a very cost-effective solution if you want to try out an optical joystick for yourself.
Recently as well, Rollie Electronics in partnership with Happ Controls has begun reproducing the original FLASH 1 optical PCB designed for the Sanwa JLF joystick. I won't go into details, but you can find more information in their thread here:
http://shoryuken.com/forum/index.php?threads/the-original-flash1-is-back-a-product-review.151531/
Anyways, enough background information. I'd like to propose the following discussion question:
What should we dub the ASCII optical joystick?
The term "ASCII Optical" is certainly easy to remember and is definitely precise enough for people to understand what you're talking about, but (it might be just me) I feel that it's very boring sounding. Happ/Wico had their "Perfect 360" bit going, a name signifying the perfection in movement that their optical joystick gave to the player. Sanwa's FLASH 1 had a reference to light in the name, and is almost synonymous with the phrase "High-Speed Response."
So what about ASCII? I personally think that we should dub it the "ASCII Answer" for two reasons:
1) It was, after all, ASCII's own "answer" to Sanwa's optical joystick.
2) For the deep, psychological part of the name, the term "answer" refers to how the ASCII optical joystick shall always be there to "answer" to whatever request you may make of it.
I dunno though; I thought my own attempt was pretty lame so let's get talking about the ASCII's new name or anything else optical.
Have at it gentlemen!
- The Happ/WICO Perfect 360 joystick
- The Sanwa JLHS-8Y FLASH 1 joystick
- The ASCII Answer (Optical) joystick
as well as recent reproductions:
- Toodles' Spark
- Rollie Electronics and Happ Controls' reproduction FLASH 1
What is an optical joystick and why should I care?
What's so great about optics? Well, the beauty of optical joysticks is that unlike their microswitch counterparts, there's not a single component on the PCB that moves. That means as long as you're not running these things out-of-spec, they'll last a really long time. The optical joysticks invented thus far have required +5V power to power their sensors and LEDs. All 5 sticks listed above have however been successfully installed onto PlayStation 1 and 2 era sticks without much of a hitch. This would normally be an issue since PS1 and PS2 PCBs output at only +3.3V.
All of the original joysticks been out of production for a long time. The Sanwa HS-ASSY FLASH 1 PCB was discontinued in 2006; the old WICO Perfect 360s have been out of production for maybe a decade (someone fact check me on this) and the ASCII optical joysticks were just hard to find to begin with. So, needless to say, if you want an original, you're going to have to prepare a chunk of cash to get it.
HOWEVER, do not be mistaken that just because they're reproductions that Toodles' Spark or Rolllie's FLASH 1 are any worse. They are reproductions, but they are based on the same design principles and standards that original optical joystick PCBs work on. They will work the exact same.
Where can I buy an optical joystick?
As stated, if you're looking to get an original optical joystick, be prepared to get some cash on hand because depending on which joystick you want, you're going to have to spend a LOT of cash. Here are some figures regarding the average going rate I've seen for these joysticks here on SRK's Trading Outlet:
WICO Perfect 360: $100.00 +/- $20.00
Sanwa JLHS-8Y FLASH 1: $200.00 (!) +/- $20.00
ASCII Answer (Optical): $120.00 +/- $20.00
And here's the price for the reproduction optical PCBs:
Toodles' Spark: $55.00 + shipping
Rollie's FLASH 1: To be determined
Except for the newer production Happ Perfect 360s, which you can get commonly from LizardLick for $39.95 plus shipping and handling, every other optical joystick ever made is out of production. Go figure why they're so sought after; the last time people were able to get an optical joystick for reasonable prices was around in 2006!

If you are a fan of American parts you can still get a Happ Perfect 360 joystick from places like LizardLick. Just be aware that the newer Happ Perfect 360 joysticks are manufactured by Happ in their factories in China and the first batches of P360s have had issues with various aspects of the build; pivot grinding issues, diagonals not registering, and other issues have been noticed in the newer P360s (none of these reported issues have anything to do with the optics. If there were any optics issues, it's because you're not powering your joystick properly).
However, that was a few years ago when Happ first made the switch to their China factories. Today, their P360s are mostly issue free, though WICO P360 owners will tell you the new P360s "Just don't feel the same." You can get a newer Happ P360 for around $40.00 USD from LizardLick, but for a WICO P360, you're going to need to do a bit of hunting for them and shell out some more cash. I've seen WICO P360s go for around $120.00 here on SRK. The easiest way to tell if it was made by WICO or Happ is to look at the bottom of the joystick. If it was made by WICO, it will have "WICO" written on the bottom. If Happ, it will say "HAPP P360." There have been some cases where some people got a P360 without any writing on the bottom at all, and it's mostly been assumed that these are WICO P360s, but just be sure to ask.
If you are fan of Japanese parts and are looking to use an optical joystick, looking for an ASCII Answer (Optical) is probably your best bet. They're incredibly good in terms of build quality and you can find them for significantly cheaper than a Sanwa FLASH 1. Of course, you typically won't find them sold as just the joystick. The ASCII Answer is pretty elusive only because when you look for any possible ASCII joystick that might have them, people are worried about whether the stick they're buying actually has an optical joystick since ASCII did manufacture sticks with microswitch joysticks. This detailed post by jdm714 however helps us out a lot. It covers the 6 ASCII sticks ever produced that used an optical joystick along with giving us the Japanese katakana for the joystick so that if you're feeling ambitious, you can hunt for them on Japanese auction sites.
Spoiler:
jdm714, post: wrote:For PlayStation
ASCII Stick 3 (?????????3)
ASCII Stick Zero 3 (?????????ZERO3)
ASCII Stick Justice (????????? ??????)
For Dreamcast
ASCII Stick FT (?????????FT)
ASCII Stick FT Special: SNK Version (?????????FT SP SNK?????)
ASCII Stick FT Special: Capcom Version (?????????FT SP ?????????)
Wiring up the ASCII Answer is a bit odd since it does not use a standard connector for its directions, voltage line, or ground. All we get with it is the wires that were attached to the original ASCII PCB. But courtesy of our encyclopedic resource, jdm714, we have a diagram for those who want to wire one up into another stick.

The colors correspond to each of the wires on the ASCII Answer PCB. Depending on whether you are using a Dreamcast or PlayStation 1 era ASCII Answer, your wire coloring may vary. This post by jdm714 tells of all the known color schemes so far:
jdm714, post: wrote:Dreamcast has colors going Green, Brown, Gray, Yellow.
PlayStation has the colors going Green, Orange, Blue, Yellow.
The colors are different, but they are the same as diagrammed.
Alternatively, you can purchase a reproduction optical PCB to install into your Sanwa JLF in your stick of choice. The first contender is made by our resident PCB wizard, Toodles.
You might some PlayStation 1 era ASCII Answers had a purple wire (image courtesy of fujifilm, linked to by jdm714) instead of blue! But they wire up just the same. Bear in mind the diagram does not mean the ASCII Answer can exclusively be installed in a Mad Catz Arcade FightStick or with a Mad Catz PCB. It's just a reference diagram. It can be easily installed in any stick you want.
What about those reproductions? Resident PCB wizard Toodles has himself designed and manufactured an optical PCB designed for use in a Sanwa JLF joystick called the Spark. You can order one of these from his site. These are very reliable PCBs and are a very cost-effective solution if you want to try out an optical joystick for yourself.
Recently as well, Rollie Electronics in partnership with Happ Controls has begun reproducing the original FLASH 1 optical PCB designed for the Sanwa JLF joystick. I won't go into details, but you can find more information in their thread here:
http://shoryuken.com/forum/index.php?threads/the-original-flash1-is-back-a-product-review.151531/
Anyways, enough background information. I'd like to propose the following discussion question:
What should we dub the ASCII optical joystick?
The term "ASCII Optical" is certainly easy to remember and is definitely precise enough for people to understand what you're talking about, but (it might be just me) I feel that it's very boring sounding. Happ/Wico had their "Perfect 360" bit going, a name signifying the perfection in movement that their optical joystick gave to the player. Sanwa's FLASH 1 had a reference to light in the name, and is almost synonymous with the phrase "High-Speed Response."
So what about ASCII? I personally think that we should dub it the "ASCII Answer" for two reasons:
1) It was, after all, ASCII's own "answer" to Sanwa's optical joystick.
2) For the deep, psychological part of the name, the term "answer" refers to how the ASCII optical joystick shall always be there to "answer" to whatever request you may make of it.
I dunno though; I thought my own attempt was pretty lame so let's get talking about the ASCII's new name or anything else optical.
Have at it gentlemen!

↧
↧
Anyone know where I can get the rubber Contact part for the Madcatz Fightpads?
Hello everybody. The piece I had got broken and I really don't want to buy a whole new controller. I will really appreciate the help!
↧
how do fit two 22 guage wires on a .110 quick disconnect
I just got the .110 quick disconnect for my sanwa obsf 30 buttons, but I don't know how to fit two wires on the same quick disconnect, is there a way to bend this out??
↧
The Official Post your Arcade Cabinet Thread!!
I figured we need a place for everyone to post their Arcade Cabinets. Custom Built, MAME Machines, Cocktails, Straight from the arcade, Whatever!!!
I've seen some really nice cab's here, but it's hard to find them all.
I'll start.
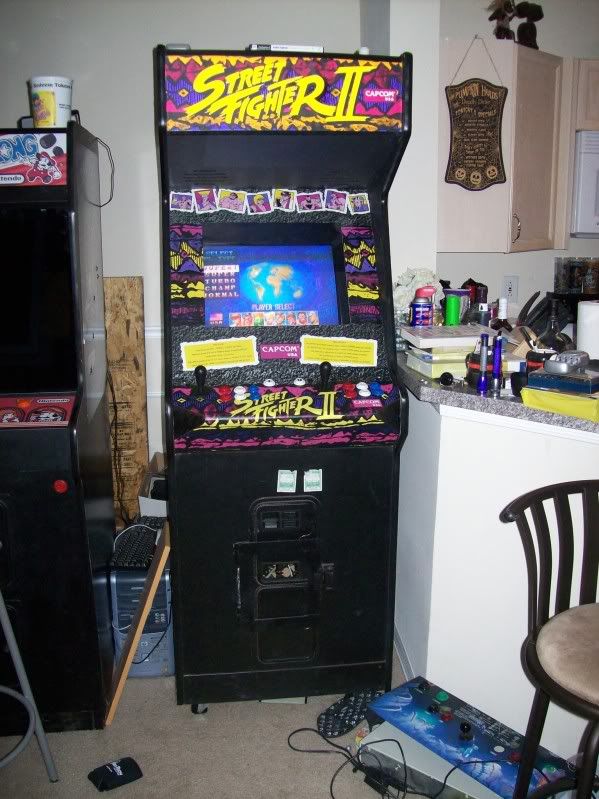
![101_0996-1.jpg]()
This is my Dynamo 20" Street Fighter 2 Cab. Currently houses a PS2 with hacked DS1 pads under the CP.
![101_0985.jpg]()
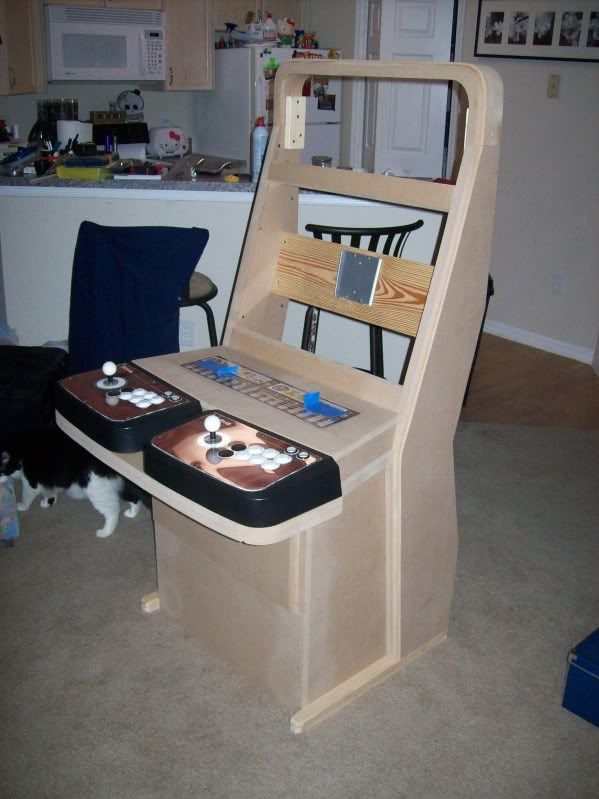
Up next is my Current WIP. It's a vewlix style cab using T5's as a CP. This should be done in a few weeks.
![101_0874.jpg]()
Last is my MAME setup. Usually going for high scores in Donkey Kong. Had to build the CP from scratch. Pretty Stoked about how it came out.
Alright all, let's see some Cabs!!!
I've seen some really nice cab's here, but it's hard to find them all.
I'll start.
This is my Dynamo 20" Street Fighter 2 Cab. Currently houses a PS2 with hacked DS1 pads under the CP.
Up next is my Current WIP. It's a vewlix style cab using T5's as a CP. This should be done in a few weeks.
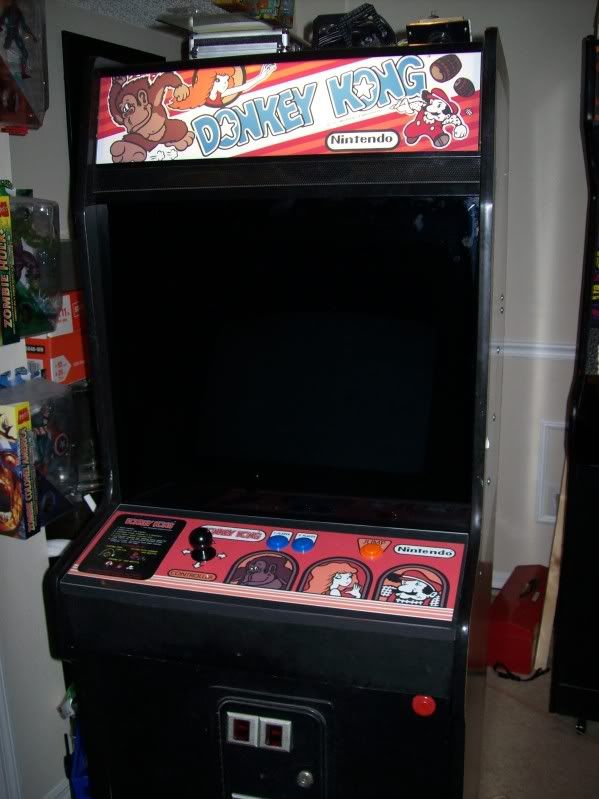
Last is my MAME setup. Usually going for high scores in Donkey Kong. Had to build the CP from scratch. Pretty Stoked about how it came out.
Alright all, let's see some Cabs!!!
↧