I'm wondering if there is a way to upgrade my eightaec fusion so I can use it on my Xbox one. I know there is that thing I can buy to plug in any controller. Just wondering if there was any fight stick hardware I can install, as i have to replace the joy stick anyways. Thanks.
↧
Fight stick upgrades?
↧
The Crossbone, Xbox One padhack with minimal effort.
The Crossbone is designed to allow the user to padhack an Xbox One first party controller with ease, eliminating >90% of the soldering and work and replacing it with a near plug and play experience.
It's very simple, unhook the original top board of the connected PCBs, and replace it with the Crossbone. All of your normal input points are then broken out, including a micro USB connector for easy incorporation to your set up.

Top Side

Bottom Side
The connector is placed at a right angle to the PCB, this allows for minimal space usage, even with bulky connectors. There is also 0.1" pitch solder points if you want to directly tie into the lines if it's easier or better suited for your application.
The Crossbone also comes equipped with an on-board signal switcher so that 2 cables, or an external switching mechanism, are not needed. It defaults to the Xbox One, so if you don't need it you don't have to worry about it. However to utilize it you simply attach the "SYS. 2" solder points to your second system of choice, and the "Switch" signal to whichever button you want to control this function:
Switch signal grounded = SYS. 2
Switch signal left alone = Xbox 1
You can access the USB signals for all areas, including the ones after the signal switch if you need more advanced applications or need to debug an issue.
The Crossbone also comes equipped with a front end protection diode, meaning you can't reverse the voltage on the main input, which should keep any accidental power swaps from destroying the board.


The board also contains spots for trigger fix resistors, in case you accidentally wreck the Hall Effect sensors while soldering the triggers, which are 2 of the 3 required solder points.

Installation
Step 1.
Remove the power board from the Xbox One controller PCBs, and connect the Crossbone in it's place. Note that it makes things easy if you look in between the two boards when doing this as the Crossbone's headers do NOT have plastic shrouding to help with alignment. This is because the headers on the Xbox One's PCB are proprietary and no others have this matching material. Just take your time and when you have it aligned, press together.


Step 2.
Solder small wires to the required points, which are B, LT, and RT.
More details on soldering to these points can be found here:
http://forums.shoryuken.com/discussion/184953/xbox-one-padhack-thread-calling-the-goons-toodles-gummowned-phreak-and-you-do-it-for-the-kids/p1
RT and LT can be difficult for new users, and technically you can solder directly to the Hall Effect sensor's pin, but it ensures part longevity if you solder after the resistor and capacitor pair noted in the diagrams and thread. The Crossbone does NOT have a 100 Ohm inline resistor on-board.


Step 3.
Solder the other ends to the corresponding points on the Crossbone, LT/4k IN, RT3K IN, and B/2K IN

That's it! now you can connect the broken out points however you choose. The 3.5mm positions are easy to solder to, but will probably be offered as screw terminals as an add-on order, since not everyone wants them and they add extra height. Likewise the 20P header spot is a direct plug and play for the PS360+ PCB, but does requires that a 20P header be soldered to the PS360+ since it's not there by default. I'm looking into ways to help avoid doing that, but soldering a 20P header is very quick work even for someone with so-so abilities.

This is the older version as you can see, but works for now as a reference to the attachments.
I screwed up the triggers by pulling off the sensors!

Don't worry, if you can still attach to the trace somewhere, the Crossbone has you covered.
Step 1. Grab a high Ohm resistor, such as a 4.7k or 10k ohm.

Step 2. Solder it into place where the "Trigger Fix" is designated. The left and right side of the board denote LT and RT, respectively.


Extra fun stuff
The Crossbone also comes equipped with circuitry to handle the LEDs, both the Home LED and IR LEDs. They are denoted in the 3.5mm screw terminal area by HO LED and IR LED, respectively. The resistors are already on-board, so the only thing you need to do is connect the anode to VCC and the cathode to the LED control point. This allows you to place the LEDs that might be beneficial to you wherever you choose, so place the Home LED externally on your stick, or route the IR LEDs to the front of it if you want to take advantage of the Xbox One's player recognition.
Fun fact, you can also connect whatever LED you want to the IR control and it will blink as it's supposed to, which is fun but won't actually allow the system to see/read the controller in that fashion.

Image shows this in a preliminary test on the 1st beta units.
FAQ
-How much?
I'm not sure yet, putting in a quote request this week to see if I can lock a price in, but I'm hoping to keep this in the $20-25 range in single orders since I know the pads aren't very inexpensive.
-I still need to solder?
To take full advantage, yes. If you want to run a setup with minimal connections and deal with button mapping you can totally do that though.
-Autodetection?
No, this thing has no brains other than to swap based on an input, this keeps costs low as the microcontroller is very inexpensive and quick to program.
↧
↧
Dual-Mod a TE(PS3) with PS360[HELP PLEASE!!!]
So I made a previous thread about wanting to dualmod my VLX(PS3), but screw that.
Now, will the TE-S(PS3) require any soldering, and is there a guide somewhere showing how to install the PS360 onto it, or even pictures showing the insides.
Thanks.
Now, will the TE-S(PS3) require any soldering, and is there a guide somewhere showing how to install the PS360 onto it, or even pictures showing the insides.
Thanks.
↧
Is a trial of photshop enough to make art for my fightstick?
I've ne'er used it and need to learn by doing. I want some new art. Is the trial enough for me to hook it up?
↧
New Fightstick or Mod?
I brought a Injustice Fightstick for really cheap brand new. I'm not sure if I should do all the mods for it or just buy a better fight stick.
I would change the gate, buttons to Sanwa, and likely add some weight to it. I have been looking at other fight sticks on eBay and not sure if I should just buy one of those for around $100-150 or do the mods for $50-75.
THANKS FOR ALL THE HELP!
I would change the gate, buttons to Sanwa, and likely add some weight to it. I have been looking at other fight sticks on eBay and not sure if I should just buy one of those for around $100-150 or do the mods for $50-75.
THANKS FOR ALL THE HELP!
↧
↧
Should get a Sanwa Joystick JLF-TP-8Y-SK as a replacement
Okay I have this hori real arcade pro 3 ps3 arcade stick, got it used on ebay for $68... I don't know if it's me about the joystick when it comes to SSFIV linking the combos, My friends told hori make their own buttons and stick, will getting Sanwa Joystick JLF-TP-8Y-SK make a different?
↧
Art's Hobbies Big Update! 1/32" Acrylic, V.S., Pro, Qanba, HRAP V3/VX, Custom Art Dustwashers.
Website: Welcome to Art's Hobbies
Big Update 3/4/2012
Hey guys! It's been a while since I've had the chance to be more active around here, and provide the occasional updates and question sessions. Long story short, I picked up consulting on a software project for the County. So between working on that and taking care of orders, I've been pretty beat up, trying to balance everything. Even with some added help in the business, I'm still the only one to answer emails and work on the more customized orders, so I have been a bit overwhelmed, particularly over the winter season and tournament seasons.
Now that my county project is at a phase where I can take a break, and after I had a little opportunity to relax, I'm refreshed and back with updates! And what timing too... with the V.S., Pro, and other new things coming out! Here's some things on the plate.
1/32" Acrylic!
This is one of the biggest things for me. For a while, I've had people ask me about 1/32" options, and I always had to turn them down because the only material that is normally available in that thickness, is Polycarbonate (Lexan). I've mentioned before that laser cutting Lexan can emit potentially toxic fumes and tends to discolor and burn the edges. So for a while I've been searching for an acrylic option in 1/32" thickness. Some places could make normal acrylic in that thickness, but it becomes way too brittle. Regardless, I continued to look for options.
Now, finally I have found a source that carries 1/32" Impact Modified Acrylic. This material is 10x stronger than normal acrylic, and is perfect for a thin alternative to Polycarbonate. It's incredibly flexible and more than durable enough for fight stick purposes, even for those times of pushing down hard to snap in buttons. Also, Acrylic has the advantage over Polycarbonate in that it is crystal clear (more clarity), less prone to scratches and will not yellow over time when exposed to UV (sunlight). Here are some images for you to compare.
![acry_1.jpg]()
Incredibly flexible and durable. (It can bend more than this)
![acry_3.jpg]()
Superior clarity. And this is after it was bent.
![acry_2.jpg]()
So I'm very excited to offer this new line of acrylics. This idea of 1/32" Impact Modified Acrylic is still so new, that most plastic businesses either haven't even heard of it, or still don't carry it in that thickness. Trust me, I've called like over 30 companies in California alone, and only one out of those 30 knew what I was talking about.
I'm aiming to make these available on my site in a few weeks. I just ordered a huge batch of them so I still need to wait for them to arrive, while also updating a lot of other products and the need to code in a lot of new options on my site.
Madcatz Street Fighter x Tekken V.S. Fightstick
As it's already mentioned in the V.S. thread, covers for the Top, Bottom, Sides and Corners have been worked on. The templates are currently available. That case is incredibly modifiable and easy to personalize. There's more that can be done and I'll continue looking at ways to offer more options to spice things up. More info and pictures in that thread:
V.S. Thread - Post 1
V.S. Thread - Post 2
Madcatz Street Fighter x Tekken Pro Fightstick
I've also got the Pro Top and Bottom covers. More info and pictures in the Pro thread here:
SFxT Pro Post
Qanba Plexi and Artwork
I've had a lot of requests for this but while working on my other projects, I really couldn't give an answer to working on a new stick. Now, I finally had a chance to complete the Qanba plexi. It also has Laser 3D engraved countersunk holes so you can use the existing screws. This method of countersinking can only be done on 1/8" or thicker material, otherwise it can cause thinner plexi to become too brittle and crack. So thank goodness Qanba plexi's are 1/8" thick.
I understand Qanba has their own plexis, but I was told it can some times be too large for some of the fightsticks and some sanded was necessary. Well, I modeled my template from the original Qanba plexi, and the person whom I've worked with (Motoyuki) has confirmed that everything fits perfectly without sanding (as he had to do with his replacement Qanba plexi from another source). Additionally, this will allow me to offer Artwork print and Cut services and other plexi color options for the many different colors Qanba has.
![qanba.jpg]()
HRAP V3/VX and Artwork.
Finally, I get a chance to work on the V3/VX. It's been on my plate for a while, and I finally got to it. One of the things that stalled this project were the issues with the countersunk screw holes that could put a lot of stress on regular acrylic. But with the 1/32" Impact Modified acrylic, it is no longer an issue!
Notice, like the MadCatz Pro, I did not cut the middle screw hole as the screw there would very likely cause discomfort with game play, since it's so close to the lower button.
The necessary screws to install the plexi/artwork, as well as giving you top access for modifications, will also be included. Will be coming in another week or two along with all the other new additions =).
Here is the VX/V3 Template.
( Taokaka design by Stoogie )
![vx.jpg]()
TE Soul Calibur V Covers. (In Madcatz TE Section, scroll down a little to see them)
![te_scv_1.jpg]()
![te_scv_2.jpg]()
HORI Soul Calibur V
![hscv_2.jpg]()
Custom Artwork Dustwashers Return!
![cdw_1.jpg]()
When I first introduced these, they were laminated by a clear acrylic laminate spray. Unfortunately, that spray produced some technical difficulties in its application and made it difficult to produce a consistent, good quality product. So for a while, I was trying to look for an alternative. It took some time because most laminates that were presented to me, usually had some type of vinyl, polycarbonate, or pvc element to it, all of which are bad for laser cutting.
Well, finally I found a great quality overlaminate that is safe for laser cutting. So now, I can bring back the custom artwork dustwashers that many have emailed me about, and with more consistent quality.
Here are some closeups of some SFxT Dustwasher samples.
![cdw_6.jpg]()
![cdw_5.jpg]()
![cdw_2.jpg]()
![cdw_4.jpg]()
Custom Artwork dustwashers will be available again this upcoming week.
Alright, that was a ton of stuff. Time to get some rest. Hopefully I get to talk to some of you guys again, and get a chance to check out everyone's stick posts. Been seeing great things! Thanks again for everyone's support! Have a good one!
-Arthur
Also, Shoutout to JDM. Thanks for all your help to answer questions while I wasn't around on my threads. You rock!
Please check my website for more details : Welcome to Art's Hobbies
Big Update 3/4/2012
Hey guys! It's been a while since I've had the chance to be more active around here, and provide the occasional updates and question sessions. Long story short, I picked up consulting on a software project for the County. So between working on that and taking care of orders, I've been pretty beat up, trying to balance everything. Even with some added help in the business, I'm still the only one to answer emails and work on the more customized orders, so I have been a bit overwhelmed, particularly over the winter season and tournament seasons.
Now that my county project is at a phase where I can take a break, and after I had a little opportunity to relax, I'm refreshed and back with updates! And what timing too... with the V.S., Pro, and other new things coming out! Here's some things on the plate.
1/32" Acrylic!
This is one of the biggest things for me. For a while, I've had people ask me about 1/32" options, and I always had to turn them down because the only material that is normally available in that thickness, is Polycarbonate (Lexan). I've mentioned before that laser cutting Lexan can emit potentially toxic fumes and tends to discolor and burn the edges. So for a while I've been searching for an acrylic option in 1/32" thickness. Some places could make normal acrylic in that thickness, but it becomes way too brittle. Regardless, I continued to look for options.
Now, finally I have found a source that carries 1/32" Impact Modified Acrylic. This material is 10x stronger than normal acrylic, and is perfect for a thin alternative to Polycarbonate. It's incredibly flexible and more than durable enough for fight stick purposes, even for those times of pushing down hard to snap in buttons. Also, Acrylic has the advantage over Polycarbonate in that it is crystal clear (more clarity), less prone to scratches and will not yellow over time when exposed to UV (sunlight). Here are some images for you to compare.

Incredibly flexible and durable. (It can bend more than this)

Superior clarity. And this is after it was bent.

So I'm very excited to offer this new line of acrylics. This idea of 1/32" Impact Modified Acrylic is still so new, that most plastic businesses either haven't even heard of it, or still don't carry it in that thickness. Trust me, I've called like over 30 companies in California alone, and only one out of those 30 knew what I was talking about.
I'm aiming to make these available on my site in a few weeks. I just ordered a huge batch of them so I still need to wait for them to arrive, while also updating a lot of other products and the need to code in a lot of new options on my site.
Madcatz Street Fighter x Tekken V.S. Fightstick
As it's already mentioned in the V.S. thread, covers for the Top, Bottom, Sides and Corners have been worked on. The templates are currently available. That case is incredibly modifiable and easy to personalize. There's more that can be done and I'll continue looking at ways to offer more options to spice things up. More info and pictures in that thread:
V.S. Thread - Post 1
V.S. Thread - Post 2
Madcatz Street Fighter x Tekken Pro Fightstick
I've also got the Pro Top and Bottom covers. More info and pictures in the Pro thread here:
SFxT Pro Post
Qanba Plexi and Artwork
I've had a lot of requests for this but while working on my other projects, I really couldn't give an answer to working on a new stick. Now, I finally had a chance to complete the Qanba plexi. It also has Laser 3D engraved countersunk holes so you can use the existing screws. This method of countersinking can only be done on 1/8" or thicker material, otherwise it can cause thinner plexi to become too brittle and crack. So thank goodness Qanba plexi's are 1/8" thick.
I understand Qanba has their own plexis, but I was told it can some times be too large for some of the fightsticks and some sanded was necessary. Well, I modeled my template from the original Qanba plexi, and the person whom I've worked with (Motoyuki) has confirmed that everything fits perfectly without sanding (as he had to do with his replacement Qanba plexi from another source). Additionally, this will allow me to offer Artwork print and Cut services and other plexi color options for the many different colors Qanba has.

HRAP V3/VX and Artwork.
Finally, I get a chance to work on the V3/VX. It's been on my plate for a while, and I finally got to it. One of the things that stalled this project were the issues with the countersunk screw holes that could put a lot of stress on regular acrylic. But with the 1/32" Impact Modified acrylic, it is no longer an issue!
Notice, like the MadCatz Pro, I did not cut the middle screw hole as the screw there would very likely cause discomfort with game play, since it's so close to the lower button.
The necessary screws to install the plexi/artwork, as well as giving you top access for modifications, will also be included. Will be coming in another week or two along with all the other new additions =).
Here is the VX/V3 Template.
( Taokaka design by Stoogie )

TE Soul Calibur V Covers. (In Madcatz TE Section, scroll down a little to see them)


HORI Soul Calibur V

Custom Artwork Dustwashers Return!

When I first introduced these, they were laminated by a clear acrylic laminate spray. Unfortunately, that spray produced some technical difficulties in its application and made it difficult to produce a consistent, good quality product. So for a while, I was trying to look for an alternative. It took some time because most laminates that were presented to me, usually had some type of vinyl, polycarbonate, or pvc element to it, all of which are bad for laser cutting.
Well, finally I found a great quality overlaminate that is safe for laser cutting. So now, I can bring back the custom artwork dustwashers that many have emailed me about, and with more consistent quality.
Here are some closeups of some SFxT Dustwasher samples.


Custom Artwork dustwashers will be available again this upcoming week.
Alright, that was a ton of stuff. Time to get some rest. Hopefully I get to talk to some of you guys again, and get a chance to check out everyone's stick posts. Been seeing great things! Thanks again for everyone's support! Have a good one!
-Arthur
Also, Shoutout to JDM. Thanks for all your help to answer questions while I wasn't around on my threads. You rock!
Please check my website for more details : Welcome to Art's Hobbies
↧
The "Check out my Supergun!" thread
This thread probably won't become as popular as the "Check out my new arcade stick" or "Check out my arcade cabinet", but anyhow.
Considering how many people make their Superguns to be more than "just-a-connector-box", Superguns seemed like they deserved a (small) thread of their own.
@Jasen Hicks has recently been selling some pretty kick-ass metal Superguns and Supergun-cases; and @Gummo had made an amazing PS2-case-based Supergun a year or two ago, to name a couple.
So post your cool-looking (and even not-so-cool-looking) Superguns here!
↧
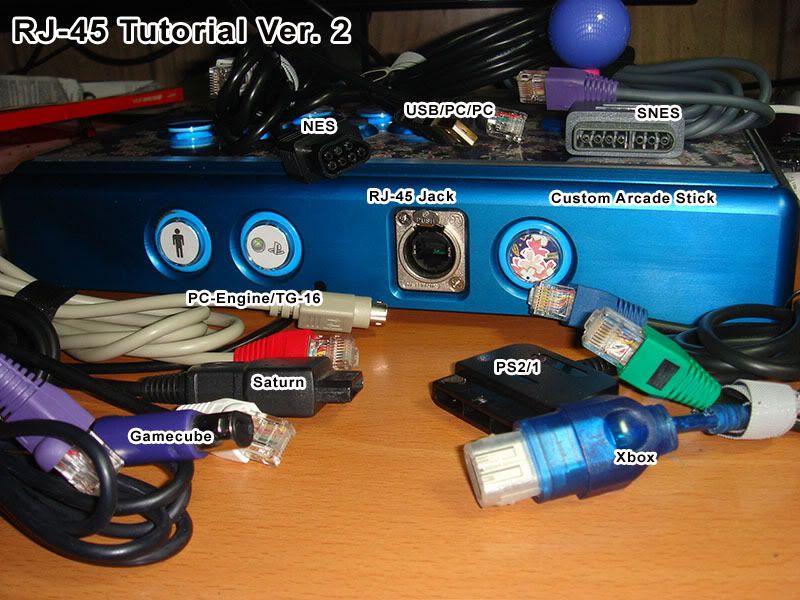
RJ-45 Multi Console Cthulhu Arcade Stick Tutorial Ver.2
Edit:Also Dreamcast and 3DO
Intro
This post is a rewrite of Acceptable Risk?s RJ-45 Tutorial. This was posted to include new info such as recent console support added because the pinouts are spread out in the Cthulhu thread. Also I instead uses a Pass through over a keystone punch down type jack.
The MC Cthulhu is a purpose built PCB for hooking up with arcade joystick components. To work with different consoles, you only need to solder wires from a controller extension cable to the appropriate spots. If you look at the top op the pcb there are 3 rows of solder points with columns labled "GABCDEFV". Each extension cable wire must be soldered on to the appropriate column. When plugged in, the MC Cthulhu PCB can autodectect what system it is plugged into and then make your joystick work for that supported system. Be sure to download the latest firmware to ensure that all of the console cables you make will be compatible.
Originally the MC Cthulhu was able to support 5 consoles using 3 cables, therefore only 3 rows, but now it has grown to include many systems. Because there are 8 columns for system cables a Ethernet jack was a natural fit. The connecter used is typically an RJ-45. If you want to do a dual mod with Xbox 360 pad then you should check out this tutorial.
http://shoryuken.com/forum/index.php?threads/rj-45-mc-cthulhu-imp-xbox-360-dual-mod-tutorial-diagram.94875/
Kitty info Update: If you dual modded your stick with a Kitty board, they come preinstalled with a RJ-45 jack. If you connect that to a RJ-45 pass through, then you can use the same cable pinouts for making your own custom cable.
Begin Tutorial
Spoiler:
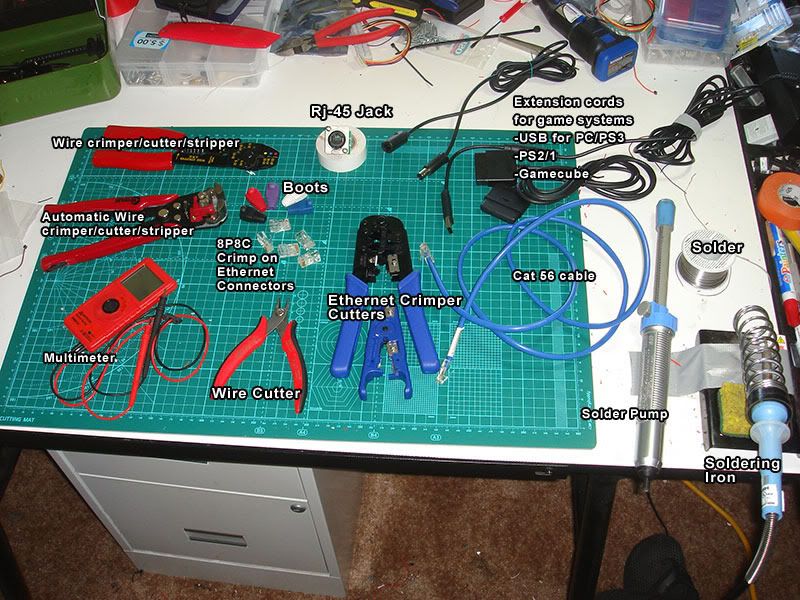
Supplies List:
MC Cthulhu
Arcade stick case and buttons.
Soldering Iron and Soldering supplies
Digital Multimeter (Recommended feature: beeping continuity tester)
Wire stripper/cutter
Neutrik or SwitchCraft RJ-45 Jack.
Cat 5 or Cat 6 ethernet cable. For pass through you need a cable with a connector at the end.
Cat 5/6 Crimper and wire cutter/stripper.
Cat 5/6 8P8C crimp on Connectors.
Extension cables for systems you want to use
24mm drill bit (forstner or Holesaw) for mounting hole and drill.
(optional)
Ethernet boots
Neutrik ruggedized boots for use with Neutrik Jack.
Hammer
![RJ-45_Tools_Supplies.jpg]()
Part 1: Mounting the RJ-45.
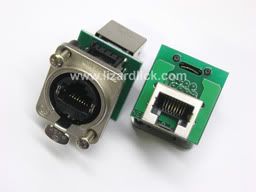
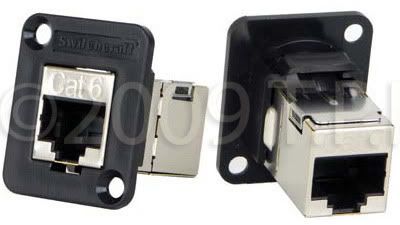
I think it was Robokrikit that first linked the community to these. These are Neutrik RJ-45 panel mount jacks, available at lizardlick.com.
![ne8fdp_thumb.jpg]()
If you have a Plastic arcade stick Like a TE or SE or Hori
You will need to find a suitable place to drill a 24mm hole. 15/16 inches is equivalent to 24mm. Make sure before you drill a hole that you have enough space inside for the internal parts and can plug in the cable to it without obstruction.
![Placing-Neutrik-Hole.jpg]()
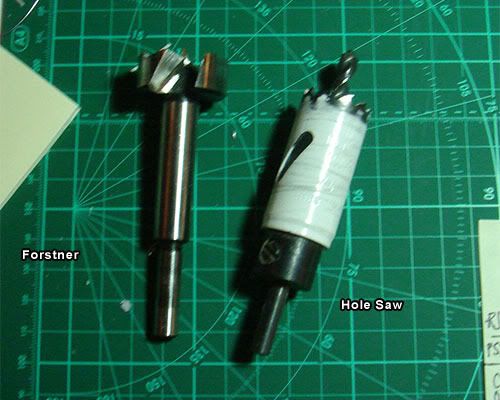
Pictured is a Hole Saw and a Forstner bit. A hole Saw is great for plastic and metal, and will work for wood, you will have to clear out the material out of the bit with a screwdriver. Forstners are great for wood an plastic, but do not attempt to cut metal with a forstner bit.
So if you drill a 24mm hole you can then use the mounting plate to drill the 2 mounting holes.
![DrillBits.jpg]()
For a wood case it is recommended that you use a switchcraft RJ-45. I think it was Voltech that first used these.
![SwitchCraftRJ-45.jpg]()
If you must mount the Neutrik in a wood case look to a post below.
Drill free option Update:
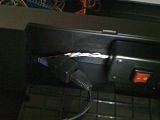
Recently I modded a VLX but this can also be used with a TE or any stick with a cord notch. I didn't want to drill into my VLX case so Instead I used an Ethernet coupler and hid that away in the cord compartment. I tied a knot in my ethernet cord so that the cord would not be pulled out of the notch used for the default usb cord. For a TE, you would cut off one end of the ethernet cable and then feed it through the hole previously used by the USB cable. After it is through the hole tie a knot in it. With the cut end on the inside you can then solder to the G-V row.
![th_1b827ab6.jpg]()
![th_2cf280a1.jpg]()
Part 2: Soldering on the ethernet cable to the MC Cthulhu
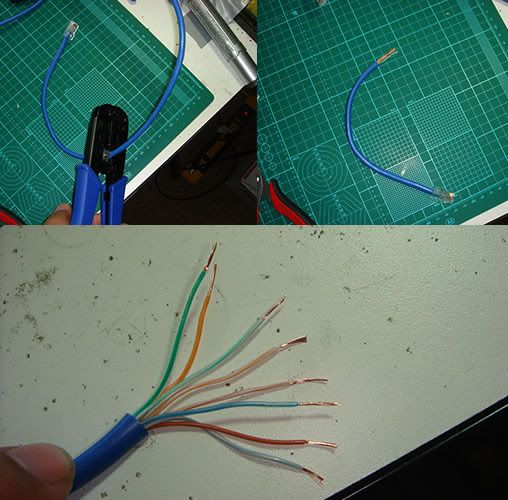
To start you would cut off maybe a foot off a cat5 or cat6 ethernet cable. The length should be long enough to reach where the RJ-45 jack is on your arcade stick. Strip off maybe a inch or two off the outer insulation and untwist the cables.
![CutStripCat5.jpg]()
You want to use Ethernet Tybe B layout as most networking cables come in that wiring order. You need to take the 8 wires and strip off 5 mm off the ends and solder them to row 1 using the following diagram. If the are stranded like pictured above then you want to twist and tin each cable end with some solder so it goes in easier. Each of those colored wires corresponds to a letter on the GABCDEFV row.
![WiringEthernetColorsTo_GV_Row.jpg]()
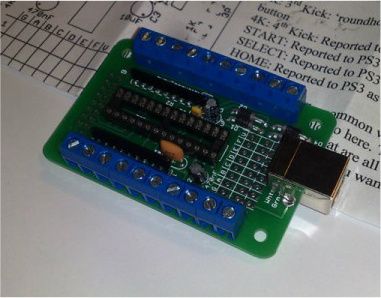
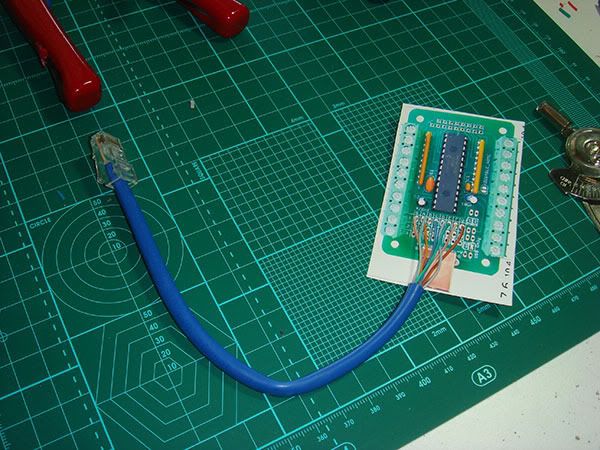
It also helps if you solder on to an actual MC board instead of a picture of the board. (note pictured on the paper is a ps3 cthulhu, which is identical in appearance except for 4 diodes to the right of the G-V rows)
![Cat5eSolderedonBoard.jpg]()
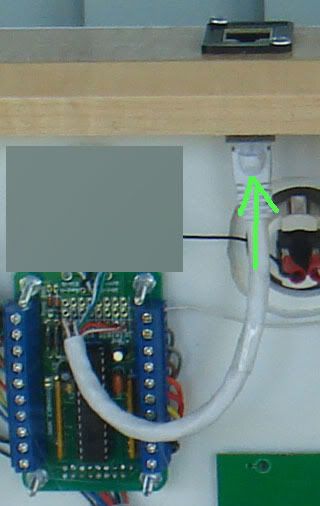
Now you just plug it into the RJ-45 pass through port.
![PlugIt_intoPort.jpg]()
MC Cthulhu
Arcade stick case and buttons.
Soldering Iron and Soldering supplies
Digital Multimeter (Recommended feature: beeping continuity tester)
Wire stripper/cutter
Neutrik or SwitchCraft RJ-45 Jack.
Cat 5 or Cat 6 ethernet cable. For pass through you need a cable with a connector at the end.
Cat 5/6 Crimper and wire cutter/stripper.
Cat 5/6 8P8C crimp on Connectors.
Extension cables for systems you want to use
24mm drill bit (forstner or Holesaw) for mounting hole and drill.
(optional)
Ethernet boots
Neutrik ruggedized boots for use with Neutrik Jack.
Hammer
Part 1: Mounting the RJ-45.
I think it was Robokrikit that first linked the community to these. These are Neutrik RJ-45 panel mount jacks, available at lizardlick.com.
If you have a Plastic arcade stick Like a TE or SE or Hori
You will need to find a suitable place to drill a 24mm hole. 15/16 inches is equivalent to 24mm. Make sure before you drill a hole that you have enough space inside for the internal parts and can plug in the cable to it without obstruction.
Pictured is a Hole Saw and a Forstner bit. A hole Saw is great for plastic and metal, and will work for wood, you will have to clear out the material out of the bit with a screwdriver. Forstners are great for wood an plastic, but do not attempt to cut metal with a forstner bit.
So if you drill a 24mm hole you can then use the mounting plate to drill the 2 mounting holes.
For a wood case it is recommended that you use a switchcraft RJ-45. I think it was Voltech that first used these.
If you must mount the Neutrik in a wood case look to a post below.
Drill free option Update:
Recently I modded a VLX but this can also be used with a TE or any stick with a cord notch. I didn't want to drill into my VLX case so Instead I used an Ethernet coupler and hid that away in the cord compartment. I tied a knot in my ethernet cord so that the cord would not be pulled out of the notch used for the default usb cord. For a TE, you would cut off one end of the ethernet cable and then feed it through the hole previously used by the USB cable. After it is through the hole tie a knot in it. With the cut end on the inside you can then solder to the G-V row.

Part 2: Soldering on the ethernet cable to the MC Cthulhu
To start you would cut off maybe a foot off a cat5 or cat6 ethernet cable. The length should be long enough to reach where the RJ-45 jack is on your arcade stick. Strip off maybe a inch or two off the outer insulation and untwist the cables.
You want to use Ethernet Tybe B layout as most networking cables come in that wiring order. You need to take the 8 wires and strip off 5 mm off the ends and solder them to row 1 using the following diagram. If the are stranded like pictured above then you want to twist and tin each cable end with some solder so it goes in easier. Each of those colored wires corresponds to a letter on the GABCDEFV row.

It also helps if you solder on to an actual MC board instead of a picture of the board. (note pictured on the paper is a ps3 cthulhu, which is identical in appearance except for 4 diodes to the right of the G-V rows)
Now you just plug it into the RJ-45 pass through port.
↧
↧
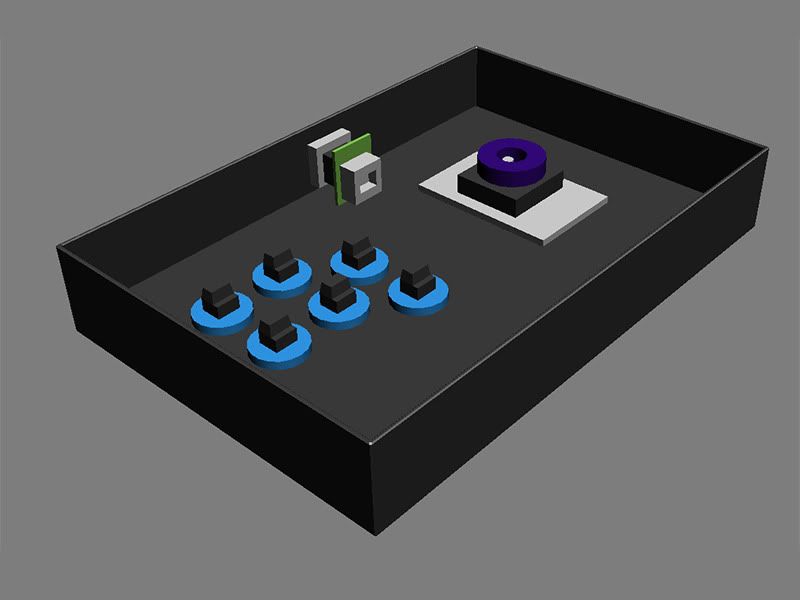
My analog A/V setup - 240p goodness

Here is my home theater and gaming setup as it stands right now. I put a lot of work into this and just thought I would share a little about it. I finally have everything connected and easily switchable, without ever having to move around or even see any wires.
I mostly play anything up to Gamecube on the Sony Trinitron KV-27FS120 CRT TV in the center. Every single console outputs RGB video over custom cables. This runs through my custom switching setup and through an RGB to component transcoder to get the best possible video quality. This is about as good as it gets for real 240p, and higher-res stuff looks decent in 480i.
For the PS3, I can change between RGB and HDMI output in the video settings menu. I can set the LG 32LD450 that's sitting up above on that little table in front of the CRT for modern 720p/480p stuff; you can see the power cable and HDMI cable sitting to the left and right of the CRT, ready to be plugged in. The box above the PS3 is a home theater PC, for movies and music and games and such, which also outputs HDMI in 1080p. I have a larger LG LED TV that I use sometimes, but it's only for movies, as it has some input lag (the 32" is only about one frame). What would really be nice would be one large low-lag flat screen on a sliding mount, so that it could slide up to reveal the CRT behind it.
Here is a close-up of the "business end" of the setup. All of the consoles run through the bank of three chained switch boxes on the top left. This provides switching for up to ten consoles. Simply turn the knobs to the positions indicated on the labels, and you have picture and sound from the console selected. As you can see, there are two slots still available, in case I get around to buying a Wii or Japanese 360, or I pull my Saturn or XBox or N64 out of the closet.
Each console has separate individual adjustments on the front of the switchboxes for red, green, and blue color levels. There are adjustment pots inside the three holes to the right of every knob position, which can be adjusted with a "tweaker" (small flat head screwdriver). The switchbox at the end of the chain also has a sync separator circuit. Basically you can feed the switchboxes any kind of RGB (RGBs, RGB with composite as sync, RGBHV, etc.) and it will output RGBHV (also known as VGA). You can also feed in composite, s-video, or component, and it will pass it through a seperate output. (EDIT: This kind of flexibility can be useful when connecting so many different systems with different requirements, but now that I have every single one of my consoles set up for RGB these other outputs aren't used anymore). See the next post for details on the switch box and the cables used.
-
The RGBHV coming out of the 3 switchboxes then runs through other switchbox to the right. This allows you to select whether to pass the signal through the Extron Super Emotia on the bottom left, or bypass it. There are certain games which are meant to run in 240p, but are only available out of a console in 480i or 480p, such as Third Strike Online, Mega Man 9/10, certain shmups on 360, and Game Boy games played with the Gamecube Game Boy Player. An Emotia allows these games to be forced back into 240p (without ANY input lag too) to regain real scanlines and that "classic" look. The Super Emotia includes horizontal size and position and vertical position controls, and this switchbox adds red, green, and blue color level adjustment for it as well.
More info on Extron Emotia's here:
http://scanlines.hazard-city.de/]http://scanlines.hazard-city.de/
-
After coming out of that switchbox, the RGBHV signal then runs through the Crescendo Systems TC1600 RGB to component transcoder in the center. The CRT I'm using doesn't accept RGB, so it needs to be "translated" to component. These are basically equivalent video formats, so this can be done without any loss in quality. The TC1600 is a proper transcoder that will transcode colorspace only, with no change to resolution or any added lag. This is about the best transcoder of this type that you can buy, and it's made by an enthusiast who will give you personal technical support that you couldn't get with anything else. Many thanks to Kim Beumer, creator of the TC1600.
Anyhow, you can see that I've modified it with a big knob on the front. This allows for horizontal position adjustment of the picture on screen. This is useful because different consoles and even different games can be skewed to the left or right a different amount when using RGB with a real CRT, and this can be quickly fixed after starting up a game by turning the knob left or right. The difference is much more noticeable when you've calibrated your display for proper geometry and minimal overscan.
-
The switchboxes also pass audio through the equalizer shown before it reaches the receiver. This can make a noticeable difference in getting full and balanced sound from some consoles.
-
Finally both the audio and video enter the Yamaha receiver on the right. On the receiver, the input selected just determines whether to use signals from the switchboxes or from the HDMI inputs from the PS3 or PC. Any HDMI video selected is passed to the HDMI cable for the 1080p TV's, and any analog video is passed to the CRT. Audio is amplified to a matched Yamaha 5.1 speaker system. For stereo sources, I just use Dolby Pro Logic II Music decoding, which sends most of the sound to the left and right speakers and subwoofer, just using the center and surrounds lightly to fill out the room.

I've spent a lot of time working with the service menu on the Trinitron to get the geometry, brightness, contrast, color, etc. all dialed in (with the TV off, press Display, 5, Vol +, Power on the remote to enter a Sony service menu). This is as good as I've gotten the geometry so far. The size is set so that most 240p games average just about a pixel or less of overscan to just fill out the screen without cutting anything off. It has the typical problems in the corners, and I'm going to see if anything can be done at the neck about the straightness of the horizontal lines and the blue convergence at the far right. It's not noticeable in games unless you're looking for it, but it's not perfect.
-
Finally, here's some screenshots. I'm having trouble with my camera trying to get a good representation of the color quality. In the pictures it always looks a little washed out, whereas it looks much better in person. I guess you'll have to take my word for it, but here are the best shots I could manage:


The last picture is of Metroid Zero Mission in real 240p on the Gamecube Game Boy Player through the Super Emotia. It looks really nice with the scanlines, very similar to a Super Nintendo game.
↧
Hori Kuro unboxing + no mods!
Thank you @Nubert for giving me permission to check out one of the Kuro buttons. BTW, this thread is a spoiler thread for you, do not read if you want that new surprised feeling when you get your buttons :) LOL @ the thread title, no modding going on here guys. Not my buttons.
Lets start! Oh, another personally scribbled letter :) Thanks to whoever packages this stuff up, you do a great job!
![100_1705.JPG]()
Hey, look at that. A big box with a bunch of Hayabusa. Where is the Kuro???
![100_1706.JPG]()
I was expecting a different box I guess, but there it is up at the top. Lets take it out.
![100_1708.JPG]()
Another quality box design. Love their presentation. Let's open her up.
![100_1709.JPG]()
And take her (and her sisters) out.
![100_1710.JPG]()
Hori also does a great job wrapping Kuro up. But we all know that I don't like it wrapped, soooo....
![100_1712.JPG]()
And there she is. Exposed for the intertron to see. What's interesting is the harder edge design of the plunger.
![100_1713.JPG]()
Let's see how she compares to my other girls. (yes, in case you didn't know, all my parts are female. wait! not those parts, only the parts I like touching!) The plunger seems to rest a lot higher than Seimitsu's PS-14-GN-C and Sanwa's OBSF. Yeah yeah I don't like Sanwa buttons but it's a loaner provided by @armi0024 :) Kahuna couldn't have happened without PA!
![100_1715.JPG]()
Here is Kuro, stripped bare with her internals exposed. Check out the switch, it's black instead of white. No vanilla inside this chocolate ice cream. Sanwa SW-68 for reference.
![100_1716.JPG]()
SW-68 vs Kuro switch. They're basically identical, they even feel nearly identical. Can't really tell the difference myself, no tactile difference IMO. I can't see any reason to do a switch swap. If there is any difference in feel of the button it's going to be the material and plunger size. Feels softer than Tkc switches used in Seimitsu, IMO.
![100_1718.JPG]()
Kuro's plunger vs Sanwa's. Kuro is about 1 mm larger. Besides the harder plunger edge, you have the extra surface area. Not sure if that harder edge comes into play, maybe it allows you to feel the edge more, I don't know, but with that much surface area I can't ever see feeling out the edge.
![100_1719.JPG]()
Well, lets wrap her and her sisters back up and banish them back in the box. After all, these need to go to Nubert.
![100_1721.JPG]()
And there we go, Pandora's Box all sealed up again for someone else to open in the future :)
![100_1722.JPG]()
My thoughts on Kuro: Well, I can't use them, so I have to analyze based on what I have used and the basic design of the buttons vs others. One thing I was surprised at was how light they felt. I guess the Sanwa buttons feel kind of light too, I'm a bit used to handling buttons with larger switches and nuts. Haha!!! Anyway, IMO, there will be no major tactile difference based on the switches vs Sanwa buttons. Compared to Seimitsu PS-14-GN there is a huge tactile difference, of course those IMO feel much better than both Kuro and Sanwa based on the switch alone. Pressing in Kuro's plunger didn't feel all that different from pressing in a Sanwa, and I didn't notice any squeeky sound coming from it. It was pretty smooth from what I can tell, the only thing is I was pressing down directly on it and it wasn't installed in a control panel where it would be possible to press it at an angle to see if it squeeks.
Would I want these personally? I'm not sure. I never had any problems with my fingers sliding off my current buttons, so I can't see how the larger plunger would be a help. I guess if you have that problem, then these would be nice buttons for you. They also feel like Sanwa buttons as far as tactile and tension, so that immediately kills them for me. I've always liked how iL competitions felt, but sadly they do not make them in smoke transparents and on top of that there is the slight problem of engaging the switch on one side vs another, so I ghetto rigged up some Seimtisu buttons with cherry switches. If I had to use stock buttons, I'd probably use Seimitsu G switch based buttons or iL, Sanwa are at the bottom and probably Kuro, too. I'd probably choose Sanwa over Kuro simply for color choice, but, the larger plunger does have me a little interested, a little. It's not like I'm winning major tournaments or anything or a name when it comes to playing, so uh, my opinion on buttons probably doesn't really matter, but those are my thoughts. For what it's worth, I tend to prefer more tension and a snappy feeling, like old school iL buttons, so if you like those and don't like Sanwa, then I wouldn't try a Kuro. On the other hand, if you really like Sanwa buttons, and feel like even Seimitsu are too tense for you, then you'd probably really like Kuro buttons. Hope that helps.
Anyway, again, thanks to @Nubert again for letting me check out one. Really appreciate it :)
Lets start! Oh, another personally scribbled letter :) Thanks to whoever packages this stuff up, you do a great job!
Spoiler:

Hey, look at that. A big box with a bunch of Hayabusa. Where is the Kuro???
Spoiler:

I was expecting a different box I guess, but there it is up at the top. Lets take it out.
Spoiler:

Another quality box design. Love their presentation. Let's open her up.
Spoiler:

And take her (and her sisters) out.
Spoiler:

Hori also does a great job wrapping Kuro up. But we all know that I don't like it wrapped, soooo....
Spoiler:

And there she is. Exposed for the intertron to see. What's interesting is the harder edge design of the plunger.
Spoiler:

Let's see how she compares to my other girls. (yes, in case you didn't know, all my parts are female. wait! not those parts, only the parts I like touching!) The plunger seems to rest a lot higher than Seimitsu's PS-14-GN-C and Sanwa's OBSF. Yeah yeah I don't like Sanwa buttons but it's a loaner provided by @armi0024 :) Kahuna couldn't have happened without PA!
Spoiler:

Here is Kuro, stripped bare with her internals exposed. Check out the switch, it's black instead of white. No vanilla inside this chocolate ice cream. Sanwa SW-68 for reference.
Spoiler:

SW-68 vs Kuro switch. They're basically identical, they even feel nearly identical. Can't really tell the difference myself, no tactile difference IMO. I can't see any reason to do a switch swap. If there is any difference in feel of the button it's going to be the material and plunger size. Feels softer than Tkc switches used in Seimitsu, IMO.
Spoiler:

Kuro's plunger vs Sanwa's. Kuro is about 1 mm larger. Besides the harder plunger edge, you have the extra surface area. Not sure if that harder edge comes into play, maybe it allows you to feel the edge more, I don't know, but with that much surface area I can't ever see feeling out the edge.
Spoiler:

Well, lets wrap her and her sisters back up and banish them back in the box. After all, these need to go to Nubert.
Spoiler:

And there we go, Pandora's Box all sealed up again for someone else to open in the future :)
Spoiler:

My thoughts on Kuro: Well, I can't use them, so I have to analyze based on what I have used and the basic design of the buttons vs others. One thing I was surprised at was how light they felt. I guess the Sanwa buttons feel kind of light too, I'm a bit used to handling buttons with larger switches and nuts. Haha!!! Anyway, IMO, there will be no major tactile difference based on the switches vs Sanwa buttons. Compared to Seimitsu PS-14-GN there is a huge tactile difference, of course those IMO feel much better than both Kuro and Sanwa based on the switch alone. Pressing in Kuro's plunger didn't feel all that different from pressing in a Sanwa, and I didn't notice any squeeky sound coming from it. It was pretty smooth from what I can tell, the only thing is I was pressing down directly on it and it wasn't installed in a control panel where it would be possible to press it at an angle to see if it squeeks.
Would I want these personally? I'm not sure. I never had any problems with my fingers sliding off my current buttons, so I can't see how the larger plunger would be a help. I guess if you have that problem, then these would be nice buttons for you. They also feel like Sanwa buttons as far as tactile and tension, so that immediately kills them for me. I've always liked how iL competitions felt, but sadly they do not make them in smoke transparents and on top of that there is the slight problem of engaging the switch on one side vs another, so I ghetto rigged up some Seimtisu buttons with cherry switches. If I had to use stock buttons, I'd probably use Seimitsu G switch based buttons or iL, Sanwa are at the bottom and probably Kuro, too. I'd probably choose Sanwa over Kuro simply for color choice, but, the larger plunger does have me a little interested, a little. It's not like I'm winning major tournaments or anything or a name when it comes to playing, so uh, my opinion on buttons probably doesn't really matter, but those are my thoughts. For what it's worth, I tend to prefer more tension and a snappy feeling, like old school iL buttons, so if you like those and don't like Sanwa, then I wouldn't try a Kuro. On the other hand, if you really like Sanwa buttons, and feel like even Seimitsu are too tense for you, then you'd probably really like Kuro buttons. Hope that helps.
Anyway, again, thanks to @Nubert again for letting me check out one. Really appreciate it :)
↧
Modding SSF4AE for PC (NO DLC UNLOCKS!)
This thread is for discussing the technical aspects of modding SF4AE. It is not for submitting skins. Do that in this other thread, instead.
If you're just getting into modding, hit up the tutorials on the modding wiki. Most everything still functions similarly to vanilla SF4, but the engine doesn't use emz bundles for costumes/colors anymore.
I will update this first post with some frequently asked questions as they arise, so please read it before asking.
↧
XBONE Pad PCBs - Now Shipping! Only $35.95!
All,
AkiShop Customs, the folks that brought us the PS360+, is still working hard to get the PS360+ upgraded to work with the XBONE and PS4. In the mean time they recognize that hard work of folks like @Phreakazoid @Gummo and whomever is working with @armi0024 are getting us access to the Current Gen with our current gear.
They approached me about selling original XBONE PCBs @ www.jasenscustoms.com for these various mods out there to save time and money when modding/padhacking/etc. These would be original PCBs devoid of the case, etc. They aren't going to do it unless the interest is high, naturally it makes sense... the more you buy the cheaper it is. If I carry them, my goal is to sell them for as cheap as possible. Ultimately, they don't fit my business model of selling tech associated with things I produce/design (I use business model loosely since business makes things not fun)... I don't want to be a wal-mart of the community.
Right now, this is me exploring the market on behalf of AkiShop customs. Nothing more. I'll report back to ASC the findings here.
Jasen
↧
↧
PS360+ RJ-45 Problem
I just finished wrapping up a ps360+ install. If i plug in a USB cable directly to the board everything works great on both ps3 and 360 as expected. If I unplug the usb cable and use the RJ45 -> USB cable I purchased with the board directly into the RJ45 connector on the board I get nothing. No blinking lights on the PCB or anything. Is there some configuration step I've missed to tell the board that I want to use the RJ45 connection instead or did I get a dud board?
↧
So how good is the Fighting Edge anyway?
Hey, I'm new here. Been lurking for a few months. Glad to be here!
Anyway, I hear a lot of people preaching the gospel about the Hori Fighting Edge, but is it really worth the $200? I've been through my fair share of sticks, and the Fighting Edge looks awesome. What do the parts feel like? Is it worth ditching my modded Qanba Q1 for?
Anyway, I hear a lot of people preaching the gospel about the Hori Fighting Edge, but is it really worth the $200? I've been through my fair share of sticks, and the Fighting Edge looks awesome. What do the parts feel like? Is it worth ditching my modded Qanba Q1 for?
↧
Supergun Case
First I wanna say thanks to everyone thats been helping helping me put this stuff together. I'm considering getting a project box for my case. I want to know if there's a site with all the measurements for cutting the holes for the video audio and controller jacks?
↧
Has anyone else had a buggy touchscreen on their fighting edge ?
if I could just fix this problem with my fighting edge I would love it so I'll ask if you have any ideas
my problem with my fighting edge is that the touchscreen is really really buggy
not sure if youve used a there are four buttons start back X and a button that looks like two arrows
the button that looks like two arrows is the problem....you hold it down to change the the actual physical buttons to what you want
the problem is this mode gets activated randomly all the time when I just barely graze the touchscreen...then when I try to turn it off it will just get stuck in that mode until I unhook the joystick
I opened the stick and everything looks good...not sure why its having this problem
↧
↧
accidental double post plz delete
delete please =)
↧
PS360+ and Mac?
When it says PC compatible does that mean mac as well?.. I was wanting to see if I could get my PS360+ stick working with mame but it does nothing when I plug it in.
↧
dual mod Hori fighting edge xbox 360
can i dual mod hori fighting edge and run panel tactil witch ps360,? tutorial?
↧