Quantcast
Channel: Tech Talk — shoryuken
Viewing all 8072 articles
Browse latest View live

Which is better, Hori or Mad Catz?

$
0
0
I'm gonna be getting myself a fight stick/arcade stick/ whatever the hell you call it stick next month, but I'm stuck between two brands: Hori and Mad Catz. I hear a lot of good things about both brands but don't know which one is actually better. Though I must admit, I find it confusing as hell that Mad Catz is one of the choices... I still remember all of those dodgy third party controllers of theirs! (And the Gamecube one that fried my friends third port).

So I figured I should ask you guys on which one is better, since this is one of the internets top fighting game forums and you are the guys that keep these company running!

Aftermarket TE Cable Door Replacement?

$
0
0
I recently sent a support ticket to get my TE Round 2 cable door replaced, and they said that they cant help me out with replacing it at all. I was wondering if there are any vendors working on providing a replacement or are we just all SOL and have to come up with our own fix.

Rollie Electronics Flash 1 Core Optical Joystick PCB $29.95

$
0
0
Rollie Flash 1 Core Optical Joystick PCB!!!

Please contact us at jpipp@ymail.com or purchase direct from Focus Attack.
www.focusattack.com

Kit Price: $29.95 + Freight
The Kit will contain the following:
( 1 ) Flash 1 Optical PCB
( 1 ) Flash 1 PCB Cover
( 1 ) Yellow Dust Cover
( 1 ) Blue Translucent Shaft Cover
( 1 ) 5 Volt Harness

If you have any questions you may contact me at jpipp@ymail.com

Parts ship from the US. All Prices in US Dollars. Prices above DO NOT include shipping. In your e-mails ALWAYS include your NAME and FULL ADDRESS.

Regards,

Ponyboy

To those who modify their JLF's and custom stick

$
0
0
I'm curious about how many people actually modify their JLF's. From what I understand, you can change the restrictor plate (which I already have an octagon on), the spring, and something called the actuator. I know what the gate does, but what about the spring and the actuator? How many of you actually modify your JLF's? What mods do you use?

Thanks!

New to Custom Stick Building

$
0
0
Hello All!

I'm new to making custom sticks so I have a couple of questions if that's alright.

I'm mainly a BB and P4A player (Ps3) for reference if you have suggestions c:
I'm certainly not anywhere near tournament level though and I'm currently using a modded ps3 pad (Pics in spoiler)
P.S Sorry for the terrible image quality, was using my netbook webcam.
Spoiler:
picture110.jpg

picture111.jpg

picture112.jpg

I'm planning to build my case out of Acrylic with the top panel being a double layered acrylic sheet to place artwork in.
I'm not afraid to solder if need be if what you guys would recommend is a sacrificial ps3 controller.
Some of the encoders I've been looking at include the zero delay encoder (for it's low price point) and the Cthulhu encoder (also lower price point)
If you guys suggest an encoder would you be so nice as to also explain/link how to install LED lighting onto those encoders? (I haven't seen them yet in person so it may or may not be self explanatory)

I also offer my apologies if you feel as if too many of these questions could be answered reading a thread somewhere else on this forum. Or if a similar question has been asked in the past.

Thanks All ~ Accent

Sanwa JLM - Magnetic sensor?

Kaimana RGB LED Board thread, RGB animations and more! SRK Tech Talk 2013 Product of the Year!

$
0
0
The Kaimana LED Controller is a powerful new tool for those looking to get the most out of their custom arcade stick or cabinet! This is the first board to used indexed LEDs in an arcade stick and allows for RGB control and animations. It is also the first fight stick RGB LED controller to provide full RGB control for joystick ball tops and hit box configurations.

image
image

The Kaimana can run conventional LEDs like the Pele's or Uila's with an adapter board or can be used to run the new Kaimana J's:
paradise-kaimana-j-rgb-led.jpg

Unlike previous LED boards, the Kaimana uses indexed LEDs so they can be connected in series and you don't have to have multiple wires running from the controller board to each LED
Diagram:
fetch.php?w=500&tok=633a2d&media=kaimana_led_chain_default.png
Example (jwyder's stick):
KaimanaInstaled_zpsdfcceb65.jpg

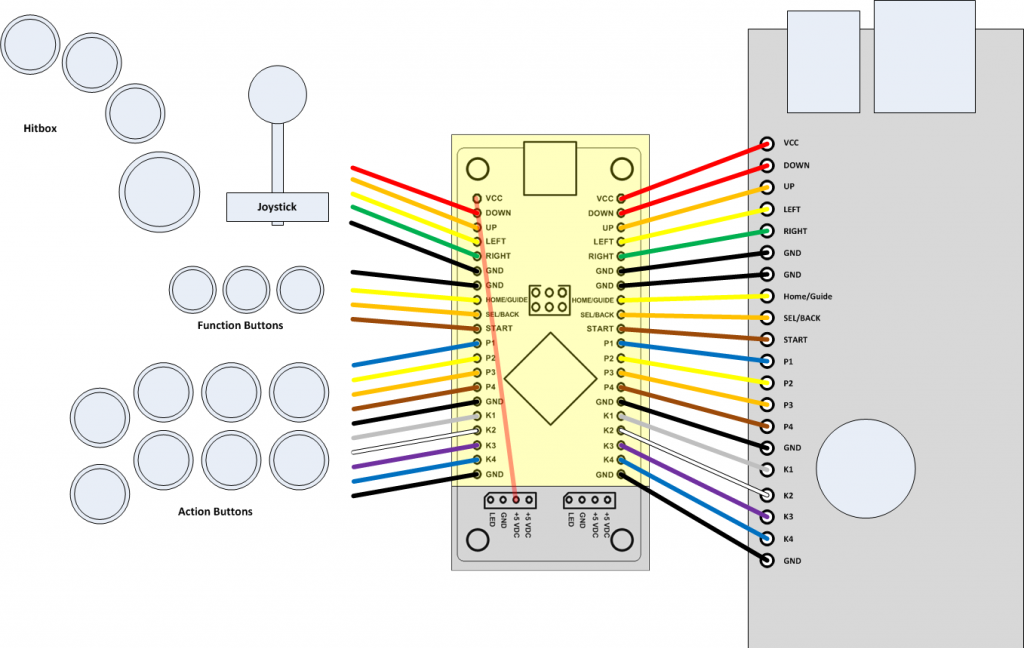
It is also designed for easy installation as a pass through board. The pinouts are the same as a PS360 so modding your dual mod stick could not get any easier!

Diagram:
KaimanaWiringDiagram_zps1cfc4cc6.png

I have installed three of these systems, and total install time, including installing all the buttons and joystick ahs been less than 1 hour each time using the Kaimana J's

Based on the infinitely flexible Arduino, this board can do just about anything you can imagine. Because it uses the extremely simple to learn Arduino programming language, this board opens the gate for anyone to create their own light patterns and shows.

As people invent there own animations series we will be adding them to the store for download and people who contribute programs will be able to earn store credit! As of right now the entire Ryu special move set for SFIV has been coded with animations. The best part is that all you need is a USB cable and any of the programs created can be loaded in seconds!

Boards and accessories can be purchased here:
paradise-kaimana-led-controller-pcb.jpg

What solutions are available to make a stick work on all current consoles (PS3/4, 360/Xbone)?

$
0
0
I have a Razer Atrox that I'd like to use on all current consoles. The problem is, after reaching out to people about the job (well in advance of an upcoming local major, CEO), nobody has gotten back to me about it. All I've heard is that modding a PS4 PCB into a stick takes half a day.

I would like to know what it would take to make my Razer Atrox work on PS3 (including PS2 backwards compatibility), PS4, 360, and Xbone, while retaining its fancy OEM pull-to-unlock USB cable. What hardware will I need, what are my options, etc. I figure I'll probably need Xbone and PS4 pads, but I don't know if I'll need a Cthulhu board or PS360+ or what.

The idea was that I could find all this stuff out, order anything that needed to be ordered, and have it all ready for whichever modder is in town as CEO gets near, possibly dropping it off at their hotel room a day or two in advance so as to not block easier/faster work during the tournament. But literally nobody has given me any actionable information on this.

I don't wanna shell out for an Xbone and have to pay another $200 for a stick, then still be assed out when it's time to play Xrd on PS4 (or pay another $180 for the new Hori).

Hori HRAP V4 announced... compatible with PS3 AND PS4

$
0
0
http://www.play-asia.com/hori-real-arcade-pro-v4-hayabusa-paOS-13-49-en-70-7nn7.html

Launching in May for $190.
Compatible with PS3, PS3 Slim, AND PS4! I think this is the first official PS4 joystick announced for market.

It's a Hayabusa HRAP. Hayabusa control lever and Kuro buttons installed. No SA or SE monikers; this is an ALL-Hori joystick but no worries. These are quality parts at least as well-performing and durable as or better than the Sanwa and Seimitsu product.

Hopefully, this sees a US release in the near-future...

These guys also talk about the joystick --
http://iplaywinner.com/news/2014/4/3/hori-japan-to-release-new-real-arcade-pro-model-compatible-w.html

It IS cheaper through other outlets like AmiAmi.
Bad news -- no international release scheduled yet but I would be surprised if it doesn't show up on US shores.


My one complaint --
I wish Hori had used the HRAP N3/NX as the base for this joystick or even the Fighting Edge.
I'm not a huge fan of the HRAP V3/VX base.

Is the Hori Hayabusa joystick compatible with the Qanba Q1?

$
0
0
I've read somewhere that a user had issues puttting the Hori Hayabusa in his Q1, but it didnt say if he was able to or not. Can anyone PLEASE help me out on this? I really would like this joystick and would like to know its compatibility with the Qanba Q1 before i do ( or if i have to do a certain mod or something). Any help will really do me good guys =/ Please and thank you.

Newbie, i need of help (modding) arcade setup

$
0
0
Hi everyone,

So I have been getting into Fightsticks, sorry (arcade sticks)

I had a bit of extra cash but could not afford to keep these and decided to buy a few sticks try them out and then re sell the ones I didn't like.

I bought a ps3 fightstick te, sold as a ps3/360/pc stick, that did not work on my pc or 360, have since (sold) this stick. (My favorite stick bar none)
I also bought a ps2/xbox 15 aniversary street fighter stick (the big one with square gate and bar top, I liked it is what I remembered as the arcades i played as a kid. but I did not like they way it compared to the TE. (sold)
I also bought a HRAP EX-SE, liked this more than the 15th, but less than the TE (still have this one)

so from this I know that I like Sanwa, and that is what I want to use :)

I want to do a budget arcade setup 2 player , just the front where you have the sticks and buttons and just sit it in front of my TV.

my main system will be xbox360, then Wii, , pc, ps2, ps3. in descending order.

I would ideally like to mod my control panel to work with all of these, and that is where my main question comes in, I have read so many threads, and it seems alot are out of date and promoting things that are no longer available. chimp, and numerous other options i am unable to find or they are outside of my budget.
I am in Australia if that helps.

my initial idea was to pick up 2 te 360 sticks cheapest I have seen them go for is $80AU, so thats $160 if im lucky,
I picked up 2 of those cheap ps2/3 encoders of ebah with the intention of dual hacking the TE's then using a ps2 to wii convertor!

my latest idea is to buy a 2 person control panel from a astro cab or the like and make a front cab like said above^^ but I am then unsure what is the best way to get 360 support, I am getting the feeling that padhack is the most cost effective option at the moment, are there any other options that are either a hell of a lot simpler or cheaper?

I do have 2 third party xbox controllers that I could sacrifice but I am unsure if they are common ground one is the madcats mini and a afterglow led both have issues with the sticks wanting to (look) up. would this be an issue and are these viable?

Last question can I pad hack and then use the ps2/3 encoder to have a multi system arcade stick?
It's my understanding that I will have 2 usb cables and a ps2 cable coming out, but will there be any issue other than that?

thank you so much I have read so much, but there is so much info and every time I thought I had found the answer I found another option and more questions.

Reuben

Homemade padhack "coverters" using a DB15 port?

$
0
0
A few recent threads got me thinking about this. Rather than constantly dual/triple/quad/whatever modding or hoping for custom multi console PCB solutions (or shitty converters), why not have your controls wired to a DB15 connector, then use padhacks in project boxes (or whatever) linked to DB15 connectors for quick swaps? Is there anything that would prevent this from being a viable solution?

Joystick for returning gamer

$
0
0
Hey guys! I am an old member of this forum and recently found myself coming back to the fighting scene. My favorite game is Cvs2 and pretty much street fighter turbo and third strike. I am a broke college student so I am in search for a new joystick. My budget is $50-100 tops. I play Cvs2 online (demul emulator) with some friends from Mexico and I want a stick that works strictly with PS3 and PC. That's it. For now I use my beloved Agetech from Dreamcast with a converter to USB. This stick is really beat up and doesn't really do it, but I can't do anything else for now. So I am here to ask the experts about getting a decent stick for that price range. I don't want fancy lights, fancy art, fancy anything, I just want comfortable buttons (like agetech) and a nice joystick. It could be a shoebox with those components lol. Any recommendations?

I was looking at these: Are this any good?

http://www.ebay.com/itm/Hori-FS3-Fighting-Stick-3-Playstation-3-PS3-PC-Arcade-Stick-Controller-/161273290546?pt=US_Video_Game_Controllers&hash=item258ca31f32

http://www.ebay.com/itm/Qanba-Q1-PS3-PC-Arcade-fightstick-fight-stick-/301156258796?pt=US_Video_Game_Controllers&hash=item461e4fd3ec


Thanks guys for helping an old member of this great community. I am returning after so many years. Great to see this is still going strong.

Hori Pad 4 FPS padhacking?

modding: replace the madcatz tvc pcb with a xbox 360 controler pcb

$
0
0
hello, im asking for any help to replace the pcb of my madcatz tvc, i have a xbox 360 wired controller, i was thinking to take the pcb to be able to play on pc and xbox 360...
i can do all soldering if i now what to do ou where to...
any help will be graceful

Dual Shock 4 PadHack Thread - If you thought the xb1 padhack was a pain, you don't know jack.

$
0
0
So you want to add PS4 functionality to your arcade stick? Well too bad. Just wait until there is a third party pcb that is cheap and easy to wire up. Maybe we'll get lucky and there will be a firmware update to any of the
custom ps3 pcb's that are out in the market. Oh, you don't want to wait? You really want it now? Well the only option right now is to padhack a Dual Shock 4 controller. Luckily for us the pcb is common ground. Unluckily for us
the pcb is a pain in the ass to wire up and is quite unforgiving if you mess up. You thought the Xbox One pad hack was hard? This pad hack shits all over it. You accidentally burn off or rip off a contact pad on the ds4 and
you've just wasted $60. The only option after that is to find a via that traces to the contact pad that you've just destroyed. They are not easy to find nor solder to.

So if you think you have the skills or are looking for a challenge you have been warned. Don't hold me responsible if you damage your DS4.

With that being said, let the padhack begin! We will start out with preparing the ds4 pcb.

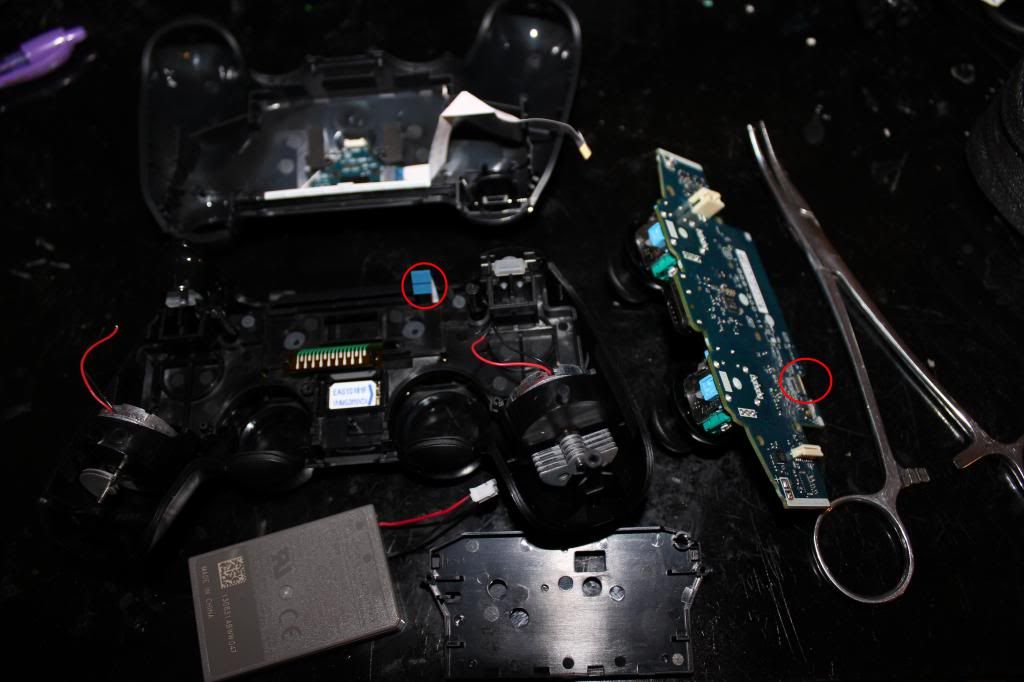
To begin opening up the DS4 you must unscrew the four screws on the back of the pad.
IMG_0336_zps442ab332.jpg

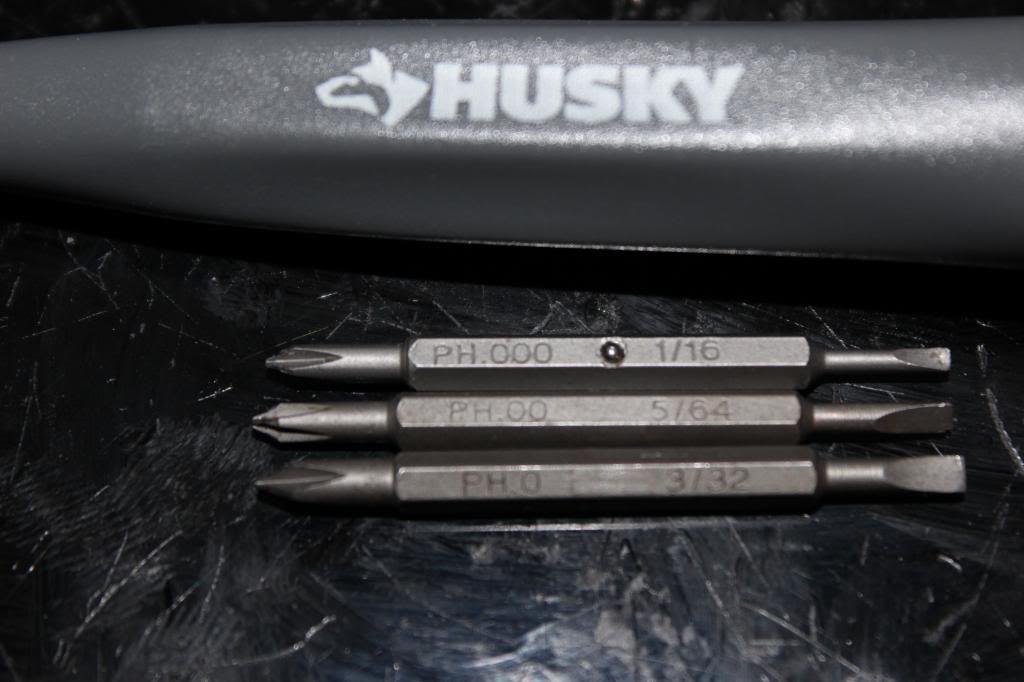
You'll need to use a size #0, #00, or #000 Phillips head screwdriver. If you don't own one then I suggest buying a Husky precision screwdriver set.
IMG_0337_zps65fe8af9.jpg

You'll need to use a little force to pull apart the shell, but don't pull the shells too far apart too fast. There is a ribbon cable connecting the usb jack to the ds4 pcb. Pull the ribbon cable out first. Then unplug the

lithium ion battery pack. Then cut off the rumble motor wires.
IMG_0338_zps823d7882.jpg

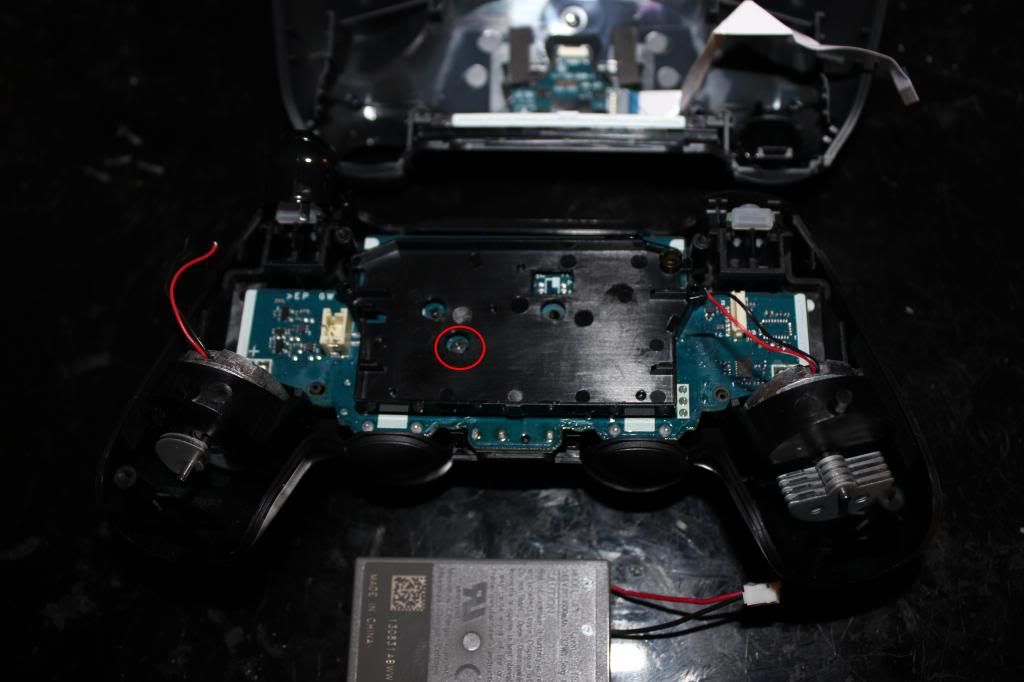
Circled is one more screw that holds the pcb to the shell.
IMG_0339_zpsced0a56e.jpg

Be careful as you lift the pcb out. There is still one more ribbon cable left that needs to be unplugged. It might be a bit difficult to unplug with your finger so using tweezers or forceps will make things easier.
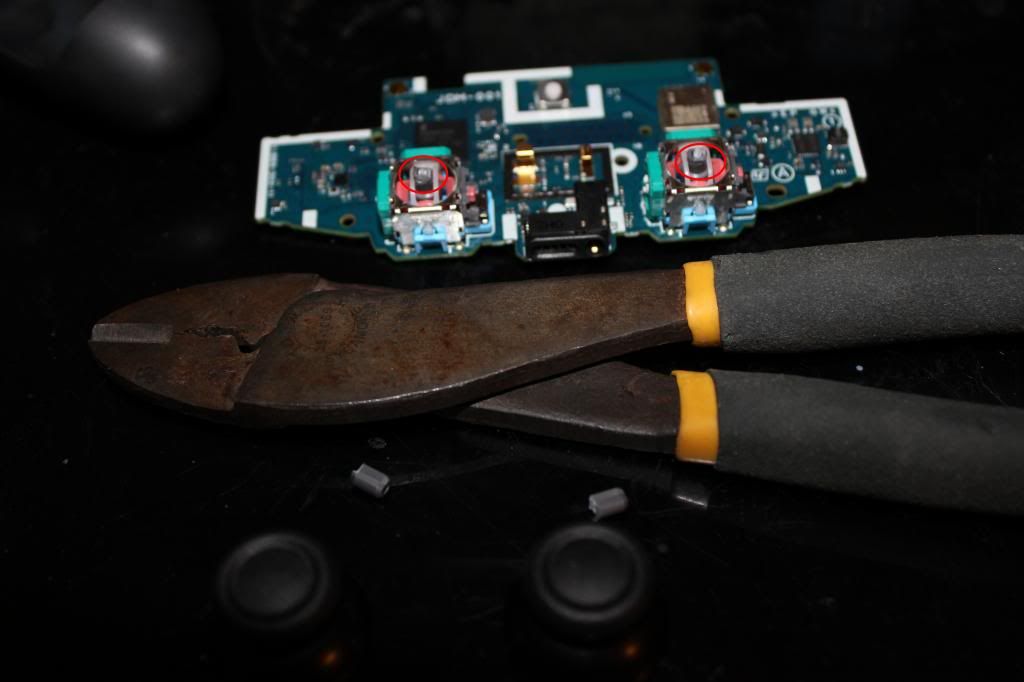
IMG_0340_zpsde1f7a4d.jpg

If you have very tight space limitations inside your case you'll probably will want to desolder the analog jacks and neutralize the axis with 10k ohm resistors. However, for most applications just cutting the stubs and gluing
the stick in place will suffice.
IMG_0341_zpsb1f0d7c5.jpg

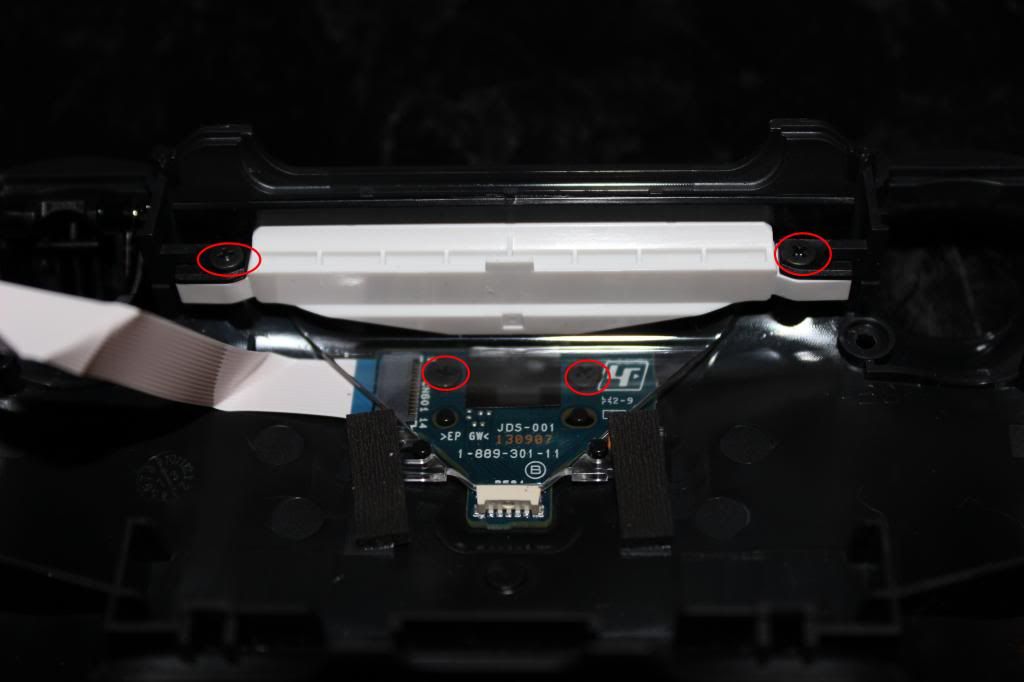
If you want to use the micro usb jack, and I suggest you do, then you'll need to unscrew four screws that hold it in place. The top two have to be removed first. Then the led light thingy can be removed to gain access to the
bottom two screws.
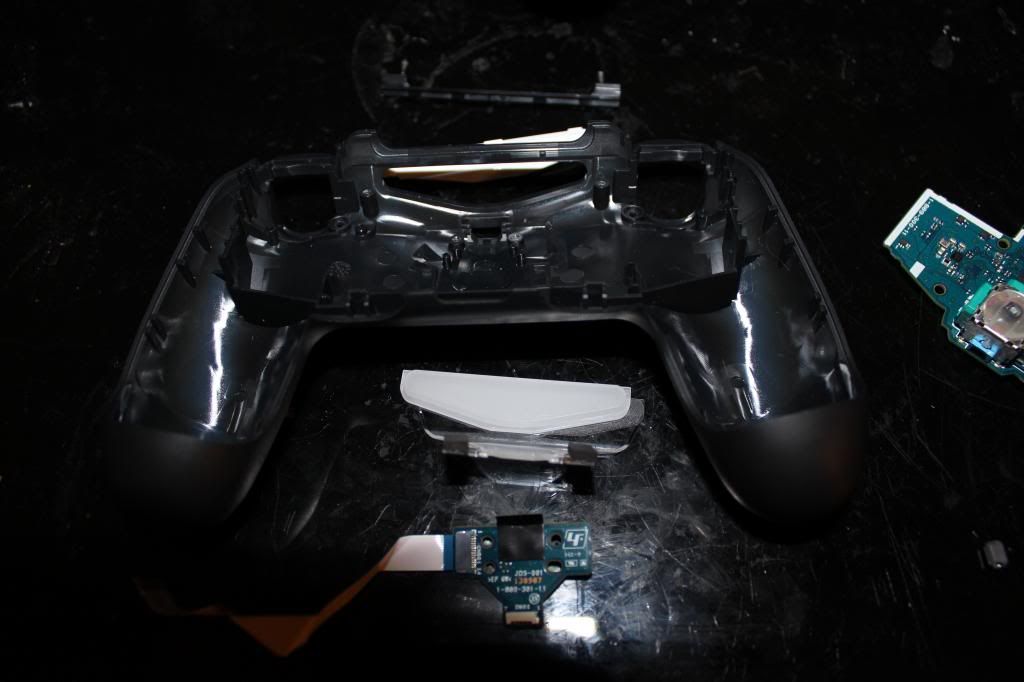
IMG_0342_zps8f1dea6e.jpg

Remove and set aside the micro usb jack.
IMG_0343_zpsf0d6dec8.jpg

This is where you'll be wiring up the joystick and buttons to. Looks fun doesn't it?
IMG_0345_zps3e268abe.jpg

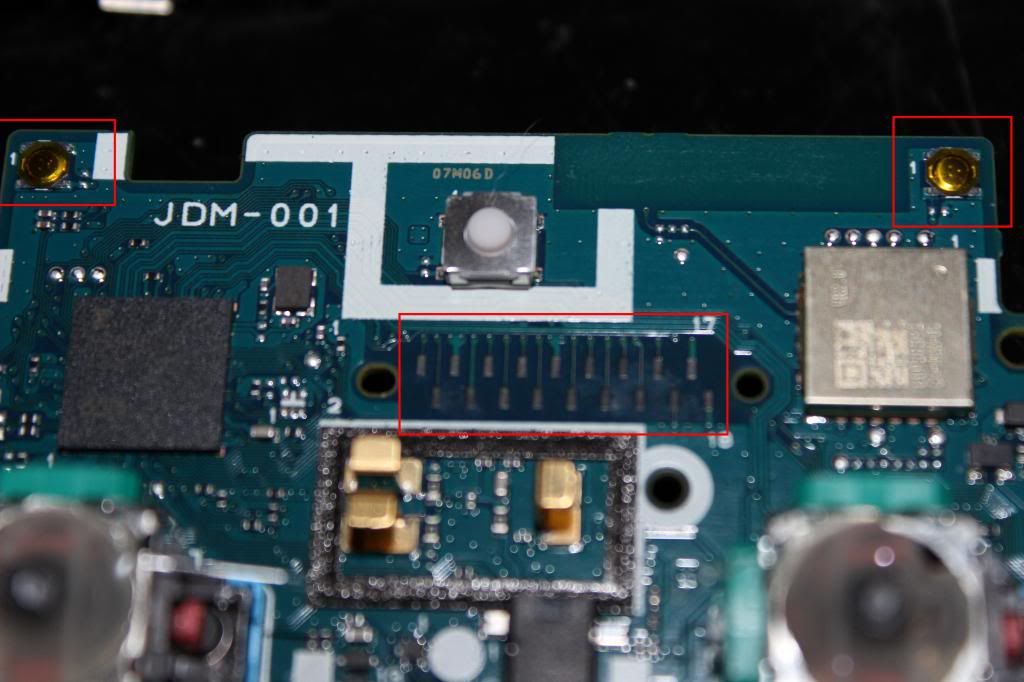
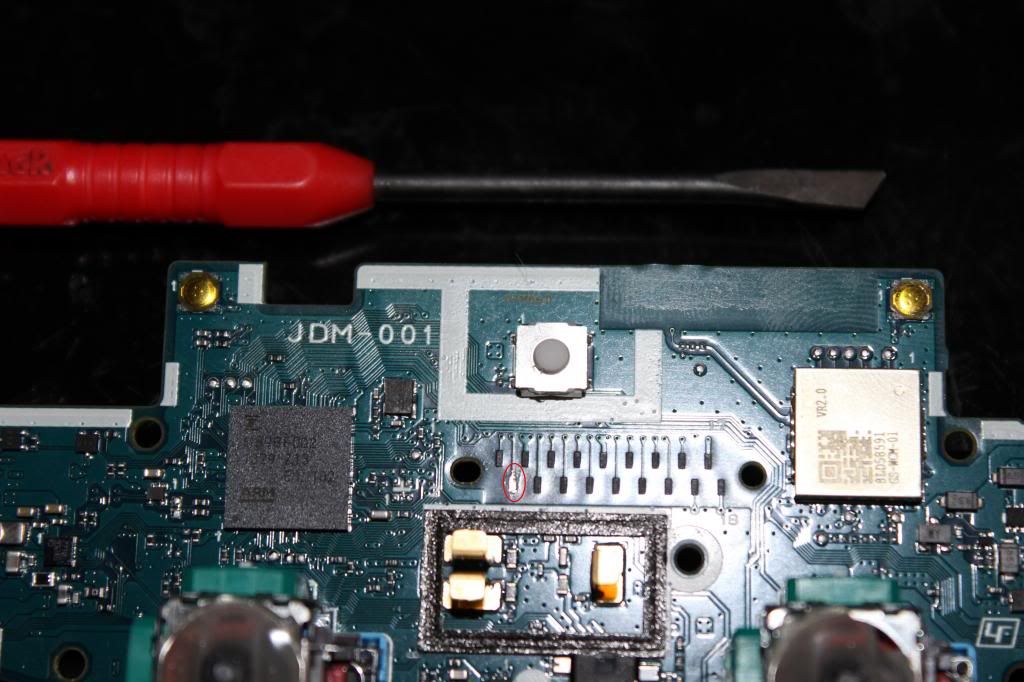
To gain access to the copper contact pads the carbon residue has to be scraped off.
IMG_0346_zpse7c0faea.jpg

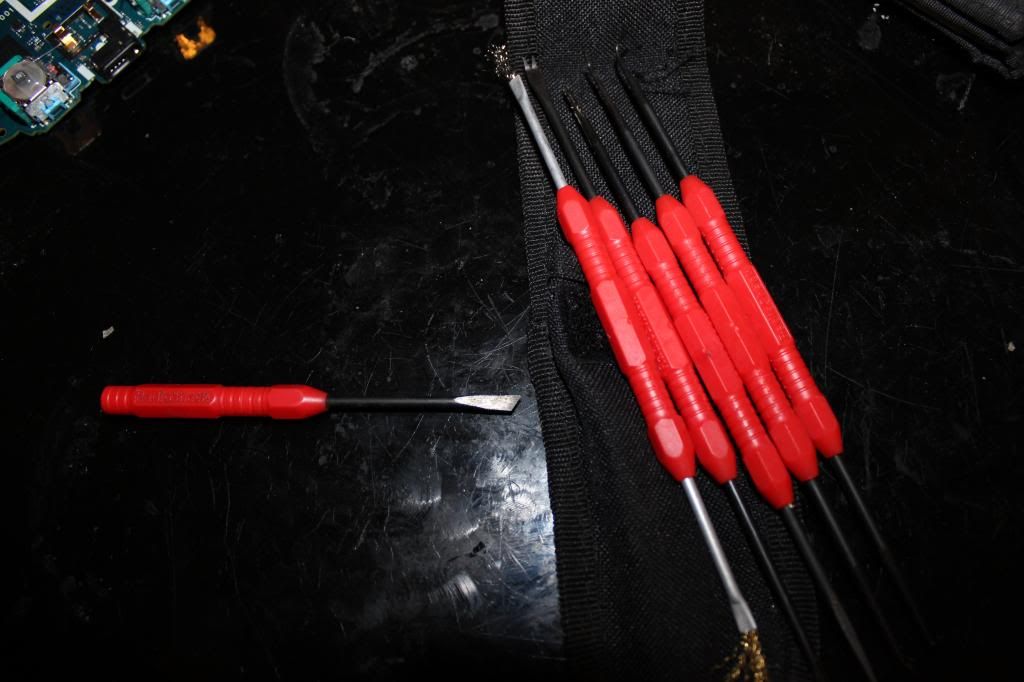
I have a pick set that I got from radio shack that I use to scrape off the carbon pads. The one on the left I accidentally broke in half from trying to pry something off. I suggest not using these picks to pry stuff off.
IMG_0348_zpsb592d658.jpg

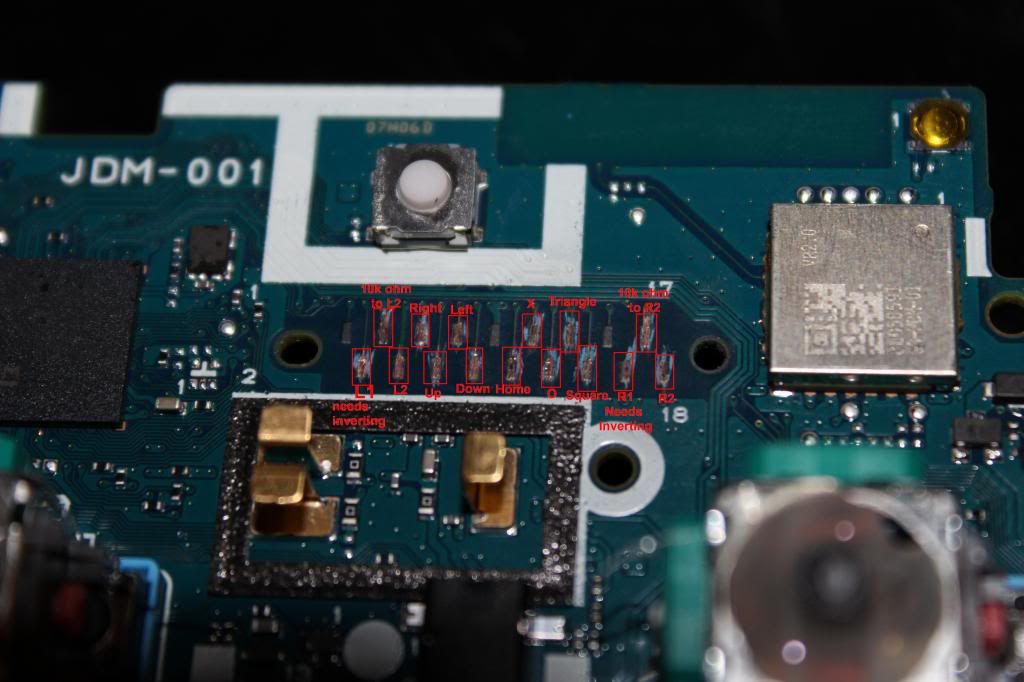
Here's the pinout for the 18 contact pads and which need to be scraped.
1-(Don't worry about me)
2-L1 (needs inverting)
3-10k ohm to pad4
4-L2
5-right
6-up
7-left
8-down
9-ground (Don't worry about scraping me either)
10-home
11-x
12-circle
13-triangle
14-square
15-(Don't worry about me too)
16-R1 (needs inverting)
17-10k ohm to pad18
18-R2
IMG_0349_zps2f5337b0.jpg

Tin the contact pads. Use flux as necessary.
IMG_0350_zps46ac45f6.jpg

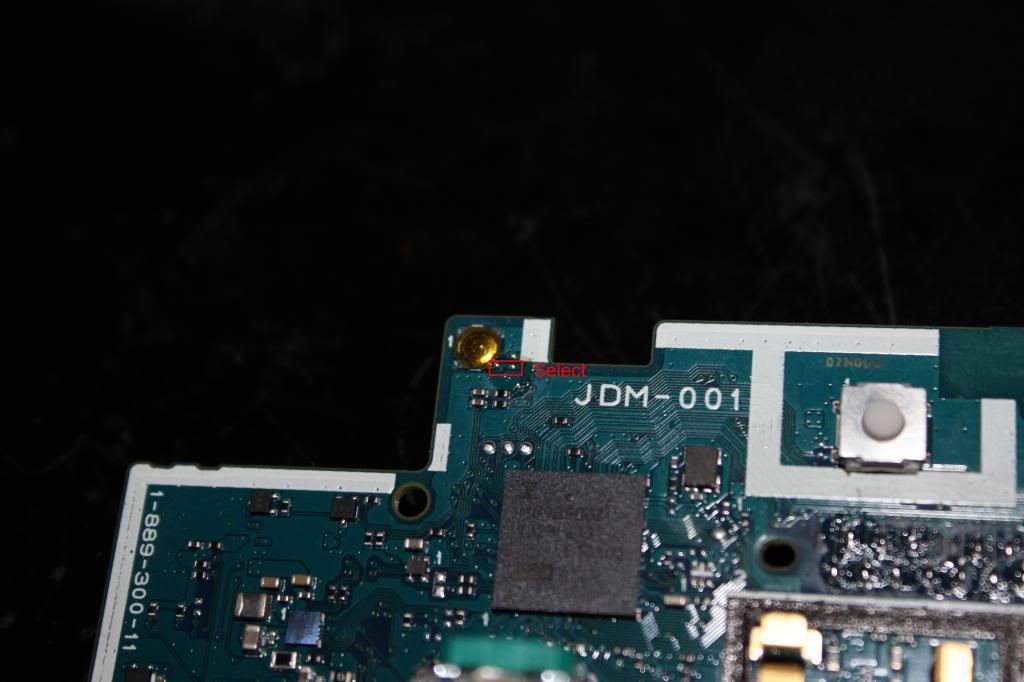
Tin the two very small contact spots in the rectangle for Select.
IMG_0351_zps5e8432e9.jpg

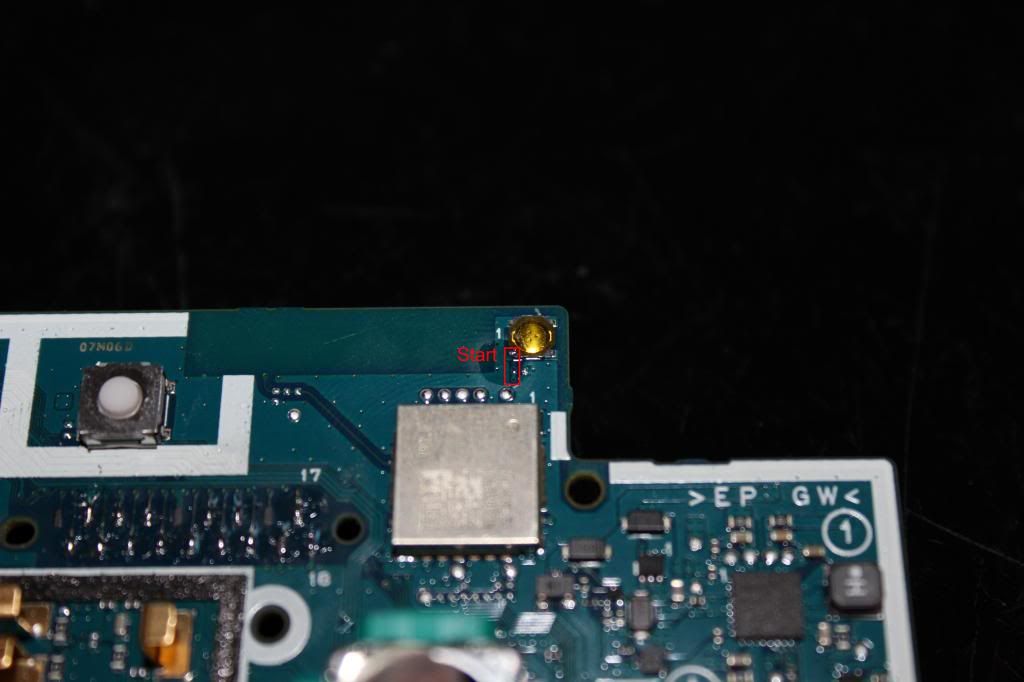
Tin the two very small contact spots in the rectangle for Start.
IMG_0352_zps4cd67d9f.jpg

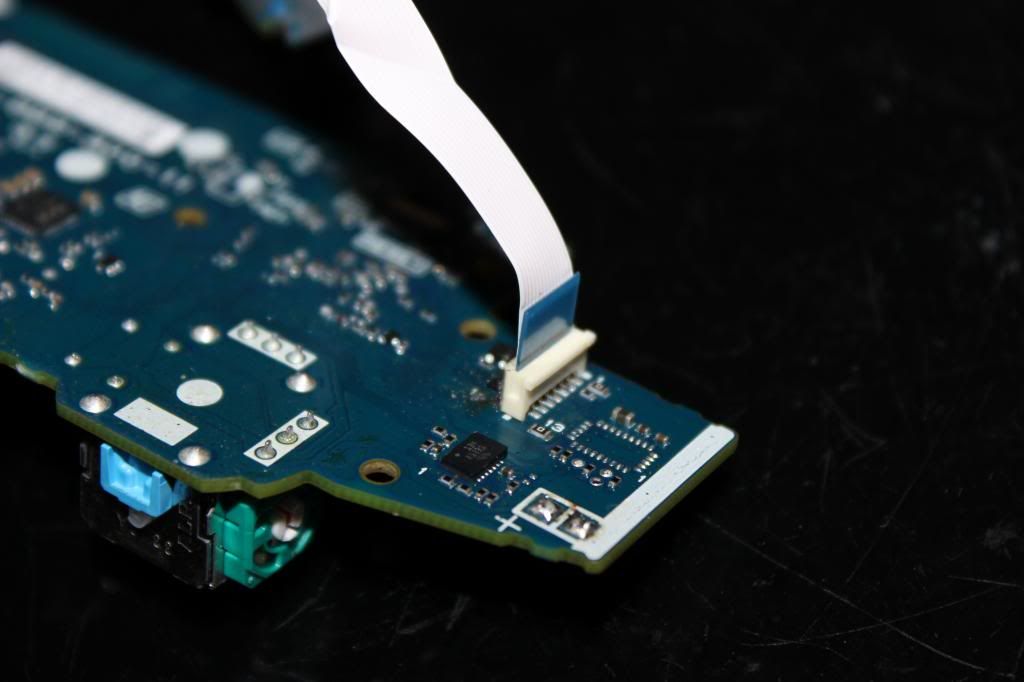
Look at this. This is the ribbon connector for the usb jack. See how simple this is? Want to see how hard your life will be if you don't use this? Just check out the next picture.
IMG_0354_zps133a474f.jpg

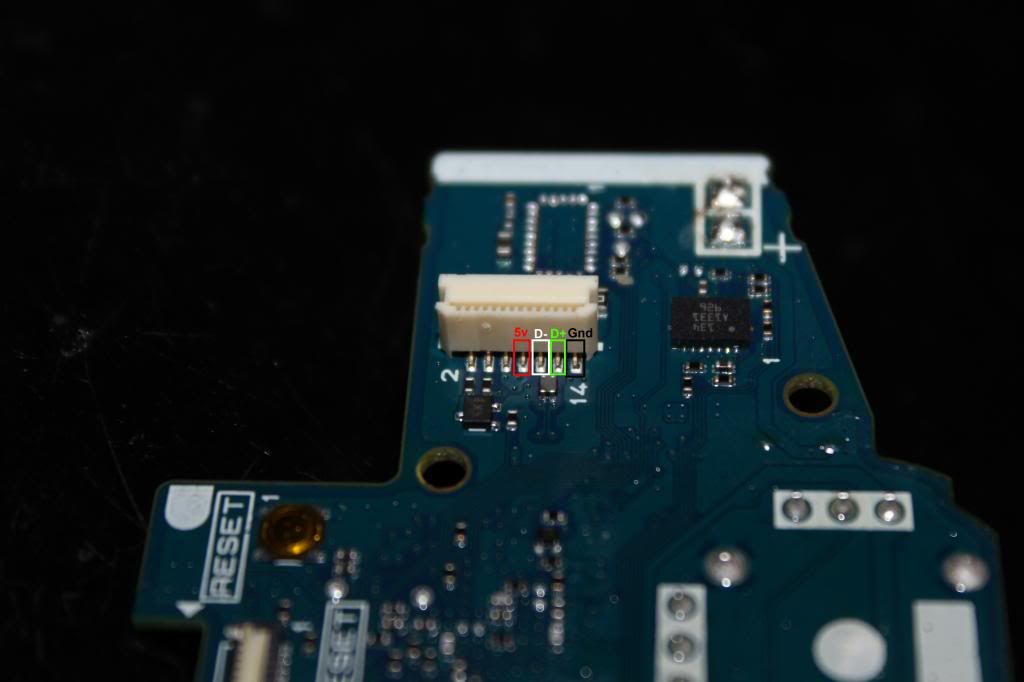
These are the four pins you will have to solder to if you don't want to use the micro usb jack. Pretty small and cramped there.
8- Vcc
10- D-
12- D+
14- GND
IMG_0353_zpsdb05b9bc.jpg

Of coarse removing the ribbon connector will make soldering to the contact pads much easier. This route might be necessary if you are limited in case space. In which case you'd have to remove the battery jack too.
IMG_0355_zps79565b7c.jpg


Now the DS4 pcb is all prepared to begin the wiring!

The Wii U TTT2 Stick Discussion Thread

$
0
0
At first this was a post about my thoughts on the sales price and weather it was worth buying or not for dual modding purposes, however the topic evolved into a general discussion thread about the stick, so i changed the title :)

I, just like a bunch of other people, had the perfect plan: buying the Madcatz TTT2 TE for the Wii U (only 50 dollars) and dual mod it for PS3/360
After having my credit cards denied at the Madcatz store, I got kinda frustated and decided that my new stick would be a custom, and started buying the stuff to build it.

However I'm not here to talk about my experience, as many people might not be willing to spend a lot of money in a good custom stick (that's why they were going with this stick to begin with), my case was different because my idea was literally buying it to mod the hell out of it just for fun, so building a custom sounded even better for me...

First, let's check the prices:
50 dollars for the wii u stick
35 dollars for an MC Cthulhu/30ish dollars for a pad/general PCB price
10 dollars MIN for wiring and cables (even more if you want sleeving and other pretty things)
10 dollars +- for shipping (11 in my case, to MD)

That alone adds up to the price of at least 90 dollars

After all that, you have all the work, soldering, wiring, etc... that might be hard for unexperienced people

So I gotta ask: is it really worth it?

I will answer this myself: It depends.

I would recommend getting the wii u stick on these cases:
Your main game is Tekken Tag Tournament 2 and the Wii U is your practice console (lol)
You just want to have fun modding stuff, then go for it
You legitimately want a fightstick for the wii u to play virtual console games
You have money and don't know where to spend it (you can give it to me though)
Honestly, that's all I got.

Now if your intentions are:
Play on the Xbox 360/Play on the PS3
Play on PC
Have a good stick for your games
And pretty much everything not listed on the previous list

Why not just get an Madcatz Fightstick pro?
It's currently 99 dollars on Amazon
It's still a madcatz stick, with sanwa parts
It will work on PC and Console of choice out of the box
Free 2 days shipping for those that have prime (I'm pretty sure most people have it)
It will save you some rage and headache of modding (in case you're someone that rages lol)

Well guys, that's it. I just decided to talk a little about what I think from what I've seen on the last few days
Tell me what you think, and I may even change my mind :)
I like good discussions

Peace dudes

TE2 Crossbone - Electrical mods made significantly easier for the Madcatz TE2

$
0
0
Crossbone-Logo-Color-300x187.png

The T.E.2 Crossbone is designed to give the same compatibility styling as the regular Crossbone, giving you the ability to easily hack your xbox one compatible PCB into a cross compatible system. The main difference being that this one is designed specifically for the Madcatz TE2, which currently is the only arcade stick available for the Xbox One, and a damn fine one at that.

Why?
This is the main question, since the TE2 is designed to be as moddable as possible, yet electrically it's pretty unmoddable in the classic sense. You can't simply connect another PCB to it's inputs, as they are not exactly compliant with the standard you see in most setups. To put it simply, it's not "common ground," which means that all of the I/O being used in the mod do not have a return path to ground but instead have a return path to a common signal that is far harder to work with.

The exact reasoning/setup of the TE2 is hard to describe, so I won't go into detail here, but suffice it to say that simply connecting to the PCBs signals won't work straight up. You need a middle man to bridge that gap, and that's where the TE2 Crossbone comes in.

IMG_0088-300x225.jpg
Top Side

IMG_0092-300x225.jpg
Bottom Side

The design is very simple. You remove the plastic enclosure surrounding the PCB and remove all of the ribbon cables, plug the TE2 Crossbone into the original PCB and then put the ribbon cables back into place. The original button harness goes to the spot labeled BUTTON HARNESS, and a double ended ribbon cable goes to a position labeled PCB HARNESS and gets plugged into the spot the harness originally went.

IMG_0090-225x300.jpg
Button Harness position, the button wire harness goes here

IMG_0091-225x300.jpg
PCB Harness position, the included ribbon cable gets plugged in here and the other end into the original harness position.

The board uses the "switch" input, located in the top right of the PCB to swap to the broken out points. You can put this to a physical switch, or in your dual system setup... any input you wish. The board will not swap or be able to use the secondary inputs without this so it's very important that you control/use this. This input simply needs to be grounded upon plug in to the system to swap over, it can be released afterward.

I tried to think of a way to automate the swap, but ultimately it removed a lot of control from the user and could cause unwanted states if drivers for PC are released.


IMG_0089-225x300.jpg

The board is equipped with a data signal switch ability, and allows you to utilize the original USB connection for a one cable setup.
USB OUT = Outbound USB connection (I.E. The cable)
XB1 IN = The Xbox One PCB's USB signals
SYS. 2 = The secondary system you wish to use (I.E. PS360+, Cerberus, Cthulu, etc.)

The system will default to Xbox One usage, and can swap to the secondary system via the "Switch" input, which is described a bit more above. The "Invert" solder jumper allows you to invert the primary system, making it so that SYS. 2 is on by default, and XB1 will be the swapped to system when "Switch" is utilized.


The signals are broken out into 3.5mm screw terminal/solder positions, and also a 20P header that matches the PS360+ for ribbon cable usage. However, due to the height limitations of the TE2 you should be aware that you need to actually run the cable/headers on the underside of the board. I'll show this in the installation section.

If you haven't quite gathered it, this mod DOES require soldering. While fairly easy, if you aren't comfortable with this you should consult your nearest modder/steady solder hand. I've tried to make the important solder points as large as possible for ease of use.

Installation (start to finish with a PS360+)

Step 1.
Remove the plastic casing of the PCB, and it helps to remove the cover on the START and SELECT area to give you more slack while you work.

Step 2.
Disconnect the USB wires from the Xbox One PCB, strip and tin them. At this point it's also a good idea to solder a couple of small wires to the D+ and D- signals on the PCB.

IMG_0093-300x225.jpg
IMG_0095-225x300.jpg

Step 3.
Align the TE2 Crossbone with the original PCB, and press down until it bottoms out. To effectively get pressure, you should press on the black shrouded headers, do NOT press towards the bottom area of the board since there's really no support and could cause damage from the bending.

IMG_0097-225x300.jpg
IMG_0098-225x300.jpg

Step 4.
Solder the USB cable's wires to the USB OUT signals. Then solder the Xbox One PCB's D- and D+ signals to the XB1 IN points.

IMG_0099-225x300.jpg
IMG_0100-225x300.jpg

Step 5.
In this installation I will use the 20P header, otherwise you could simply run the inputs however you choose but for demonstrative purposes this is best.

Install/solder the 20P headers to the underside of both PCBs, and connect the ribbon cables. It's OK if you need to uproot the TE2 Crossbone to do this, just put it down back in place afterward.

IMG_0106-225x300.jpg

Step 6.
I use the RJ45 cable assembly add-ons that are sold with the PS360+ for ease of use. You only need positions 5 and 6, which are D- and D+ respectively. Run those to the SYS. 2 positions on the TE2 Crossbone.

IMG_0107-225x300.jpg
IMG_0108-225x300.jpg

Step 7.
Run the "Switch" input to your choice of button to use. I chose "Home" since the PS360+ does not use that as any sort of forced mode.

IMG_0109-225x300.jpg

Step 8.
Finalize the install by putting the included ribbon cable in place. One end to the PCB Harness position, and one end to the original place the button harness went. It will lock into place once fully engaged.

IMG_0103-225x300.jpg

Step 9.
Put everything else back into place.

IMG_0110-225x300.jpg


Step 10.
Close it up. You'll find that the plastic housing for the PCB will no longer be able to be used, but you can manage the wires better than I can probably. Just make sure the closed top doesn't hit anything, and you're good to go.

IMG_0111-300x225.jpg


Testing

Step 1.
Plug it into your PC with nothing held down, you should get an error but still a description that "controller" or "fightstick" was there but not recognized. Alternatively you can test on your Xbox One immediately, but PC is always the best feedback, since it'll tell if you have power surges, etc. This will be very useful with PC drivers when they are released.

Step 2.
Unplug and replug with your "switch" input held down, the PC should read that the PS360+ is being used. Open up the controller properties and verify your inputs all register.


Hori Hayabusa unboxing + mods!

$
0
0
Ok, shit got real at about 8 pm at the UPS office when I had to pick this package up because someone, somewhere, got my apt # wrong. Anyway, look at this!!

I wonder what's inside!
Spoiler:
100_1561.JPG

Oh my, is that a PERSONALLY signed letter of thanks? Damn, Hori you know how to treat a man. If you keep this up, I may love you long time...
Spoiler:
100_1563.JPG


Oooh, so pretty! Sanwa never sends me such pretty boxes and Seimitsu? I don't even think they know what boxes are! But look at you Hori, I think you've sent me Pandora's Box! It's so dark and mysterious, I wonder...
Spoiler:
100_1564.JPG

What's this at the bottom of the box? *Gasp* The rumors are true! There ARE stickers! Hori, I'm taking a wild guess that you'd love it if I stuck these stickers all over my stick and went out in public, to a place like EVO maybe, right? Well... maybe if you treat me right, you know I might just do it! They aren't THAT bad looking! Yeah, ok, maybe I'm a little convinced, maybe...
Spoiler:
100_1565.JPG

Pandora's box in all her glory, just look at it.
Spoiler:
100_1566.JPG

Yeah, these are definitely going on my stick. Hori, are we going to go steady soon?
Spoiler:
100_1567.JPG


Oh my, look at all that protection you have. You wrapped it up just for me? Well, I don't like it wrapped, so we about to get raw in here.
Spoiler:
100_1568.JPG

Well, maybe lets not be too hasty now...
Spoiler:
100_1569.JPG

Aye, ye like foreplay, yea? Perhaps I was too eager, Hori. Look at these textured washers, allow me to illustrate their textured glory!
Spoiler:
100_1570.JPG

Ah, finally I have unwrapped thee. See the ball top? See the shaft cover? See the dust washers? And see Hayabusa in all her glory to the left? Oh, I can't wait! I'm going to get you so naked and raw in just a minute!
Spoiler:
100_1571.JPG

Alas, I hast unscrewed thine gate, and shall probe and prod hither and to! Glorious!
Spoiler:
100_1573.JPG

I see thou hast familiar parts... couldst thou be akin to mine past love?
Spoiler:
100_1574.JPG

Now I hath pulled mine shaft out. Gaze in awe at the glory of the pivot! See, tis well lubed! Nay, can't be! For ne'er hast I seen the lubing of shafts out of the box afore!
Spoiler:
100_1575.JPG

Aha! I thought thine parts familiar! Gaze at those pulled from the Elleste Fitty Sixt! Ye doth share, ye do! Welcome back to thine castle, Matsushita!
Spoiler:
100_1576.JPG

From the same mold, yea?
Spoiler:
100_1577.JPG

Oh, Hayabusa, as much as I love the obvious quality and care put into thee, alas, ye lack levers.
Spoiler:
100_1578.JPG

Doth mine eyes deceive! What trickery is this?!
Spoiler:
100_1579.JPG

Stock spring, meet mine friend, Elleste Fitty Fith spring! Thou aren't tense enough, mi'lady.
Spoiler:
100_1580.JPG

Ah, such a friendly PCB thou hast, for those nights ye feel alone and old, thou shalt hath new parts!
Spoiler:
100_1581.JPG

Tis true what hearest me about thine V...
Spoiler:
100_1582.JPG

Alas, thou shalt not do. To the lake, with ye!
Spoiler:
100_1583.JPG

And thou shalt meet Excalibur (*cough* Dremel *cough*) and mine grip shalt wield it so!
Spoiler:
100_1584.JPG

And thou shalt hath levers forever more!!
Spoiler:
100_1585.JPG

Plus a shaft and dustwasher of the purest silver! And a Dragon bat top bathed in the fairest moonlight of the night!
Spoiler:
100_1586.JPG

I hope you all enjoyed! Apologies about the delay but the mod had to be done before I posted. Why? Because, Tech Talk! I told you all I wouldn't go 5 minutes without modding it out the box. For what it's worth, this is like the best of both worlds for Sanwa and Seimitsu. As you can clearly see, the inclusion of the metal washer is clearly Sanwa inspired. The actuator as well, is Sanwa inspired. The material for the actuator has to be ABS. It's definitely not nylon or delrin, and definitely not acrylic. The gate is clearly Seimitsu inspired right down to the hole design and the switches and the tension also Seimitsu inspired. Considering they share the same brand switches, this is a no brainer but then the placement of the switches also feels clearly Seimitsu inspired. When I did the mod to the body no plastic melted even at a high speed and no funky odors as well. I definitely like the stick a lot so far. It has a ton of mod potential, a LS-55 spring has more tension and fits right in with no modding necessary. The shaft looks to be JLF inspired to a degree. The pivot has a high quality design but the material is not delrin or nylon, it feels much harder like ABS. I would have preferred delrin but, considering how limited the points of contact are on the pivot, I do not think this is an issue.

So far, I'm rating this a 10/10. Out the box it feels good, nice tension, decent engage though the throw feels large to me (I play on no throw mods) but isn't anywhere near as large as a JLF. The stick has a nice tension out of the box as well, not too loose like a JLF. I'm thinking this is more akin to a LS-40 in feel. The smooth pivot, the engage and throw, all reminds me of the 40. Very different from the LS-56 and JLF. I haven't used a LS-32 yet except briefly and this doesn't feel like that, either. At the moment, I'm going to say if you want to try a LS-40 and are willing to do a minor mod to get levers on the stick, then get a Hayabusa.

Thoughts on Qanba Q4RAF

$
0
0
So this baby just arrived today. Seems to be working great, so far it feels sturdier and heftier than a Madcatz Fightstick Pro I was using before. I'm just curious on what others' experiences have been with these sticks. I haven't seen too many reviews (decent ones at least). I did notice that every once in a while the joystick will squeak and in some cases it feels like it has a little bit of drag. I think it might be because the stick was sitting on the shelf for a while and maybe the lubrication wore of or something? If anyone has any suggestions to that let me know please. I might do a bit of an extensive review once I get more familiar with it, if anyone's interested.

hqHlXcl.jpg
Viewing all 8072 articles
Browse latest View live