Quantcast
Channel: Tech Talk — shoryuken
Viewing all 8072 articles
Browse latest View live

Cerberus: Unleash the hellhound in your arcade stick

$
0
0
Cerberus-300x194.png
Picture-004-300x225.jpg
Cheesy title.. I know >: )

The Cerberus is, ultimately, a revamp of my TEasy Strike/TEasy Mod. It's goal is to provide the user with solderless modding options for their MadCatz Xbox 360 T.E. arcade sticks to allow them access to PlayStation 3 consoles for "dual" functionality in a single stick.

However, it may overall result in the same basic principle to give the user a dual mod with next to no effort, it's method for accomplishing that is far different. The TEasy Strike/Mod used spring loaded pins to access the original signals, the Cerberus does not. Instead, it utilizes undermounted sockets that interface with the original board. This method allows for a more solid installation, and also is actually easier for the user to do since there is little alignment required. The top right of the board has an alignment hole to see the top right most mounting screw through to give you one alignment point, as well as the board being thinner than the original Xbox 360 PCB so that the user can actually see the connection's alignment while it's happening.
Picture-008-300x225.jpg
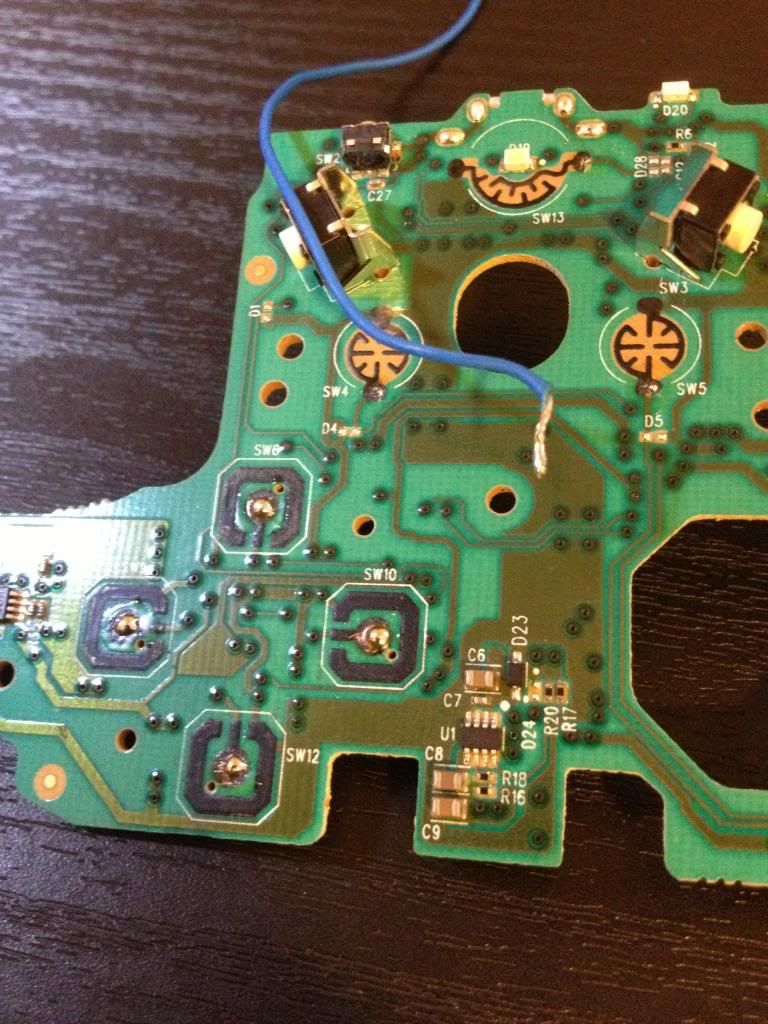
The Cerberus board mounted to the original Xbox360 enabled PCB.
Picture-009-300x225.jpg
Alignment hole to view the mounting screw.
Also pictured are solderable points for Ground and VCC for usage with other modifications such as LEDs and optical joysticks.
Picture-010-300x225.jpg
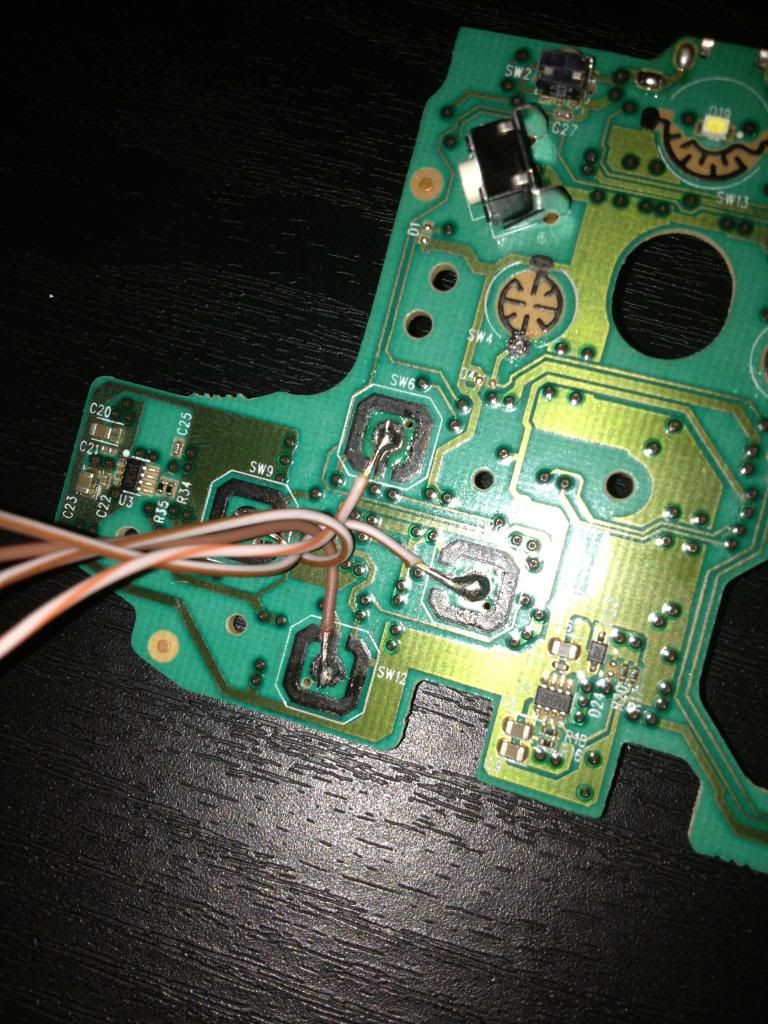
User’s view when installing, you can actually see the connection for instant feedback on alignment.
As you can probably tell, the USB cable connection points look different this time as well. They are in fact IDC terminals (Insulation Displacement Connection), which make it so that you only have to remove the outer sheath of the USB cable. The 4 wires (VCC, D+, D-, GND) do not have to be stripped. Simply inserted into the terminals and closed tightly with your fingers, you don’t even need a flat head screwdriver like the TEasy did to punch the terminals down. They’re smaller, sleeker, and do a bang up job for ease of installation. Although they are easier to use, it’s good to note that extra care should be taken to ensure they are down all the way, which I will show an example of in the Installation section.
Picture-006-300x225.jpg
IDC Terminal front view. Note that “USB IN” is only labeled on the prototype, you will see “X360 IN” for this particular pair in the final version.
Now, the name Cerberus is not just picked because it sounds cool (although I do really like it). The PCB does in fact have 3 accessible faces for the user.
  1. Bottom Face – Accesses the original Xbox 360 PCB
  2. Top Face – Accesses the JST connector harnesses that go to the rest of the arcade stick.
  3. Inner Face – This is a special advanced face that the user can access by soldering directly to.
The third (inner) face, has been specially planned out for advanced users. You may notice that all of the components are centered into a small area of the board. The reason is shown below:
Picture-005-300x225.jpg
Third face shown, the silk screen outline denotes cut lines. The gold pads are solderable for advanced usage.
The top/bottom board components that allow the PC/PS3 controller circuit to function are smashed into a tiny area to give the more savvy user the ability to literally cut the board down to the size of a quarter. This allows the user to install this board into not just it’s standard function of MadCatz Xbox 360 T.E arcade sticks, but into virtually anything.
Picture-002-300x225.jpg
Bottom side for easy soldering, the cut away section to the left.
Picture-003-300x225.jpg
Top side, denotes what’s left after cutting, the heart of this board.
*It should be noted that although the advanced operation is available, once you begin cutting the Cerberus PCB you void any and all warranty/support. This is for advanced users with the abilities required to perform such modifications.

*Also note that if you are using the cut down board and wish to use the Player LED signals. They are controlled via open collector configuration for usage with Common Anode LEDs. There are 4 0402 resistor positions (R2, R3, R4, R5) that you may wish to use. The original components are 0 (zero) Ohm resistors, so jumpers. Do NOT connect LEDs directly to these signals as you could cause irreparable damage to your setup.

Picture-032-300x225.jpg
Install FAQ Section:
Spoiler:
First make sure the pins are lined up nicely and try again. You can see where the pins are rubbing into the plastic of the connector on the Cerberus and adjust by that. Then if that doesn't work try out what mistcore has done below:
Klbti.jpg
This was my solution to installing the Cerberus successfully.
The JLF connector was rubbing up against that white guide, so I snipped the side of the guide.

Features

The Cerberus‘ list of current features are as follows:
  • PC/PS3 Functionality
  • Player indications for PS3 (Player numbers will appear on the guide ring of your arcade stick after a standard instllation)
  • LS/RS control by switching the control panel of the arcade stick
  • Auto-detection on supported systems
  • Forced passthrough mode for Xbox360 mode. Hold 1P (x) while plugging into allow this.
  • Forced PC/PS3 mode for debug/forced mode on PC. Hold 1K (a) while plugging in. (FW 1.01)
  • S+S=H ability on both PS3/360. Pressing a dedicated Home button will disable this. (FW 1.01)
  • Updatability through a USB bootloader for any firmware upgrades/bug fixes in the future. Hold START while plugging into your PC to access this mode.
Upgrading your firmware

TODO – Firmware update section

For those who know how you can upgrade the board via Atmel's FLIP DFU. The chip is an Atmega32U4

Firmware Downloads:

v1.01
  • Added code for S+S=H with a ~1/3s delay, dedicated home will disable the function. Will show up on new plugins with 1.01 as the version.
  • Also gave it a forced PC/PS3 mode, use LK to do so.
Arcade Stick Compatibility

Due to the measurement based install of the Cerberus. It will only fit SSF4 T.E. arcade sticks and newer. This means round 1/2 and SE sticks are not compatible. Obviously the cut down board does not follow this rule.
For quick reference if your stick is compatible, look on the PCB. If there is a KGND signal on the top row, it is compatible. The ONLY exception to this rule is BrawlSticks which are not compatible.
Quck Reference List of some compatible sticks, variants of these exist and more than these are compatible: *For the Fightstick PRO and the Soul Calibur V sticks, an extra step or two is required. Please see the installation section for details.

When you purchase a Cerberus, you will receive the following:
1 x Cerberus PCB with reference sheet for installation.

Assembled Cerberus ($40.00) :

Picture-037-300x225.jpg

Advanced Cerberus (Advanced Users, Special Request ONLY, $30.00):

Easy print reference for the bottom of the board

Picture-004-300x225.jpg

Picture-006-300x225.jpg

Unfortunately I pulled a stupid and when I went to process the board files, I used the wrong file to do so. Luckily the only thing that is botched is the bottom designators, the silk screen still remains. This will only affect advanced users, since the top silk screen/labels are all picture perfect and have been improved upon since last build.
I will make a downloadable/printable image that has these designators for easy reference, they just won’t be ON the board this time, sorry guys.

One possible extra use for the advanced version is a cheap fix for a 360 TE that has a busted PCB. Just remove it and swap it with the half assembled one, and voila you have a working stick again. With a little fiddling you can get this to work with round 1/2′s for a fix also since it’s no longer reliant on attaching to another PCB.

Head over to the Cerberus page of my website for the latest updates/downloads/install notes.

eBay Ps2/ps3/PC usb encoder

$
0
0
So I've been wanting to build a simple fight stick for my PS2 console and came across this $20 usb/ps2 PCB/encoder just wondering if anyone has used this product before and how well does it work $T2eC16ZHJHMFH!ZBznZsBRywbtY+ug~~60_35.JPG

Sub 1 frame HDTV/Monitor Input Lag Database

$
0
0
Purpose: To index input lag (average) results from various HDTVs and monitors that have sub 1 frame (16.66ms) of lag when compared to a CRT TV or Monitor.

Sources:

http://www.tftcentral.co.uk - Test LCD monitors for input lag compared to a CRT monitor.

http://www.prad.de - Test input lag using an oscilloscope.

http://www.hdtvtest.co.uk - Test the latest HDTV's for input lag compared to a CRT display. (Which they started doing from April 2010)

The New Definitive HDTV Lag FAQ - Been through 55 pages (Will complete looking through the thread in the coming days) or so and will add the monitors or HDTVs that lag less than 1 frame compared to CRT. http://shoryuken.com/forum/index.php?threads/the-new-definitive-hdtv-lag-faq.55593/

Testing Methods:


Please refer to TFTCentral's article on testing methods.

http://www.tftcentral.co.uk/articles/input_lag.htm

Preferred Testing Program / Hardware:

SMTT v2.0 or Oscilloscope.

http://smtt.thomasthiemann.com/index_en.html (SMTT Homepage)

http://en.wikipedia.org/wiki/Oscilloscope (Info on Oscilloscopes.)

How you can help: If you find that I have missed a HDTV or Monitor that has sub 1frame (average) of lag compared to a CRT please link to the test and results. If everything checks out it will be added to the list.

HDTVs:

Sony 32W400 - 8.6ms input lag 32" 1080p

Panasonic TC-L32X1 - 8-9ms input lag 32" 720p

Samsung LE32C530 - 14ms input lag (Any mode) 32" 1080p (U.S model LA32C530)

Panasonic TX-P50ST50B - 16ms input lag 50" 1080p (U.S model TC-P50ST50)

Samsung UE32D5000 - 16ms input lag 32" 1080p (U.S model UA32D5000)

Samsung LE32C450 - 16ms input lag 32" 720p (U.S model LA32C450)

Panasonic TX-P42S30B - 16ms input lag 42" 1080p (U.S model TC-P42S30)

Panasonic TX-P42C3B - 16ms input lag 42" 1024×768

Panasonic TX-P42ST30B - 16ms input lag 42" 1080p (U.S model TC-P42ST30)

Panasonic TX-P50S20B - 16ms input lag (Game picture mode) 50" 1080p

Panasonic TX-P42GT20 - 16ms input lag (2D to 3D conversion mode only) 42" 1080p

Panasonic TX-P42VT20B - 16ms input lag (2D to 3D conversion mode only) 42" 1080p

Panasonic TX-P46VT20B - 16ms input lag (2D to 3D conversion mode only) 46" 1080p

LG 32LD450 - 16ms input lag (Game picture mode) 32" 1080p

Samsung PS51D550 - 16ms input lag (HDMI 1 input label set to PC) 51" 1080p (U.S model PN51D550)

Samsung PS51D6900 - 16ms input lag (HDMI 1 input label set to PC) 51" (U.S model PS516900)

Toshiba 47VL863B - 16ms input lag (Game picture mode) 47" 1080p

User Reviewed HDTV's:

An area for user reviews of HDTV's that don't have hard results, however according to the poster "feels" to have low input lag. This section was added due to the very limited number of HDTV reviews that actually test for input lag. So, these HDTV's listed might be worth trying out at a store for yourself.

Samsung UE32EH5000 - low input lag 32" 1080p User Review

Monitors:

Dell E228WFP - 3ms input lag TN Film 22" 1680x1050 (User Tested)

Dell S2330MX - 3.8ms input lag TN Film 23" 1920x1080

Acer S243HLAbmii - 3.8ms input lag TN Film 24" 1920x1080

Philips 273P3LPHES - 4.4ms input lag (SmartResponse "On") TN Film 27" 1920x1080

ASUS MS238H - 5.05ms input lag TN Film 23" 1920x1080

AOC e2352Phz - 5.1ms input lag TN Film 23" 1920x1080

Samsung C27A750X - 5.3ms input lag (Fastest setting enabled) TN Film 27" 1920x1080

BenQ XL2410T - 5.6ms input lag (Instant = On) TN Film 120Hz 24" 1920x1080

Sceptre X270W - 5.75ms input lag TN Film 27" 1920x1080

BenQ GW2750HM - 6ms input lag AMVA27" 1920x1080

BenQ GW2450HM - 6ms input lag AMVA24" 1920x1080

LG IPS231P - 6.9ms input lag (user mode) e-IPS 23" 1920x1080

ASUS MS246H - 6.9ms input lag TN Film 24" 1920x1080

ASUS VE228H - 7ms input lag TN Film 22" 1920x1080

Samsung SM245B - 7.5ms input lag TN Film 24" 1920x1200

Hazro HZ30W - 7.5ms input lag S-IPS 30" 2560x1600

Hazro HZ26Wi - 7.5ms input lag H-IPS 26" 1920x1200

Asus VG278H - 7.9ms input lag (at 60Hz) TN Film 27" 1920x1080

NEC EA232WMi - 8.1ms input lag e-IPS 23" 1920x1080

Dell U2311H - 8.2ms input lag e-IPS 23" 1920x1080

ASUS VE247H - 8.3ms input lag TN Film 23.6" 1920x1080

ASUS VH236H - 8.3ms input lag (game mode) TN Film 23" 1920x1080 (A.K.A EVO MONITOR)

ASUS VH238H - 8.3ms input lag TN Film 23" 1920x1080

Dell G2410H - 8.59ms input lag TN Film 24" 1920x1080

Hazro HZ27WC - 8.8ms input lag H-IPS 27" 2560x1440

NEC EA231WMi - 8.8ms input lag e-IPS 23" 1920x1080

Asus PA238Q - 8.9ms input lag P-IPS 23" 1920x1080p (Factory Setting)

Dell U2312HM - 9.3ms input lag e-IPS 23" 1920x1080

LG L227WT - 9.4ms input lag TN Film 22" 1680x1050

Viewsonic VX2739wm - 9.4ms input lag TN Film 27" 1920x1080

Dell U2412M - 9.4ms input lag e-IPS 24" 1920x1200

HP ZR24W - 10ms input lag e-IPS 24" 1920x1200

Samsung F2380 - 10.6ms input lag cPVA 23" 1920x1080

Dell U2311H - 10.6ms input lag e-IPS 23" 1920x1080

HP ZR30W - 11.26ms input lag S-IPS 30" 2560 x 1600

Hazro HZ27WB - 11.3ms input lag H-IPS 27" 2560x1440

ASUS VG236H - 12ms input lag TN Film 120Hz 23" 1920x1080

LG E2711PY-BN - 12.9ms input lag TN Film 27" 1920x1080

Apple 27" Cinema Display - 12.73ms input lag IPS 27" 2560x1440 (Late 2010 model)

BenQ XL2420T - 13ms input lag TN Film 24" 1920x1080

Dell U2410 - 14.4ms input lag (Game mode) H-IPS 24" 1920x1200

Hazro HZ30Wi - 14.4ms input lag H-IPS 30" 2560x1600

LG IPS235V - 14.7ms input lag e-IPS 23" 1920x1080

Samsung 2233RZ - 15ms input lag TN Film 22" 1680x1050

ASUS ML239H - 15ms input lag e-IPS 23" 1920x1080

Dell U2211H - 15.6ms e-IPS 22" 1920x1080

Panel Technologies TN Film, MVA, PVA and IPS Explained

http://www.tftcentral.co.uk/articles/content/panel_technologies_content.htm

Modding shops in EU ?

$
0
0
Hi all

Is there anyone that knows if there is any online shops in EU that sells things for arcade sticks ? i have a razer atrox that i wanted to "tune" :)

Qanba Q4 Relocating the start button...

$
0
0
I asked this question in the questions thread, but it got overlooked. I'm copying and pasting my comment here:

I just picked up a Qanba Q4 after using a custom TE-S stick for a couple of months. I plan on modding this one and had a question. I'm a minimalist, so I plan on ordering a plain black plexiglass cover with only the first 6 buttons. I'd like to relocate the start button.

I was wondering if I could rewire the stick so that the SELECT button on the top-front pnale would be the start button instead (and just not have a select button). Is this possible? If not, I might dremel another 24mm hole near the top and place the start button there, similar to the TE-S.

I opened the stick up, and there is only one wire running from the main PCB to the SELECT/MODE/TURBO etc PCB labelled select. If I remove that wire and replace it with the START wire (not its ground), would that work?

Any suggestions or thoughts? Is there any reason I would need that SELECT/BACK button?

From your experience, was it more advantageous to buy a PS3 or 360 version of a fighstick?

$
0
0
Im buying a madcatz pro and depending on my local scene theres both 360 and ps3 support. However, i wanna think outside just local play. In general which console is more popularly used in tournaments?

TV no good for gaming?

$
0
0
So I'm not new to SFIV but I was practicing linking normals with Evil Ryu and noticed how slow the inputs are registered. My TV doesn't have a 'game mode' so I'm assuming its not good for gaming, especially this one. Should I switch to something else? I have a bunch of computer monitors but I don't know if thats any better.

Can't Connect My 360 Madcatz TE Fightstick to PC

$
0
0
I am having big problem with my 360 SFIV TE Fightstick.

When I connect it to the computer the lights flash once and it turns off. I get a driver error and it shows up in device manager as an unknown device. I have tried the following

1. Uninstall any old Xbox controller drivers on the computer > Restart > Install newer drivers
2. Same, but just plug it in to let them download themselves
3. Go to device manager and click on the unknown device > Update drivers manually > choose from a list and uncheck only show compatible drivers > pick the xbox controller driver... but it's not there
4. Same as above, but try to install driver manually from the system32 file. It tells me Unknown Device already is the best driver and too damn bad.
5. Plugging it into multiple computers. It doesn't work on my wife's laptop either.

It works fine on the 360 and wired 360 controllers work fine on my computer. This is just getting frustrating.

Does anyone have any other ideas?

ps2 to 360 adapter -fried

$
0
0
I was using Xtokki's adapter for the 360, plus an adapter for snes to ps2 on the windows game controller, when making a snes joystick with spare parts. I forgot about power differences and I fried the xtokki :( Anyone know if Xtokki's adapter has a fuse that could just be replaced for it to work again? the adapter does work on windows but not on the xbox 360. When I plug the adapter in to the 360 it'll flash 4 lights.

Xbox One PadHack Thread - Calling the goons "Toodles, Gummowned, Phreak and You" Do it for the Kids

$
0
0
Making the thread so we can combine our efforts and do this as soon as we can. I am going to try to get my hands on a controller asap.

P.S. This may be a little early but..... the people need this. Also missed Team tech talk, sup. If you are a big dog around here, please reply below, I only know OG's

JUST WANT TO THANK EVERYONE FOR THEIR AWESOME WORK. HERE IS AN AWESOME PCB PINOUT GUIDE BY CHAOTIC MONK(Great Job!)
Heres an attempt to consolidate the thread into a guide.

If your new to padhacking, highly recommend reading this as it goes over a lot of it http://www.slagcoin.com/joystick/pcb_wiring.html

Before you begin, test the controller out and make sure all the inputs work. Last thing you'd want to do is void it and later discover its a dud.

Start off by removing the boards from inside the pad as done in this vid (you can stop watching at 6:26).
image

You'll be left with 2 PCBs shown below with the spots you'll be connecting too (optionally you could connect to the pins shown but can be difficult due to close proximity)
pcb.jpg~original

On Top Board Topside you'll notice a 'sticker' on the dpad.
dpad.jpg

You'll want to use something thin and sharp to lift an edge then you should be able to just peel it off.
removedpad.jpg

Gently and carefully scrape off the black stuff at the signal points till you see shiny metal (careful not to scrap too much or you could take off the contact point).
scrape.jpg

keep going on all the signal points till you have shiny metal visible and ready for tinning.
scraped2.jpg

Tin (apply small amount of solder) the signal points and wires. Can be made easier with the use of flux
tinned.jpg

Solder the wires to the signal points (put tinned wire against tinned signal point, apply heat and they should join together)
solder.jpg

You'll want to apply a dab of hot glue to the wire next to each solder to stop it from moving around and potentially breaking off.

When connecting the triggers (RT & LT), you'll need to use a 100ohm resistor
2w30soi.jpg (img credit MacabreMonster)

The two analog cubes can be left on the board or taken off and replaced with resistors.

If leaving on the board simply cut down the grey analog pole that sticks out of the cube and while making sure its centered, apply hot glue to keep it in place.
PE1fxl8.jpg (img credit socks)

If removing, you'll need to replace with 4 resistors (10k ohm recommended).
There'll be 2 sets of 3 points. You'll need to connect a resistor from each of the outer points to the center point.
analogresistor.jpg

Once you have everything wired up your ready to add to your stick. The rest depends on what your setup is.

If your just doing an Xbone stick then its just a matter of connecting the wires to the button/stick and feeding a micro usb cable through.
330uuyx.jpg (img credit MacabreMonster)

If adding to an existing setup with other boards you'll either want to use a seperate usb cable for xbone and leave the existing usb for your current setup
or you'll need to add a switch to determine where the usb should go (could be an actual switch or an Imp board).
Just make sure every board has power (VCC) and ground connected to it or you'll run into issues with buttons pressing by themselves.
instick2.jpg

Good luck!

HORI Fighting Commander 4 for PS3 and PS4

FAQ: Buying Arcade Sticks & Parts in Canada

$
0
0
2013 Update - cleaned out a bunch of old stuff and added a few new ones.

1. Where can I buy sticks in Canada?

Amazon.ca
GameShark Store Canada (MadCatz official store)
Canadian Joysticks

2. Where can I buy modding parts in Canada?

Inside Canada
Canadian Joysticks - http://www.canadianjoysticks.com/
Playdium - https://www.theplaydiumstore.com/c-2-parts.aspx?id=3

Outside of Canada
The following part vendors ship to Canada. I've ordered from all of them with no issues. Shipping tends to take a while to get across the border. Lizardlick has the cheapest shipping to Canada that I've come across.
FocusAttack (Sticks, buttons, pcbs) - Focus Attack
akihabarashop.jp (Sticks, buttons, pcbs) - AkihabaraShop.jp
Art's Hobbies (Plexi, cases) - Welcome to Art's Hobbies

Looking to mod a Mad Catz SE

$
0
0
I picked up an SE model a while back, the stick is pretty horrible so I ordered a Sanwa JLF stick, GT Y octagonal gate and a full set of OBSF buttons while I was at it. I'd like to use it on PC as well but unfortunately it doesn't agree with my USB chipset and an attempt at adding a (possibly compatible) VIA chip have given me nothing but headaches with regards to driver compatibility. Can anyone recommend a good PCB for PS3/PC compatibility?

On a less urgent note is there somewhere that ships good alternative artwork, these sticks are pretty old now so I don't hold too much hope.

Netherlands vs Spain live ONLINE STREAM FIFA 14 WORLD CUP SOCCER.

Is there a way to tell if I have a ps360+ in a used stick I bought?

$
0
0
I recently bought a stick off of someone that said it is dual modded. I opened up the stick and looked at the board and it looks like a ps360+. Is there another way I can tell it is like via the PC?

Thanks.

Madcatz Killer Instinct T.E 2 (Xbox One) HELP on PC

$
0
0
Hey guys, i need help with the stick, LT and RT buttons wont recognize but the rest of the buttons work.

PSX solderless A pcb help

$
0
0
edit: Nevermind, found another one to compare it to!

Qanba Q1 xbox 360 arcade stick

$
0
0
Is this any good? Obviously is not the best, compared to Hori or MadCatz but is this decent for $75? Is it made with sanwa parts? Personally i think it looks cool but looks can be deceiving.

Dual Controller Help

$
0
0
So Im a pad player............I love the ps 1-3 pad style. However, the ps3 controller is not authorized at evo or most tournaments anymore. Is there a good option for a controller just like the ps controllers that is authorized and maybe compatible with xbox platforms as well? Thanks for your input!

Hori Real Arcade Pro ONE for XBox One

Viewing all 8072 articles
Browse latest View live