Quantcast
Channel: Tech Talk — shoryuken
Viewing all 8072 articles
Browse latest View live

I want to use my OG MAS STICK case

$
0
0
I have a old school mas stick case that pretty much doesnt work anymore...i was wondering what parts should i look into buying so it can hit the mas case? I know they were using happ parts however i would like to use:

1. Optical stick
2. sanwa buttons
3. a board that supports ps3/360/ and possible ps4 and x1

Any help would be dope!

RAZER ATROX Next Gen Mod?!

$
0
0
Hello guys,

I'm pretty new to the Genre and to Arcade Sticks. I'm from Germany and Beat'em ups are not really popular here.
You have to pay over $200 for an allready used TE mad catz stick and that's y I decided to buy a new Razer Atrox.

Maybe I'm gonna buy a new xbox One next year, maybe a PS4. I don't really know right now.
So my question is: Is it possible to mod this Stick that I can use it with the next gen consoles? I've read something on the US-ebay sites with 360+ on some sticks,
that they would allready be preparded for the next gen consoles.

Can I mod my Razer Atrox to use it on Xbox One when I got one?

best regards and sorry for my bad English :)


Andre

Mad Catz CURLEH MUSTACHE SOUTH Promo! $50 OFF AND FREE SHIPPING! WHAT!?

$
0
0
The Mad Catz CURLEH MUSTACHE SOUTH Promo! This is our best deal of the year, you DON'T want to miss out on it!

14177266498_e004ac2aec_b.jpg

14363890555_67763ca35a_b.jpg

Mad Catz’s special promo code ‘CURLEH’ gives you $50 OFF and FREE GROUND SHIPPING for US customers! Here are direct links to the products:

FightStick PRO for Xbox 360: http://store.madcatz.com/categories/fightsticks-category/Mad-Catz-Arcade-FightStick-PRO-for-Xbox360.html
FightStick PRO for PS3: http://store.madcatz.com/categories/fightsticks-category/Mad-Catz-Arcade-FightStick-PRO-for-PS3.html

FightStick KE for Xbox 360: http://store.madcatz.com/categories/fightsticks-category/Mad-Catz-Arcade-FightStick-KE-for-Xbox360.html
FightStick KE for PS3: http://store.madcatz.com/categories/fightsticks-category/Mad-Catz-Arcade-FightStick-KE-for-PS3.html

UD-CPS2: Fully Consolized Capcom Play System 2

$
0
0
Introduction -

Alright, folks, here it is, a fully consolized CPS2. And when I say fully consolized I don't mean with some monstrous external power supply and DB 15 connectors that require custom joysticks or adapters. I'm talking about a setup where everything is "off the shelf."

The core elements of this project are: Power, Video, and Controls:

Power - Internal DC/DC converter. An off the shelf laptop charger supplies this board with power which is then converted to proper voltages necessary to run everything inside.

Video - [NTSC] Composite, S-Video, and low resolution RGB+S (no Component). Uses a standard off the shelf Playstation A/V port cable.

Controls - 2 Player XBOX 360 and PS3 controller support. Yes, you just plug and play.

Photos of one of my prototypes:

th_DSC07928.jpgth_DSC07925.jpgth_DSC07923.jpg
th_DSC08337.jpg
th_DSC08335.jpg

Location Tests -

Devastation 2011 - Phoenix, AZ (early prototype, hard-wired controls)
th_DSC07913.jpg

EVO 2012 - Las Vegas, NV (prototype, XBOX 360 support)
th_DSC08205.jpg

AIAB This is It! 2012 - Tucson, AZ (prototype, PS3 & XBOX 360 support)
th_DSC08316.jpg

ST Games @ EVO 2013 - Las Vegas, NV (production, PS3 & XBOX 360 support)
th_DSCF0417_zpsb1535561.jpg

F.A.Q. -

Ordering:
Spoiler:
Q: What am I getting exactly?
A: You will receive a modified system (CPS2 A Board), power adapter (100-240V AC), video cable (Composite & S-Video), and USB cable for future firmware updates to the controller interface. You will still need a game (CPS2 B Board), TV (CRT with S-Video recommended), and controller (X360 or PS3).

Q: Can I pre-order one of these now?
A: Yes! I have not opened an official sales thread, but for the time being you can send me a PM or e-mail me: udgametech [AT] gmail.com

Q: So, how does ordering work, exactly?
A: Just let me know that you want to order a system and I will respond with an order number and an estimated time to complete it. When your order is being built, I will send you a payment request, after which you will have 2 weeks to make payment or forfeit your order position.

Q: How much does shipping cost?
A: It depends on which country you live in. USA is $20. Other countries vary.

Q: What forms of payment do you take?
A: This also depends on which country you live in. USA: PayPal (shipping only to verified address), money order, bank transfer, or personal check. Other countries: bank transfer or money order.

Q: I already have an A Board. Can I save money on my order and just send you mine?
A: Yes. You can receive $30 off of your order for each A-board sent (you can send multiple). However, you are not guaranteed to receive the exact board you sent (it is difficult to keep track of who sent what when they are disassembled in batches). Two other reasons to send me an A Board would be 1.) you would like an ASIA/Grey or SA/Orange compatible system, or 2.) you want an absolutely mint condition A Board and you happen to have one.

Q: I already have a laptop power supply. Can I save money on my order and just use mine?
A: No. I'd rather you start with a setup that has already been guaranteed to work than spend any time trying to figure out why power supply x isn't working properly.

General:
Spoiler:
Q: What region/color B Board (Game Cartridge) will run on the UD-CPS2?
A: The standard compatibility for the UD-CPS2 is US/Blue and JP/Green (and RENTAL/Yellow, as far as I know). If one desires to play ASIA/Grey or SA/Orange games, a custom order can be placed for a unit which is compatible with (only!) one of those.

Q: Will this still work on an arcade cabinet?
A: No. Even if the JAMMA connector were exposed, there are still technical reasons for it not being able to run both ways.

Video Related:
Spoiler:
Q: I'm tired of lugging around a heavy CRT TV to gatherings/tournaments. Being able to hook this up to a monitor would be a huge convenience. Is there any way to have Component Video available for this?
A: Not natively. You could run the UD-CPS2's RGBS output through an RGB to Component transcoder (like this) to output 240p Component Video, but any HD monitor (that actually supports 240p) must upscale that resolution in order to display it. Upscaling inevitably adds lag to your setup, therefore (non-HD) CRTs are the lag free display of choice for this system.

Q: I would like to stream/capture video from this unit. Do you have a recommended setup?
A: In the realm of standard resolution, the highest video quality for the least amount of hardware headache is certainly S-Video. By simply running S-Video and Stereo Audio to a distribution amplifier (like this or CE Labs AV 400SV) you can run both the player setup and stream/capture setup at excellent quality with fairly little extra hardware/cabling.

Q: Will this output PAL video?
A: No. There are no immediate plans to add PAL support.

Controller Related:
Spoiler:
Q: Will all PS3 and XBOX 360 controllers work with UD-CPS2?
A: This cannot be guaranteed, but based on location testing, it certainly works with the majority. Also, the controller interface firmware can be updated via USB, so future firmware updates may expand controller support as more data is gathered.

Q: Can USB controllers other than XBOX 360 & PS3 be used?
A: No. I'd like to add support for other controller types in the future, though.

Q: Can buttons be re-mapped?
A: Yes, all buttons except for START and SELECT are able to be mapped to any one of the 6 Punch/Kick buttons.

Q: Can directions be re-mapped?
A: No.

Spinoff Products -

For those of you looking to add XBOX 360 and PS3 controller support to your own superguns, I will be making discrete USB Decoders, soon. There's a dedicated thread for those here:

http://forums.shoryuken.com/discussion/186701/undamned-s-usb-decoders-usb-to-jamma-etc/p1

I will also be making available the internal DC/DC converter used in the UD-CPS2 so people can use those in their own consolization/supergun projects! When those are available, I will update this post with a link to a separate thread.

The rest of this thread is a work log from early in the project up to the present...

PS3 issues

$
0
0
I'm posting this here since I got no help from sony and also because tech talk.

Anyway my ps3 suddenly won't recognize anything plugged into the USB ports minus a few things. At first I thought the ports were going bad so I checked the prongs with a multimeter and they are fine. It also won't charge my dual shock 3 with a mini USB cord that worked last week. And yeah the cord is fine I can charge the controller with my computer.

None if my arcade sticks will work on ps3 now, but they work fine on PC (various pcbs in them - Cthulhu/mccthulhu, zd encoder, ps360+, ps1/2 stick with dualshock1 pcb via inpin adapter, namco stick with adapter, hrap3) they show up fine on PC as mccthulhu or ps3 controller with the inpin and they work fine on ps2.

What's strange is that I can still use a random iPhone cord to charge my phone and transfer saves and such with a flash drive. Has my ps3 locked out my 3rd party devices/arcade sticks?

Special offers in the EU?

$
0
0
I'm not in the market for any new peripherals right now but I have noticed that people are being advised on new arcade sticks etc the recommendations of sales and special offers always crops up, especially through companies like mad catz. The EU seems to be a bit of an outpost, the mad catz store for instance is ran through the mad catz subsidiary gameshark and everything has a specialist interests import feel to it. Does anyone know if the EU regions get sales similar to those in the US or is it better to just import?

Need HELP: Modded Hori T5 stick, but directionals does not work.

$
0
0
Ok, so I just finished modding my T5 stick with a new JLF and buttons. All of the buttons work except for the joysticks... it's not outputting any directions.

I used this tutorial when modding the T5: forums.shoryuken.com/discussion/40330/hori-t5-modding-tutorial/p1 . The tutorial explained the T5's PCB wires and their specific directions:
Grey 1 = Common ground
Grey 2 = Joystick Right
White 1 = Common ground
White 2 = Joystick Left
Yellow 1 = Common ground
Yellow 2 = Joystick Down
Red 1 = Common ground
Red 2 = Joystick Up
basically what you do is connect the black wire thats on the 5 pin harness to any one of the common ground wires coming out of the PCB. any ground wire is ok because theyre all at the same potential (thats what common ground means). the other ground wires you can tie off or just leave them hanging (probably better to tie it off).


The JLF did not come with a 5-pin wiring harness, so I bought one from Focus Attack. It is stated on their product page that the RED wire is the GROUND, not the BLACK wire like the official Sanwa's harness, so I did my wiring according to their info:
When connected to a Sanwa JLF joystick, use the following wiring from the 5-pin harness colors to your control PCB (Sanwa > DIRECTION > 5-Pin position [color]):

Orange > UP > 4 (Orange)
Red > DOWN > 5 (Green)
Yellow > LEFT > 3 (Black)
Green > RIGHT > 2 (Yellow)
Black > GROUND > 1 (Red)

My setup is based on the first picture (upper left) of this diagram:

JoystickWiringGuide2__90136.1349796435.1024.768.jpg?c=2

So yea I'm a little confused. Focus Attack says their harness's RED wire is for GROUND, but in the diagram the BLACK is GROUND and the harness that they sent me looks exactly like that one in the diagram, with BLACK as GROUND.

So can anybody tell me how I should do my wiring? Do it based on the diagram or Focus Attack's?

NEW Hori Fighting Stick VX (360) & V3 (PS3) Thread

$
0
0
Sucessor to the Hori EX2 and FS3?
MarkMan wrote:
Hori will be unveiling their new "Fighting Stick" series of arcade sticks prior to/at Tokyo Game Show 2009 this year.

They are 6 button arcade sticks and will be available on both the Xbox 360 (VX) and PS3 (V3).

The 360 version will be white and PS3 version will be black.

More details on this one as TGS rolls around.

http://cache.gawker.com/assets/images/kotaku/2009/09/sukima065400-1.jpg

I know I posted a link to a Left 4 Dead 2 thing, but it has pictures of what looks like magazine ads or something. If you look to the right of the L4D2 ad there is another ad for a Hori stick with a 6 button layout. It also doesn't seem to have any wires, but they never show that in ads anyways.

What do you guys think? Could they be rolling these out the same time they roll out with the new sticks that come with the Tekken 6 bundle?

Edit: I got this from Kotaku. Link: http://kotaku.com/5353782/left-4-dead-2-image-edited-for-japan

*The "padhacking" thread*

$
0
0
I thought a pad hacking/pad info thread should be started so that everybody can see where to solder on different pcb´s.
If you want a picture added please write in the thread.


***Microsoft***

Xbox:

http://slagcoin.com/joystick/pcb_diagrams/xbox_diagram1.jpg
http://slagcoin.com/joystick/pcb_diagrams/xbox_diagram2.jpg
http://slagcoin.com/joystick/pcb_diagrams/xbox_diagram3.jpg
http://slagcoin.com/joystick/pcb_diagrams/xbox_diagram4.jpg


Xbox 360:

http://slagcoin.com/joystick/pcb_diagrams/360_diagram1.jpg
http://slagcoin.com/joystick/pcb_diagrams/360_diagram2.jpg
http://slagcoin.com/joystick/pcb_diagrams/360_diagram3.jpg
http://slagcoin.com/joystick/pcb_diagrams/360_diagram4.jpg
http://slagcoin.com/joystick/pcb_diagrams/360_diagram5.jpg
http://slagcoin.com/joystick/pcb_diagrams/360_diagram6.jpg
http://slagcoin.com/joystick/pcb_diagrams/360_diagram7.jpg

http://akihabarashop.jp/images/ChImpHookUp360Full.jpg
Chimp with Madcatz Xbox 360 PCB.

http://akihabarashop.jp/images/IMPconnection.jpg
MCC with Madcatz Xbox 360 PCB and Imp PCB.


***NEC***

Turbo Grafx 16:

http://slagcoin.com/joystick/pcb_diagrams/tg_diagram1.jpg


***Nintendo***

Nintendo Entertainment System (NES):

http://slagcoin.com/joystick/pcb_diagrams/nes_diagram1.jpg
http://slagcoin.com/joystick/pcb_diagrams/nes_diagram2.jpg
http://slagcoin.com/joystick/pcb_diagrams/nes_diagram3.jpg


Super Nintendo Entertainment System (SNES):

http://slagcoin.com/joystick/pcb_diagrams/snes_diagram1.jpg
http://slagcoin.com/joystick/pcb_diagrams/snes_diagram.jpg


Nintendo 64:

http://slagcoin.com/joystick/pcb_diagrams/n64_diagram1.jpg


Nintendo GameCube:

http://slagcoin.com/joystick/pcb_diagrams/gc_diagram1.jpg


***SEGA***

Sega Genesis:

http://slagcoin.com/joystick/pcb_diagrams/gen_diagram1.jpg
http://slagcoin.com/joystick/pcb_diagrams/gen_diagram2.jpg


Sega Saturn:

http://slagcoin.com/joystick/pcb_diagrams/sat_diagram1.jpg
http://slagcoin.com/joystick/pcb_diagrams/sat_diagram2.jpg


Sega Dreamcast:

http://slagcoin.com/joystick/pcb_diagrams/dc_diagram1.jpg


***SONY***

Sony Playstation 1:

http://slagcoin.com/joystick/pcb_diagrams/ps1_diagram1.jpg
http://slagcoin.com/joystick/pcb_diagrams/ps1_diagram2.jpg
http://slagcoin.com/joystick/pcb_diagrams/ps1_diagram3.jpg
http://slagcoin.com/joystick/pcb_diagrams/ps1_diagram4.jpg
http://slagcoin.com/joystick/pcb_diagrams/ps1_diagram5.jpg
http://slagcoin.com/joystick/pcb_diagrams/ps1_diagram6.jpg
http://slagcoin.com/joystick/pcb_diagrams/ps1_diagram7.jpg
http://slagcoin.com/joystick/pcb_diagrams/ps1_diagram8.jpg
http://slagcoin.com/joystick/pcb_diagrams/ps1_diagram9.jpg


Sony Playstation 2:

http://slagcoin.com/joystick/pcb_diagrams/ps2_diagram1.jpg
http://slagcoin.com/joystick/pcb_diagrams/ps2_diagram2.jpg
http://slagcoin.com/joystick/pcb_diagrams/ps2_diagram3.jpg
http://slagcoin.com/joystick/pcb_diagrams/ps2_diagram4.jpg
http://slagcoin.com/joystick/pcb_diagrams/ps2_diagram5.jpg
http://slagcoin.com/joystick/pcb_diagrams/ps2_diagram6.jpg
http://slagcoin.com/joystick/pcb_diagrams/ps2_diagram7.jpg


Sony Playstation 3:

http://slagcoin.com/joystick/pcb_diagrams/ps3_diagram2.jpg
http://slagcoin.com/joystick/pcb_diagrams/ps3_diagram3.jpg

Face Buttons on TE-S Chun Li not working

$
0
0
Hey guys, this is something weird that I'm not sure what to do about. Over the last month my face buttons (ie. all 8 buttons) go out during match and don't work unless I repeatedly plug it and unplug it while switching it from PS3 to 360 mode where it will work and last either 10 minutes to a couple hours. I'm not sure whether I need to swap the PCB out completely or if it's just a button problem, or w/e else it could be. It has the original PCB but it's also dual-modded with a 360 fightpad, and when I change it to that mode the buttons don't work either. Is there anything I can test to find out what the issue really is? I do have a PS360+ lying around if it is a PCB issue. Any help is appreciated.

Honcam Mod (First Tutorial/Mod) with Free and Easy Mod Tutorial

$
0
0
After reading SRK forums for about a month, I am finally able to contribute. Paying for an arcade stick at the cost of +$100.00 is ridiculous. I wanted to bring an alternative to the Modded Mayflash, SE, and TE sticks. This post was inspired by http://forums.shoryuken.com/showthread.php?t=206013&highlight=honcam
Knowledge is power, so read up on your arcade stick stuff http://www.slagcoin.com

IMG_4541.jpg

I purchased 2 Honcam Arcade Sticks for $49.99 on ebay. Two crappy sticks for the price of one. :)
I am currently waiting for my order from LizardLicks. 2 JLF's and 20 Sanwa OSBF-30 buttons (various colors)


Out of the box, the stick was unable to perform diagnols. Fear not, here's a quick easy joystick mod to hold you over before the

replacement parts arrive. Besides, using a crappy stick to train on will help improve your Hadokens. :D


QUICK AND EASY MOD (MAY WORK ON MOST IF NOT ALL GENERIC CRAPPY STICKS)

Tools

1 Flathead Screw Driver
1 Phillips Screw Driver
4 inches of electrical tape

1. Remove the plastic film from the back panel of the plastic housing.

IMG_4542.jpg


2. Use your Flathead Screw Driver/Fingernails to remove the rubber feet. The adhesive is really good, I just replaced the feet right next to the screw holes.

3. Unscrew the 6 Phillips screws with the Phillips Screw Driver and remove the metal back panel.

4. Use the flathead screw driver to hold the shaft in place while you unscrew the balltop.

IMG_4543.jpg

5. Unscrew the 4 screws from the joystick and remove the stick from housing. Be careful, although the microswitches soldering points have been hotglued, they can still come off.

6. Carefully unlatch the restrictor gate with the screw driver. It comes very easily so be gentle.

IMG_4548.jpg

7. Carefully remove the microswitches (beware be gentle)

8. Wrap the electrical tape around the Actuator. (You can cut the access tape, but I left it as is since its going to be replaced anyway)

IMG_4551.jpg
IMG_4550.jpg


9. Replace the microswitches (in the correct order) and reattached the restrictor gate.
10. Rescrew all the appropriate screws in order to remount the stick and balltop. (don't forget the dust cover)
11. Replace the back metal panel and rescrew everything. DONE!

**The stick should now work, with a little effort. You can place more tape but I don't know if that will truly improve performance of

hitting the microswitches.**


Here are some pics that you will find helpful for soldering and such. **FYI** The points on the backside of the pcb works as well. Which is where I soldered the buttons. When mounting the JLF, the wireless harness will not work because there is not common ground for the directions. All the buttons can be daisy chained but the directions cannot. I had to solder directly to the microswitches. Also, you can use the original microswitches instead of desoldering the jlf (you can use that for later use). I tried both and they both work exactly the same. :)


DremelPlastic.jpg

FrontsideOfPCB.jpg

BacksideOfPCB.jpg

Joystick.jpg

I mounted the JLF horizontally. Which is why you have to dremel off the plastic where the stick was originally mounted and some areas around it.

IMG_4563.jpg


Here is the final product. I'm working on the template **Stay tuned** :) I hope that was helpful.

IMG_4558.jpg
IMG_4565.jpg

IMG_4567.jpg

IMG_4568.jpg
IMG_4566.jpg

Issue with multiple inputs on Hori VX SA

$
0
0
Recently switched to one of these after the PCB on my sanwa modded SE died.

One thing I've noticed on this new stick so far though, is that it has some kind of issue with multiple inputs, ie 2P or 3P. It's not as noticeable in newer games like SF4 or 3S where the timing is more lenient for what the game considers to be 2 or 3 simultaneous inputs, but with older games like Alpha 2, I can't get my level 2/3 supers and activates out as consistently as I did on my old stick.

I tested in the input window on the FBA emulator, and even though I'm pressing all the buttons together.

Anyone else noticed this? Is it just an issue with the stock sanwa buttons that the stick came with? Or is it some problem with the way the PCB is wired?

Paradise Arcade Shop, LED Joysticks, Buttons, Mods and more

$
0
0
logo.jpg
We have been floating around for a little while posting and received a recommendation to start a thread. Paradise Arcade Shop is based in Hawaii, working to bring a variety of controls to the arcade and fight stick market. We carry a number of different options for price points in both sticks and buttons, but we only sell products that we would use. That means, there is a difference between a Porsche and a Toyota, we see a place for both of those in the market, and we won't sell Toyota's at Porsche prices.

I say "we" as Ponyboy likes to harass me about, because the company is my wife and I. For those of you who have ordered already(thank you) she packs the orders and answers about 90% of the emails (mostly logisitics, but she is answering the "How to I light an LED" questions now) This is also her full time job and my part time job. She works hard to send out all stock items in 1-2 days, and rides my ass about the cutsom builds so they stay close to 1-3 days(We build LED sticks to order, and some of our game systems)

I have been an active membe of KLOV, Coinopspace, and BYOAC for sometime, and we sell on EBAY and Amazon. I will probably edit the intro down in the future, but I wanted just let people know who "we" are and who I am. Thank you for all the support and orders we already have received and now...it's time for the good stuff!

Mortal Kombat 9 Stick mod products!!!!! If you want new controls with the same forms to just upgrade your stick try some of these IL products and microswitch upgrades.

Translucent Concave IL buttons - A great upgrade to your stick, especially with...

IL-lumination LED pads - Available in RGB or single color
[media=youtube]P7zdGGsF2oI[/media]

IL Eurosticks provide "Happ Competition" Style with an upgrade in quality

And, for amazing light touch, upgrade any Happ or IL button to our 20 gram micros (Please note that these are 20 gram max spec and really are closer to 15 grams of actuation force)

We also carry JLF's, JLW's, LS-32, LS-32-01, LS-40, PS-14-KN pushbuttons, re-released PS-14-K Skeleton buttons, Paradise LED sticks, custom ball tops and a variety of hollow shafts(we also have 10 new custom hollow shafts on order, need a long JLF shaft or want to put a ball top on a Eurostick joystick?)

Finally... we have two new ball tops in, Pearls and Emerald Green that will be available shortly and were built to match the Rollie Buttons.
IMG_6424.JPG
And the answer is "Yes, the pearl will light up."
IMG_6432.JPG

Sanwa JLF double-input from microswitch

$
0
0
Hey all,

It looks like my Round 2 TE is acting up. When I slowly tap left, it will register left twice and starts a dash. But if I hold left quickly, it will register left once. But if I let it go, it will register another left input (kind of like a negative-edge).

Is this a microswitch issue or the PCB? Has any one run into this issue before?

Post pictures of your SF/entertainment setup!


The official Cthulhu and ChImp thread - Try our new Dreamcast flavor!

$
0
0
Welcome Sheets:
PS3 Cthulhu: http://www.godlikecontrols.com/download/PS3CthulhuWelcome.pdf
MC Cthulhu: http://www.godlikecontrols.com/download/MCCthulhuWelcome.pdf
ChImp: http://www.godlikecontrols.com/download/chimpwelcomev2.pdf
ChimpSMD: http://www.godlikecontrols.com/download/chimpsmdwelcome.pdf
Imp: http://www.godlikecontrols.com/download/impwelcome.pdf

MC Cthulhu newest firmware: http://www.godlikecontrols.com/download/cthulhu/MCCthulhu23.zip
MC Cthulhu Variations firmwares:
http://www.godlikecontrols.com/download/cthulhu/MC_Variations.zip
Cthulhu troubleshooting guide: http://shoryuken.com/forum/index.php?threads/t.46572/page-40#post-2271122
Chimp troubleshooting guide: http://shoryuken.com/forum/index.php?threads/t.46572/page-85#post-2273436
ChimpSMD newest official firmware: http://www.godlikecontrols.com/download/chimp/ChimpSMD12.zip
ChimpSMD Firmware Variations: http://www.godlikecontrols.com/download/chimp/ChimpSMD_Variations.zip

Imp thread:http://shoryuken.com/forum/index.php?threads/s.59232/

Q: I'm having problems on SF4 AE for PC.
A: http://shoryuken.com/forum/index.php?threads/t.46572/page-163#post-5526956

Q: When using the Cthulhu on a PC, I see Select and Start are buttons 9 and 10, and the Home button is button number 13. How come there is a button 11 and button 12, but nothing ever turns them on?
A: Buttons 11 and 12 are read by the Playstation 3 as L3 and R3, the 'clicks' when you press down on the analog sticks. Even though nothing on the Cthulhu activates them, we still have to send the information to the PS3 so that it believes we are a proper controller.

Q: Why won't the PS3 turn on when I press the Home button?
A: When the PS3 is off, it cuts power to the USB ports. SIXAXIS controllers are the only ones that can wake a PS3 up from being off. No wired controller can ever turn a PS3 on.

Q: When using the Cthulhu on a PC, moving the stick around causes BOTH the X/Y axis to change, and the POV Hat to change to match. When using the Cthulhu on a PS3, moving the stick around causes BOTH the d-pad to change, and the Left analog stick to change to match. Why does this happen, and how could I change it?
A: The Cthulhu is designed to do this; it's normal and won't cause any problems. This setup was created as a compromise between how PC games usually expect the directions to be reported (X/Y axis) and how the PS3 expects the d-pad to be reported (POV hat). With this setup, you can just plug and play on most if not all of the games you want to play on both PC and PS3. If you would like the stick to be reported as one and only one of those for whatever reason, hold down the Select or Start button when plugging in; I don't remember which is which, but one disables the X/Y and only reports dpad/POV hat, the other disables POVhat/dpad and only reports over the left analog stick/X/Yaxis

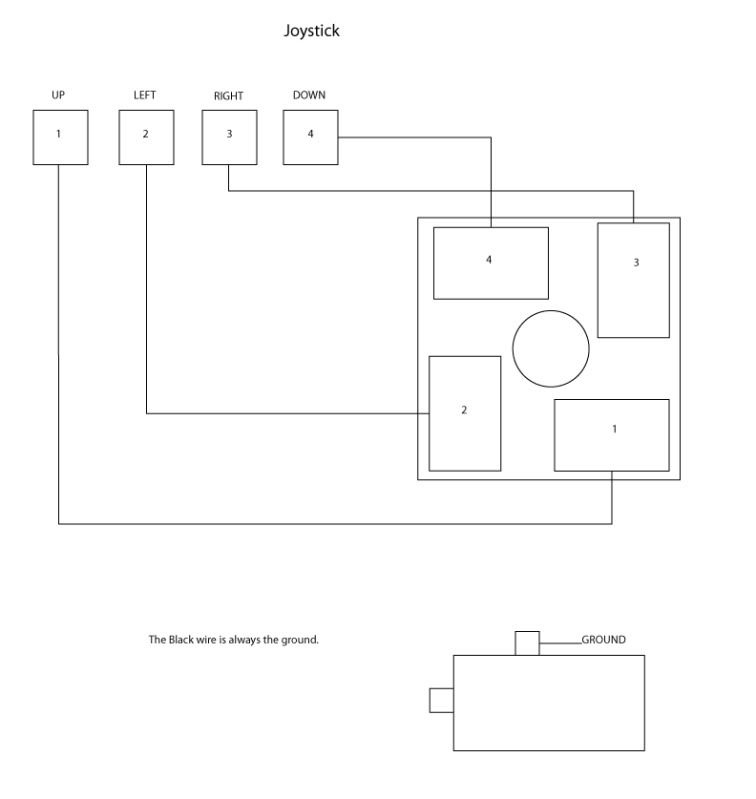
Q: Where can I access the D+/D- lines for a dual mod?
A: D- (white) can be tapped in the D column. D+ (green) can be tapped in the E column.

_________________
Multi-Console 'MC' Cthulhu questions:

Q: What is it?
A: The MC Cthulhu is the multi-console version of the Cthulhu. It uses a more feature-rich chip that allows for the board to support more than just the PS3.

Q: So what's different?
A: The chip is different, and it comes with diodes that help protect the console in case the cord is plugged into more than one console at a time. The green board is the same, all of the parts are the same, the pinout is the same, etc.

Q: What consoles will it work on?
A: Currently, the MC Cthulhu will work on the PS3 (with all of the functionality of the original PS3 Only Cthulhu, so yes, it works just fine on PC), Xbox1, Dreamcast, Playstion/Playstation 2, Gamecube, NES, Super Nintendo, 3DO*, Sega Saturn and TurboGrafx16/PC-Engine consoles. Playstation support appears to work well with many converters.
(3DO support is currently limited to being the only controller. No daisy chain support or support in a daisy chain.)

Q: What about Wii?
A: The GameCube support will work on any game that supports a GameCube controller. (GG:AC, TvC, Smash Bros, Metal Slug Anthology, etc.)

Q: What about on Smash Brothers?
A: Yes! The Gamecube support in the MC Cthulhu includes two different modes for Smash Brothers play. These modes are very experimental so feel free to speak up any input on how it could be improved. Information on how to enter these modes and how they work can be read up on here: Universal PCB (eventually) thread

Q: I have a Cthulhu, but I don't know if I have a PS3 only version, or an MC Cthulhu. How can I tell the difference?
A: If the Cthulhu is assembled, just plug it into a PC and check the game controller applet in the Control Panel. The name should be very clear about whether it is meant for PS3/PC or is a MultiConsole version. If the Cthulhu is unassembled, look in the bag for a set of four diodes; MC Cthulhu kits come with diodes, but PS3 Only versions don't. If you're looking at just the chip, look at the first row of text on the chip; the PS3 Only version will have the text 'F24' on it, usually 18F2450. The MC Cthulhu will have the text 'F25' on it, usually 18LF2550.

Q: What about Xbox360?
A: Nope. Xbox360 uses special chips to prove they're licensed. Until they get publicly cracked, I dont think its going to happen.

Q: What about console X?
A: Maybe, but for now I need more feedback on the consoles already supported. No promises, no guarantees.

Q: If I buy now, and then you get console X added, won't I be screwed?
A: No, you'll still be fine. The MC Cthulhu includes a bootloader that allows the firmware to be updated in the event a new console gets added.

Q: I have a PS3 Cthulhu now. Do I have to buy a whole new board?
A: No. Upgrade chips are available. Installation is just a matter of popping the old chip out, popping the new chip in, and soldering the four diodes into place; if your Cthulhu already has the four diodes on it (board revision 1.4 or higher) then you don't even have to do that, just swap chips. You can find detailed instructions on the diode installation here:
Select Your Power

Q: Where can I buy an MC Cthulhu?
A: Godlike Controls
Focus Attack

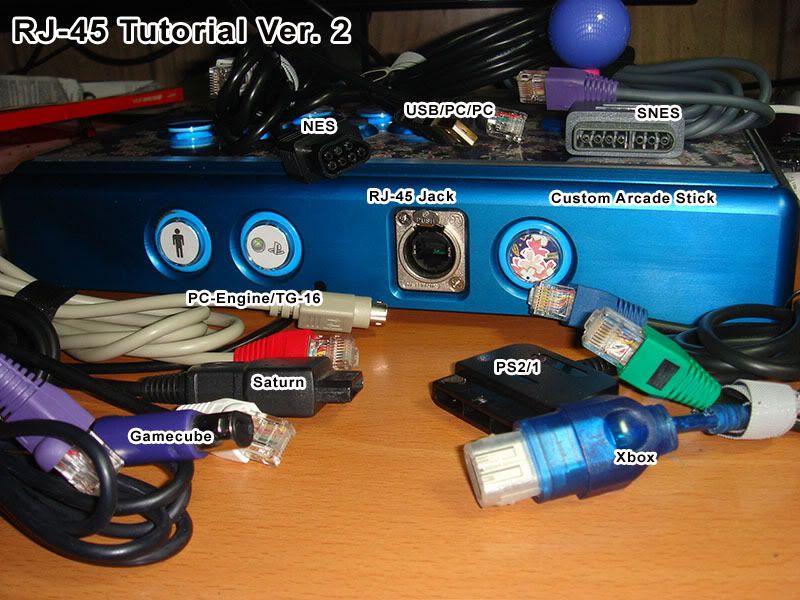
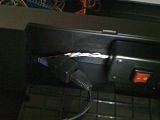
Q: How does the board connect to the console?
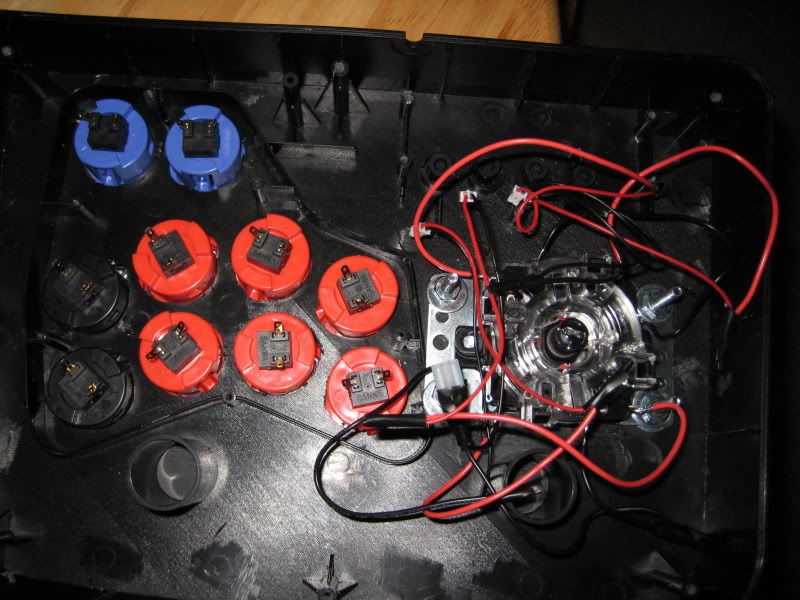
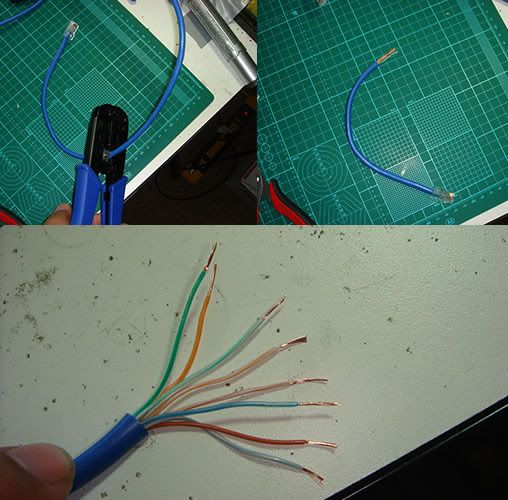
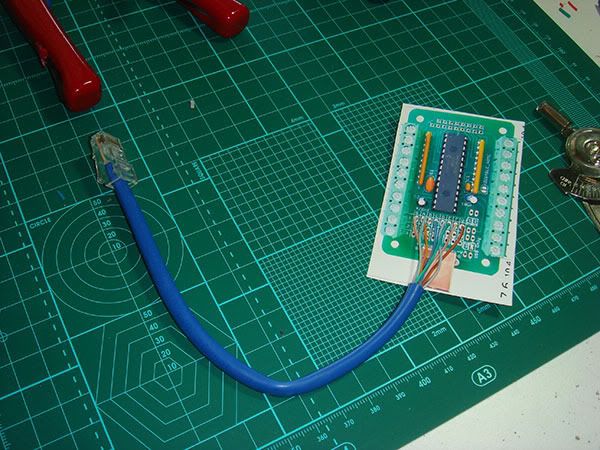
A: The Cthulhu board has a set of unused holes near the USB jack, labelled with row 1-3 and columns G, A-F, and V. Each one has a specific purpose. For each of the possible consoles you want to use with your stick, you need a cable for that system (from an extension cord or dead controller) and you solder the wires in that cable to specific points on the Cthulhu.

Q: So if I want to play on PS3 and Playstation, I'll need 2 cables coming off of the MC Cthulhu board?
A: Exactly.

Q: I don't plan on ever playing on a Gamecube/PSX/Xbox/ConsoleX. Do I have to put in that cable?
A: Nope. Only put in the cable for the consoles you want to play on.

Q: So how do I install the Playstation, or Gamecube, NES, SNES, or Xbox1 cable on the MC Cthulhu?
A: Instructables for all supported consoles have been placed. Easiest way to find everything related to the Cthulhu is to go to Instructables.com and search for 'cthulhu' which will bring up everything I've done, and a couple of cool knitting instructions.
Gamecube: How To Install an Gamecube cable onto a Multi-Console Cthulhu
PSX: How To Install a Playstation cable onto a Multi-Console Cthulhu
Xbox1: How To Install an Xbox1 cable onto a Multi-Console Cthulhu
NES: How To Install an NES cable onto a Multi-Console Cthulhu
SNES: How To Install an SNES cable onto a Multi-Console Cthulhu
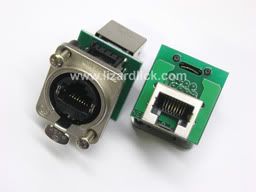
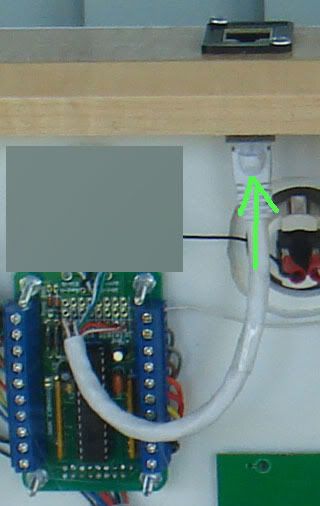
A collection of all of them can be found in rtdzign's RJ45 thread:
http://shoryuken.com/forum/index.php?threads/r.100475/

Q: How do I update the firmware? Where is it?
A: A link to the most recent version is at the very top of this post. Read the included readme.txt for directions.

Q: I get a weird error when I try to doubleclick Bootloader.exe?
A: Bootloader requires dotNet, which can be downloaded here: Microsoft .NET Framework

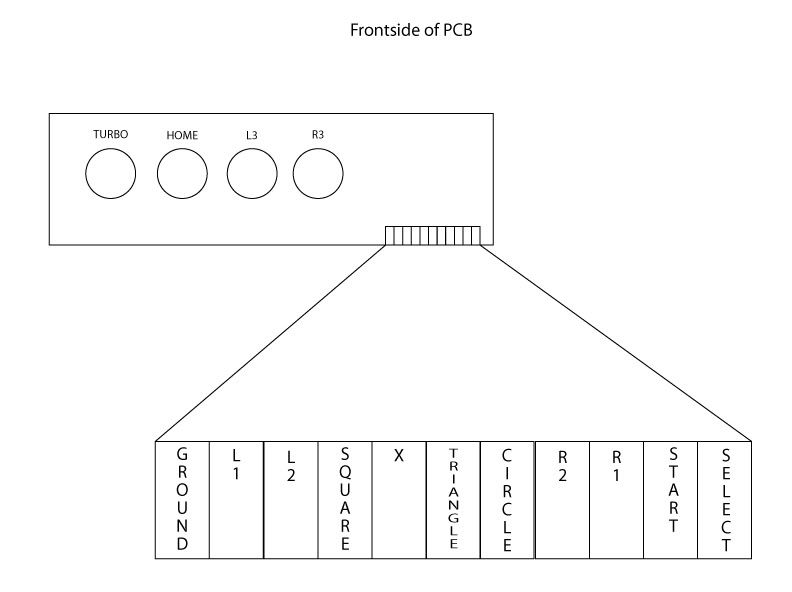
Q: What's the button mappings on all of the consoles?
A:
Spoiler:

PS3:
1P: Square
2P: Triangle
3P: R1
4P: L1
1K: X
2K: Circle
3K: R2
4K: L2
Start: Start
Select: Select
Home: PS

PSX:
1P: Square
2P: Triangle
3P: R1
4P: L1
1K: X
2K: Circle
3K: R2
4K: L2
Start: Start
Select: Select
Home: Up+Select

PSX (DC Converter mode: Hold 3P and 3K when plugging in)

1P: Square
2P: Triangle
3P: L1
4P: L2
1K: X
2K: Circle
3K: R1
4K: R2
Start: Start
Select: Select
Home: Start+X

Gamecube (normal mode):
1P: Y
2P: X
3P: L
4P: B
1K: B
2K: A
3K: R
4K: Y
Start: Start
Select: Z
Home: N/A

Dreamcast:
1P: X
2P: Y
3P: Z
1K: A
2K: B
3K: C
Start: Start

Xbox (Select not pressed):
1P: X
2P: Y
3P: White
4P: LT
1K: A
2K: B
3K: Black
4K: RT
Start: Start
Select: Back
Home: N/A
Home + 1P : Left stick click
Home + 1K : Right stick click
Home + Stick: Left and Right analog sticks

NES (All Modes)
Start:Start
Select:Select
1K: B
2K: A
Home: Go to next mode (Normal -> Turbo -> Punchout -> Normal ->.....)

NES (Turbo Mode)
1P: Rapid Fire B
2P: Rapid Fire A

NES (Punchout Mode)
1P: Select
2P: Start

SNES:
1P: Y
2P: X
3P: L
1K: B
2K: A
3K: R
Start: Start
Select: Select

Saturn:
1P: X
2P: Y
3P: Z
1K: A
2K: B
3K: C
4P: L
4K: R
Start:Start
Select:L

3DO:
1P: L
2P: P (Play/Pause)
3P:R
1K:A
2K:B
3K:C
Start: P
Select: Stop

TG16/PCE:
All modes:
Select: Select
Start: Run
Guide: Next mode (Direct: Normal -> Neogeo. Through multitap: Normal -> Six button -> Neogeo)

Normal:
1K: II
2K: I

Neogeo:
1K:Select
1P: Run
2P: II
3P: I

Six button:
1P: IV
2P: V
3P: VI
1K: III
2K: II
3K: I


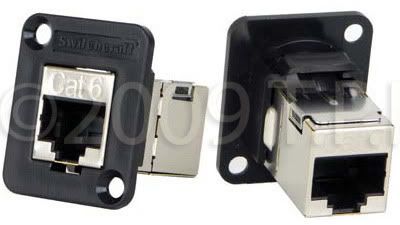
Q: What about if we only want one cable on the stick at a time? Is there way to make removable cables?
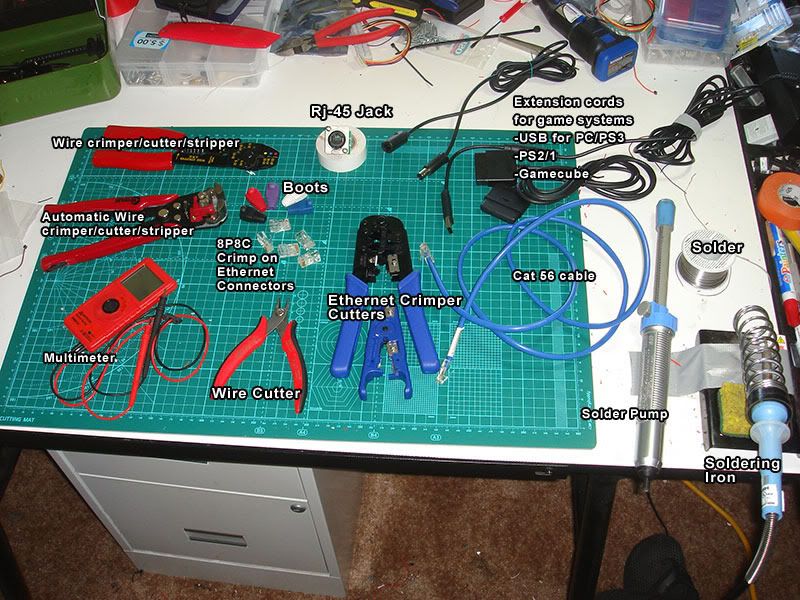
A: Yes. Please look into this thread which covers how to use RJ-45 modular connections for making cables.
http://shoryuken.com/forum/index.php?threads/r.100475/

Q: You said the firmware on the MC Cthulhu can be updated. Can I update the firmware on my current PS3 Only Cthulhu?
A: No. The PS3 Only Cthulhu doesn't contain the ability to update firmware. Even if it did, it wouldn't help; the chip in the MC Cthulhu is much stronger than the chip in the PS3 Cthulhu. There is a piece called the SPI module that is needed for most consoles that just doesn't exist on the PS3 Cthulhu chip.

Q: Can I order console cables from you?
A: Sure. I have extension cables for Playstation, Gamecube and on hand; the same ones used in the Instructables. Price is listed below.

Q: Can I pay you a little extra to install them on the MC Cthulhu for me?
A: I'm sorry but I just can't do that right now. If I had the time, I would, but the SF4 rush currently underway has everything crazy for everyone.

Q: Would it matter what kind of PS cord i use? Do I need a PSX cord or a PS2 cord?
A: PS2 cord is identical to a PSX cord. If it plugs into the controller port on a PSX or a PS2, then it will work for this.

Q: What about converter support?
A:
Spoiler:
Tested as working:
Joytron Xconverter360+ (Toodles): Joytron Xconverter 360 Plus
EMS USB2 (Mixah)
EMS Trio Linker Plus (Mixah)
EMS Trio Linker Plus II (Mixah)
Nexxtech PSOne and PS2 to USB Adapter / Radio Shack PSX-to-USB Game Adapter with Vibration Driver / Sector 7 (Orbyx Electronics) Model 5810257 (Mixah)
Innovation [PSX->DC] (Mixah, Toodles)
Total Control 2 [PSX->DC] (Mixah)
Pelican PS3 [PSX->PS3] (Toodles)
Total Control Plus [PSX->DC] (Truckasaurus)
Blazepro PS2-360 [PSX->360] (drunkninja42)

Tested as semi-working/glitchy:
RedOctane Universal PS/PS2 Controller Adapter - weird dropped inputs (Mixah)
Super Joybox 4- dropped diagonals (Mixah)
'Vibration' converter [PSX->GC/Xbox] - Start button doesn't report right (Mixah)
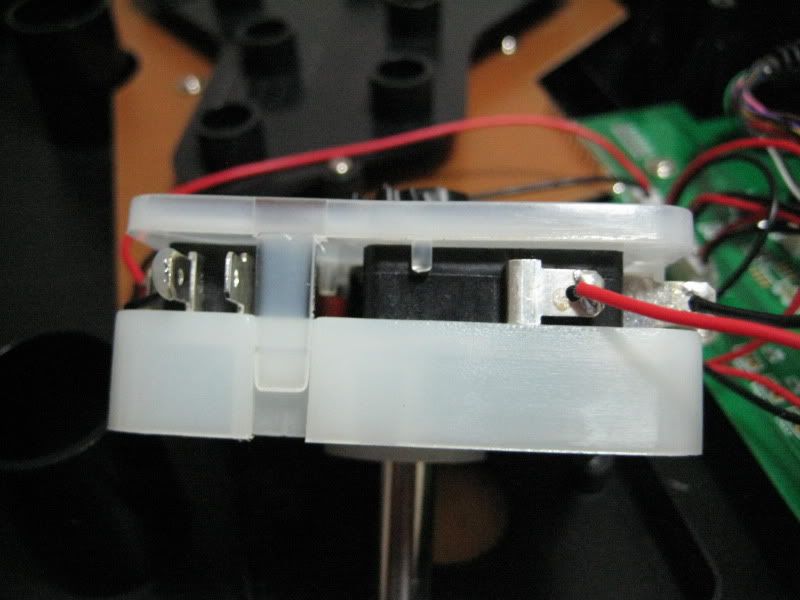
____________
ChimpSMD Questions

Q: What is it?
A: The Chimp is a new board that combines a PS3 Cthulhu with an Imp into one board. It's made for wiring along side an Xbox360 pcb so your arcade stick can work on both 360 and PS3 cleanly and easily.

Q: What's different about the ChimSMD versus the Chimp?
A: http://shoryuken.com/f177/greetings-lizard-lick-amusements-130032/index350.html#post9514577

Q: Why would I get a ChimpSMD instead of just getting a Cthulhu and an Imp?
A: Lots of reasons.
1. With only one board instead of two, the Chimp will be easier to wire up to the 360 board.
2. Autodetection. The Chimp can identify when it is plugged into an Xbox360 and automagically go into 360 mode. No slide switches, no holding down buttons, just plug in and go on any system.
3. Trigger inversion. If you want to connect the Chimp to an Xbox360 pad that requires the triggers to be inverted, the Chimp will handle this for you. No more transistor or inverter chip hacks.

Q: So why would I ever want to use a PS3 Cthulhu instead of a Chimp?
A: There are some reasons for that as well.
1. If you're going to mod more than just a 360 and PS3 pad together, you'll have more than one cable coming out of the box, and risk causing severe problems if its ever plugged into more than one console at a time. The diodes on a PS3 Cthulhu will help you route all of the power in a way that is safe in case that ever happens.
2. The PS3 Cthulhu can be upgraded to an MC easily. The Chimp can ONLY support PS3/PC USB, and cannot and will not be upgradable to a Multi-Console version.
3. If you prefer using the Xbox360 board when connecting to a PC, a regular Imp will make that easier for you. Using the 360 pad on a PC requires holding down three buttons (Short, Strong, RoundHouse) when using a Chimp, while the Imp used just the one button or slide switch, however you set it up.

Q: What about other consoles like PSX, Gamecube, and Xbox1 supported on the MC Cthulhu?
A: They are not and cannot be made to work on the Chimp.

Q: Will there be an MC Chimp in the future?
A: No. I simply can't. The pins that would normally go to the extra console cables are currently used to control the Imp chip present on the Chimp.

Q: How do I install the Chimp in my TE/SE FightStick?
A: Here is the current wiring diagram. Definitely post up in this thread if there are any questions or areas that are vague:
Yfrog Image : yfrog.com/5ychimpmadcatzp

Q: My X/Y axis moves when I hit a trigger button in 360 mode.
A: Known issue with pads using analog triggers requiring inversion. Please read:
http://shoryuken.com/f177/official-cthulhu-chimp-board-thread-mc-firmware-2-0-released-162026/index285.html#post9194306


Q: What should the button layout be?
A: This is rather important, so please pay close attention to this answer. The layout that I HIGHLY HIGHLY absolute must insist upon is the layout from the original MadCatz sticks:
For PS3:
[] /\  R1  L1
 X  O  R2  L2
For Xbox360:
X  Y  RB  LB
A  B  RT  LT
You can probably rig up things to use a different layout if you like, but they won't be supported.

Q: My 360 board requires the triggers to be inverted. What do I do?
A: On your 360 pad, remove the two trigger pots. Try to keep middle pad of the pots intact if you can; the side pads can be ignored or torn without care, but it'll be easiest if you can leave the middle pad in place. Connect the wire from 3K_Invert screw terminal to the middle pad of the right trigger, and the 4K_invert screw terminal to the middle pad of the left trigger. If the middle pads got torn from removing the pots, follow the trace to find another point to connect the wires.

Q: Can I use a ChimpSMD in a stick by itself?
A: Certainly. The only thing to keep in mind is that it will still try to go to 360 mode if you plug it in with Short, Strong, and Roundhouse held down. As long as you don't hold these buttons down when plugging it in, it will work just fine on PS3 and PC by itself without being dualmodded.

Q: I want to use the Xbox360 mode on a PC.
A: If you hold down the Short, Strong, and Roundhouse buttons (1K, 2P, 3K) when plugging it in, it will skip the autodetection and go straight to Xbox360 mode.
_____________________
Misc:
Q: What are the golden rules?
A: The two golden rules of dual pcb mods:
1. All pcb's must be common ground.
2. All pcb's must be powered at all times.

Q: My MadCatz 360 TE/SE fightstick occasionally has a problem where the RT and LT buttons will stop working. If I replug, they work for a while, but eventually go out again.
A: Known problem with 360 TE/SE boards, and happens whether it is dual modded or not. No known 100% fix. Suggest you rearrange buttons so you dont use RT or LT.
_____________________
Ordering:

If you're interested in ordering, please try ordering from one of our online resellers:

Focus Attack
Gremlin Solutions (UK)

If you can't find what you're looking for, or have other reasons to order from me directly, that's fine, but it really is preferred you go through a reseller when possible.

Q: How do I order?
A: Easiest way is through the Paypal shopping cart setup: http://www.godlikecontrols.com/order.html

Q: How long to ship?
A: Please allow 3 business days for packing and shipping out.

Q: How long will it take to arrive?
A: West Coast: 2-3 days after mailing. East Coast: 3-4 days after mailing. Rest of world: 2 weeks after mailing.

Building a 2 player setup.

$
0
0
Hi, I'm Sinfolmatt.

I am currently trying to build a 2 player custom arcade stick to plug into pc so I can emulate old arcade games. Once I have that working, I think I am going to put a Raspberry Pi inside to emulate the games and basically have a portable 2 player arcade cabinet that can plug into any tv.

I read slagcoin multiple times and decided to try to build something like the idiot box on there. Only power tool I have is a drill (not even using a rotary saw) so the process started by buying wood from home depot and asking them to cut it for me there. They are not as precise when cutting so the edges are not all evenly lined up but I am ok with that. Safer than me using a power saw or anything like that.

I forgot to take a picture of everything before I started working, sorry.

Here is the first pic which was right after attaching the top to the sides.

P6050054.jpg

Afterwards I added a 1/4 border to the top so I could add another layer of wood and then plexiglass so it can protect any artwork I want to add.

P6140055.jpg

Home depot would not cut the plexiglass so I had to do that myself. Cutting plastic sucks. First piece got completely messed up. Second attempt was better but still didn't crack perfectly on one edge.

After layering on the additional wood and plexiglass I began the process of drilling holes for the buttons and joysticks.

P6140057.jpg

Made a huge freaking mess in the process

P6140063.jpg

And this is where I am currently at. Cracked the right side of plexiglass. Working with plastic really sucks, but I think it will look OK once everything is painted and stuff.

P6140068.jpg

Now I need to make some wider holes in the bottom layer of wood, then sand and paint, and after that add the joysticks and buttons. I ordered the joysticks and buttons today. Will update this with more progress as it happens.

For the bottom layer I am trying to figure out the dimensions of the stick to make sure it will mount properly. I found the following two images which look to be dimensions of the stick and mounting plate on focusattack.com

sanwa_spec_4_23628_29625_1384109387_1024_768.jpg

sanwa_JLFP1_92730_1394135865_1024_768.jpg

Has anyone who has already built a stick before used these? The numbers are for millimeters correct? So if I print to the right size, with everything measuring to the same millimeters I could use this to outline where I need to drill right? I want to get the drilling and painting done before the parts arrive if possible because I just got hired for a job and want this done before I start work.

Thanks,
Sinfolmatt

RJ-45 Multi Console Cthulhu Arcade Stick Tutorial Ver.2

$
0
0
RJ45_Title_TutorialPicture.jpg
Edit:Also Dreamcast and 3DO

Intro
This post is a rewrite of Acceptable Risk?s RJ-45 Tutorial. This was posted to include new info such as recent console support added because the pinouts are spread out in the Cthulhu thread. Also I instead uses a Pass through over a keystone punch down type jack.

The MC Cthulhu is a purpose built PCB for hooking up with arcade joystick components. To work with different consoles, you only need to solder wires from a controller extension cable to the appropriate spots. If you look at the top op the pcb there are 3 rows of solder points with columns labled "GABCDEFV". Each extension cable wire must be soldered on to the appropriate column. When plugged in, the MC Cthulhu PCB can autodectect what system it is plugged into and then make your joystick work for that supported system. Be sure to download the latest firmware to ensure that all of the console cables you make will be compatible.

Originally the MC Cthulhu was able to support 5 consoles using 3 cables, therefore only 3 rows, but now it has grown to include many systems. Because there are 8 columns for system cables a Ethernet jack was a natural fit. The connecter used is typically an RJ-45. If you want to do a dual mod with Xbox 360 pad then you should check out this tutorial.
http://shoryuken.com/forum/index.php?threads/rj-45-mc-cthulhu-imp-xbox-360-dual-mod-tutorial-diagram.94875/
pcb-mc-cthulhu-multi-console.jpg

Kitty info Update: If you dual modded your stick with a Kitty board, they come preinstalled with a RJ-45 jack. If you connect that to a RJ-45 pass through, then you can use the same cable pinouts for making your own custom cable.
Begin Tutorial
Spoiler:
Supplies List:
MC Cthulhu
Arcade stick case and buttons.
Soldering Iron and Soldering supplies
Digital Multimeter (Recommended feature: beeping continuity tester)
Wire stripper/cutter
Neutrik or SwitchCraft RJ-45 Jack.
Cat 5 or Cat 6 ethernet cable. For pass through you need a cable with a connector at the end.
Cat 5/6 Crimper and wire cutter/stripper.
Cat 5/6 8P8C crimp on Connectors.
Extension cables for systems you want to use
24mm drill bit (forstner or Holesaw) for mounting hole and drill.
(optional)
Ethernet boots
Neutrik ruggedized boots for use with Neutrik Jack.
Hammer
RJ-45_Tools_Supplies.jpg

Part 1: Mounting the RJ-45.
I think it was Robokrikit that first linked the community to these. These are Neutrik RJ-45 panel mount jacks, available at lizardlick.com.
ne8fdp_thumb.jpg
If you have a Plastic arcade stick Like a TE or SE or Hori
You will need to find a suitable place to drill a 24mm hole. 15/16 inches is equivalent to 24mm. Make sure before you drill a hole that you have enough space inside for the internal parts and can plug in the cable to it without obstruction.
Placing-Neutrik-Hole.jpg

Pictured is a Hole Saw and a Forstner bit. A hole Saw is great for plastic and metal, and will work for wood, you will have to clear out the material out of the bit with a screwdriver. Forstners are great for wood an plastic, but do not attempt to cut metal with a forstner bit.
So if you drill a 24mm hole you can then use the mounting plate to drill the 2 mounting holes.
DrillBits.jpg

For a wood case it is recommended that you use a switchcraft RJ-45. I think it was Voltech that first used these.
SwitchCraftRJ-45.jpg

If you must mount the Neutrik in a wood case look to a post below.

Drill free option Update:

Recently I modded a VLX but this can also be used with a TE or any stick with a cord notch. I didn't want to drill into my VLX case so Instead I used an Ethernet coupler and hid that away in the cord compartment. I tied a knot in my ethernet cord so that the cord would not be pulled out of the notch used for the default usb cord. For a TE, you would cut off one end of the ethernet cable and then feed it through the hole previously used by the USB cable. After it is through the hole tie a knot in it. With the cut end on the inside you can then solder to the G-V row.
th_1b827ab6.jpg th_2cf280a1.jpg
Part 2: Soldering on the ethernet cable to the MC Cthulhu
To start you would cut off maybe a foot off a cat5 or cat6 ethernet cable. The length should be long enough to reach where the RJ-45 jack is on your arcade stick. Strip off maybe a inch or two off the outer insulation and untwist the cables.
CutStripCat5.jpg

You want to use Ethernet Tybe B layout as most networking cables come in that wiring order. You need to take the 8 wires and strip off 5 mm off the ends and solder them to row 1 using the following diagram. If the are stranded like pictured above then you want to twist and tin each cable end with some solder so it goes in easier. Each of those colored wires corresponds to a letter on the GABCDEFV row.

WiringEthernetColorsTo_GV_Row.jpg

It also helps if you solder on to an actual MC board instead of a picture of the board. (note pictured on the paper is a ps3 cthulhu, which is identical in appearance except for 4 diodes to the right of the G-V rows)
Cat5eSolderedonBoard.jpg

Now you just plug it into the RJ-45 pass through port.
PlugIt_intoPort.jpg

PS360+ Xbox mode not working properly

$
0
0
Hey guys!

I posted in the HitBox thread and after contacting AkiShop with no luck in getting any useful feedback (told me they were too busy working on PS4 support but "would look into it"), I was wondering if anyone here could help me out or at least let me know if it's a problem they've experienced or heard about before.

Basically, whenever my controller is plugged into any Xbox, it'll randomly drop buttons pressed at the same time and instead output them as individual button presses. I recorded a video, hopefully you can hear that I'm pressing the buttons at the same by the sound (the inputs don't even show it plinked, so there'd have to be a noticable gap inbetween), but I can guarantee that it's a problem specific to the Xbox mode as I've tested it on PC and it works perfectly fine on it. I've tried replugging and restarting the Xbox many times and it's always the same thing and always works great on PC. This bug on Xbox makes feinting and doing EX moves so inconsistent the game is flat out unplayable for me, sometimes it will happen several times in a row and other times it'll not happen for maybe 15 seconds or so. It's pretty frustrating when I've bought an Xbox + XBL mainly to play AE and now it's just sitting there.

image

Since it's specific to the Xbox mode, I figure it can't be the wiring or anything like that, but I'm not really sure what I can do to solve it. I tried updating the firmware already with no luck. Any ideas?

Thanks!

Streaming Software

$
0
0
I want to get into streaming within the next few weeks and I wanted to know the generally preferred software, along with any issues (common or otherwise) that I could run into when trying to initially set this up.
Viewing all 8072 articles
Browse latest View live