Quantcast
Channel: Tech Talk — shoryuken
Viewing all 8072 articles
Browse latest View live

Hori Real Arcade Pro 4 Kai Silent Questions

$
0
0
Hey guys, I've been looking to get another stick and I've been looking at the HRAP4 Silent.
For those who have experience with or own one of these...
Question is how are how is the feel and sound of these buttons and stick in comparison to Sanwas? Also, is there any noticeable input lag on these sticks? I've read Teyahs website that these have fairly high input lag but I'd like to get feedback from anyone who's used this stick fairly frequently.

Madcatz Street Fighter V Fightstick Alpha

$
0
0
I'll keep this thread updated with all details of this stick as it's released including links to mods etc once they happen


madcatzfightstickalpha2.png

Madcatz Street Fighter V Fightstick Alpha for PS4/PS3

Release Date-
=Unknown

SRK Front Page article via @d3v -
http://shoryuken.com/2015/08/31/mad-catz-unveils-street-fighter-v-arcade-stick-and-controller

Case-
Fightstick Alpha Case (New/Original Design)
=Weight (Unknown)
=Dimentions (Unknown)
=6 button Vewlix design (Prototype looks like it has a slightly larger gap between LP/LK buttons and MP/MK buttons)

Metal Panels-
=Unknown

Plexi/Art-
=Unlikely to have any future plexi option due to case design (No where to screw in plexi and curved base front)

Bottom Padding/Feet-
=Has some type of padding (Specifics unknown)
=Does not appear to have feet in stock photo (Unknown)

Joystick-
=Unknown

Buttons-
=Unknown

PCB-
=Unknown

Wiring-
=Unknown

USB Cable-
=Wired
=Unknown if cable is removable


Finished mods from community-
=Not available at this time


COZrk9hW8AE070T.jpg


I won't make too many assumptions, but it looks like a budget stick. (EDIT- It is)
I believe we need more budget sticks on the market to get more new fighting game players familiar with using arcade sticks at a reasonable cost.

The base looks a bit thin by the photo, so I'm unsure if a JLF shaft would clear that. (EDIT- Likely will be high enough to swap joysticks, mentioned mod friendly by MarkMan on Twitter)

May not be Sanwa parts to keep costs low.

It's cooler (6 button) instead of dick (8 button) which is BADASS (This sentence is an SRK Tech Talk inside joke. Don't take it personally)

how am i going to remove the wires off this ?

$
0
0
notice no tabs or anything to push its literally just flat? 64hyxw.jpg
i have 2 other atroxs next to mine and me and my boys are puzzled were about to just throw it away.

Newbie guide: Venom PS4 / Mayflash V2 Full Sanwa (/Seimitsu) Mod with Octo for £116 [UK Pricing]

$
0
0
Hi all,

A lot of information I've seen out there is useful, but sometimes it's quite technical, so I thought I'd make this beginners guide for a full Sanwa modded PS4 arcade stick on the cheap.

Background:
I've been playing fighters on and off for a while, but SFV re-ignited that passion. Shame about the beta. Anyway, I decided to rock an Arcade stick and the Venom was very cheap in comparison to the others. I'm getting used to it but found the square gate horrible, and the buttons were even worse. The stick was quite stiff but I kind of liked it! Either way, I have been reading up various posts and threads and people have been raving about this value setup, but I couldn't find a comprehensive guide (particularly for a noob like myself). So I decided to put this together, please let me know if it's useful and if any corrections are needed. As PresidentCamacho mentions below, the Venom is the same as the Mayflash V2, so the same guide should apply.


What you'll need (and pricing):

How to:
1. Open up your original stick and have a play with it so you can notice the difference afterwards. After all, it's what you prefer and not what everyone else says you should be using
DSC_0110.jpg


2. Flip it over and open the 6 screws on the back and take the backplate off to reveal (image taken part way through but effectively there's a bunch of cables and buttons and stuff):
DSC_0085.jpg


3. You will notice there are 6 buttons and corresponding colored wires going into them. To save time, I put a mark next to the ones that had duplicate colors and mapped them so I knew where they went (if you don't do this you can refer to the small board which they come out from). Here's a closeup of some helpful coloring :smile: (picture taken post assembly, but the principal is the same):
DSC_0108.jpg


4. Start taking all the wires from the buttons out, don't pinch all the way at the root, but a bit above:
DSC_0086.jpg


5. Remove the ball top by putting a screwdriver under the stick and rotate the ball top (image taken post assembly, but the principal is the same):
DSC_0106.jpg


6. & 7. Now remove the four screws holding the actual stick and lift it, then remove the 4 cables from the board it's connected to (these can just be pulled out). Cut the cabletie CAREFULLY so the cables aren't bound (in this picture the cabletie is not cut) and lift it out.
DSC_0090.jpg
DSC_0094.jpg


8. OPTIONAL: Take your JLF 8YT and pop out your gate (there are 4 clamps, just put minimal pressure lifting it out and pop each clamp gently:
DSC_0091.jpg
DSC_0092.jpg


9. OPTIONAL: Replace the square gate with your GT Y Octagonal gate (again, there are 4 clamps, just put minimal pressure and gently pop each on):
DSC_0093.jpg


10 & 11. If you have two washers, put one washer between the stick and the inside of the case, then screw the 4 screws back in place which hold the stick, ensuring the 5 pins are facing INWARDS. Then connect the 5 pin JST cable, however, ensure the teeth of the CABLE is FACING you when you put it on, otherwise only one direction will work. I was paranoid and I connected the cable then tested it out with the case option to ensure UP wasn't DOWN etc :smile: ...and I suggest you do the same if you're not certain. Once you've connected the JST cable, then connect the other end to the board, there's only one slot for it and one way it can go in. Don't be too forceful but do make sure it's all the way in (in my picture it's right above the bit that says MF002V). Do not connect the ball top yet!
DSC_0106.jpg
DSC_0099.jpg


12. Unless you've already done so, pop out all the stock buttons, you will notice they have two 'clamps' which extrude under the plexi and metal. The easiest way to do this is to push one side first, then the other. If you plan on re-using these buttons, please be careful as these clamps are fragile and can't be removed and inserted too many times as far as I understand it (picture post assemble but principal is the same):
DSC_0103.jpg


13. Once they're all popped out, you can lift the plexi where the USB cable resides:
DSC_0087.jpg
DSC_0088.jpg


14. Feel free to replace with your own art or get someone else to do it. Here's my placeholder, but I'm not entirely happy with the design so I'm going to change it (which would explain why my stick is naked!):
kYPnNaP.jpg
Yep, I know *that* Ken isn't from SFV :smiley:

Remember that the old models have the button scheme on the plexi. The new models do not have the button scheme on the plexi. As far as I understand, there are only cosmetic differences between the old and new model. This post has the template. If you want my template let me know.


15. Put the plexi back on (it's magnetic, fancy!) then insert all the buttons to your liking:
DSC_0104.jpg


16. If you had two washers (see point 10.) put the other washer on, then screw the ball top back on the stick, and use a screw driver to gently tighten (this MAY not be necessary):
DSC_0089.jpg
DSC_0106.jpg


17. Remember the little diagram we did (perhaps it was just me...) - well this comes in handy now that you need to reconnect all the cables back. It doesn't matter which PIN you connect the respective PAIR of cables to:
DSC_0085.jpg
DSC_0108.jpg


18. Voila!
DSC_0107.jpg

19. Test it out in your favourite fighter
DSC_0111.jpg

I'm aware there are similar posts but I couldn't find one that quickly explained the steps for this specific arcade stick, and with the female to female JST cable, it was super easy! I hope this has been useful.

Peace,
SineTwo

Killer instinct PC, fight sticks compatibility?

$
0
0
I read a post yesterday about the release date of Killer instinct pc and the specs as well

Even though my specs are excellent on pc,
but when they said "Additionally, it was confirmed that Xbox 360 fightsticks will be compatible with Season 3 on PC at launch, while Xbox One fightstick support will come sometime later

so what about the ps3 fightsticks will they not be compatible to this game
I own the madcatz fightstick pro and mayflash arcade stick which they work on the PS3 and PC,
and Yes, I have windows 10 and tested both of them on game control panel and they work fine

but it's just this is something new, cause this game is being cross play on xbox one, so would my fightstick be compatible to this game or what?

here's my mayflash fightstick, it's been modded
postimg.org/image/pmw12hv29/

Hori Hayabusa Buttons

$
0
0
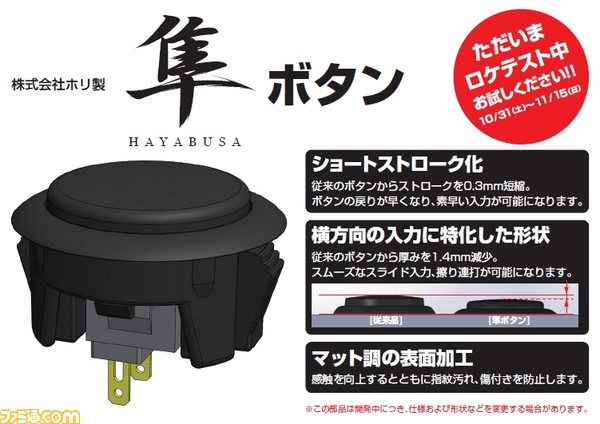
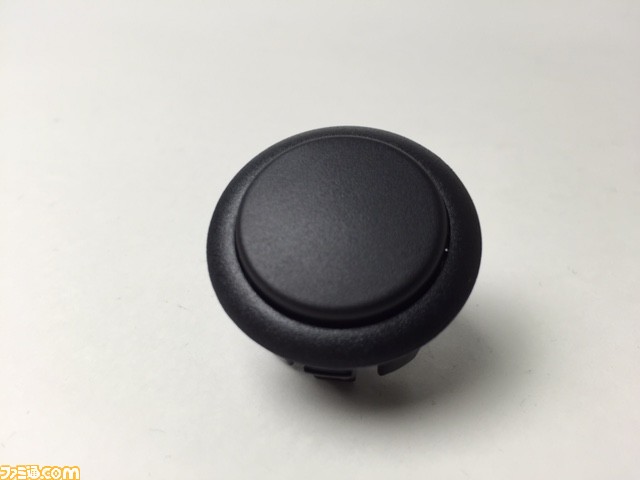
No, I'm not mixing things up. Hori will be testing a new Hayabusa Button.

Famitsu article in japanese

So, from what I read, they reduced the "stroke" (I'm translating from japanese here, is this "travel"?) in 0.3mm and the button height in 1.4mm.
The buttons also have a matte black finish.

56333b9ec8d53.jpg

l_56333baba62ac.jpg


MAYFLASH XBOX 360 / PS3 / PC Arcade Fighting Stick V2 Compatible with Sanwa Parts out of the box 69$

$
0
0
This is not mine I found it and want more information on it if possible. Plus if its as good as it says it is "too good to be true" maybe spread the word.

Ok Guys I searched all over the site an havnt seen this posted about anywere. So I figured id give a heads up. The Description and box sayes it has a new design "looks better than older universal ps2/3/pc stick" Also is completely drop in ready for sanwa parts and tri mod pcb. All for 69.00$ Thats not bad around WWE Brawl Stick prices without the ugly artwork. It stats it work on xbox 360 without a official control pad being needed. Plus acrylic top panel.

Now i cant seem to find any inside shots to see if it is soldered pcb or quick disconnects "I assume solder". Does anyone out there have anymore information on this thing? I am curiouse if it would be as easy as the wwe brawl stick to mod or if it has insides like the origanel universal fightstick from mayflash. I would assume its diffrent since its stated that sanwa parts drop in but that could only mean holes rather than harness or pcb.

I am thinking of buying it but i know i can mod the brawl stick this one is a mistery i can only go buy product statment.

http://www.amazon.com/MAYFLASH-XBOX-Arcade-Fighting-Stick/dp/B00NOAWLBE/ref=sr_1_268?ie=UTF8&qid=1416748574&sr=8-268&keywords=arcade+stick

This is the Description straight from the product.....

- Compatible with XBOX360, PS3 and PC - Compatible with Sanwa Denshi buttons and joystick that is perfect for customization to make it your very own. (Sanwa Denshi buttons and joystick are not included in the packaging and you need to buy them separately). - No need the original XBOX 360 controller when being used on XBOX 360. - Supports the XINPUT and DINPUT when being used on PC - Supports the Turbo and Macro functions with different speed settings you can toy with - The D-Pad and X/Y Analog Axis mode can be exchanged - Supports the vibration function. A sole customized wrist strap makes you feel the real vibration. - Supports the AUDIO/MIC function. - NO cheap plastic toy! Two pieces of metal panels (metal cover and metal base) increases the fighting stick's weight for a solid, secure feel. - The beautiful and strong acrylic top panel for the easy customization - The lever and buttons are designed and placed on same layout as the arcade style. - The Fighting Stick has considerable heft and rubber feet, both of which work to hold the controller firmly in place on hard, flat surfaces. - A dedicated storage case to store the 9.8ft/3m USB cable. - Compatible with Windows XP/Vista/Windows 7/ Windows 8 and Mac OS

NEW Hori Fighting Stick VX (360) & V3 (PS3) Thread

$
0
0
Sucessor to the Hori EX2 and FS3?
MarkMan wrote:
Hori will be unveiling their new "Fighting Stick" series of arcade sticks prior to/at Tokyo Game Show 2009 this year.

They are 6 button arcade sticks and will be available on both the Xbox 360 (VX) and PS3 (V3).

The 360 version will be white and PS3 version will be black.

More details on this one as TGS rolls around.

http://cache.gawker.com/assets/images/kotaku/2009/09/sukima065400-1.jpg

I know I posted a link to a Left 4 Dead 2 thing, but it has pictures of what looks like magazine ads or something. If you look to the right of the L4D2 ad there is another ad for a Hori stick with a 6 button layout. It also doesn't seem to have any wires, but they never show that in ads anyways.

What do you guys think? Could they be rolling these out the same time they roll out with the new sticks that come with the Tekken 6 bundle?

Edit: I got this from Kotaku. Link: http://kotaku.com/5353782/left-4-dead-2-image-edited-for-japan

Recent Purchases and Good Finds

$
0
0
I've seen this on other forums lately and figured I would give it a try.

Pick up a HRAP for a steal? Find a SFAC stick at a garage sale? Post it here.

I'll start out:

I picked up a Namco PS1 stick for $40 shipped today. I've been after one for a while ever since MarkMan claimed it was his favorite stick. I have a few sticks now so I'm excited to give it a try.

Also recently got a ReKleSS Saturn to PS2 converter with a very nice condition Saturn pad for $42 from Ikagi-chan in the Trading Outlet. I was supposed to have gotten a PS2 Saturn pad a while back for $90 :xeye: and I'm just as happy with this.

I know this isn't technically Tech Talk, but there's already a post about people's multi-thousand dollar entertainment setups. I won't posting be in there anytime soon. :rofl:

Is there a such a thing as portable TV?

$
0
0
I recently bought a PS4 to play SFV. The problem is that TV is a scarce resource in my household. I'd like to play more while others are using the TV. Is there a portable small TV I can buy to plug my PS4 in and I can take it around the house any play anywhere?

Originally I was hoping to be able to do HDMI into an iPad but that doesn't seem possible.

Modding PS3 TE S

$
0
0
Hey all, As I'm walking into unfamiliar territory, I was hoping I could get some assistance. I'd like to install a PS360+ in my PS3 TE S while also making it "stickless". I will be doing away with the turbo and home button and am fairly certain I have the top panel squared away. After doing a fair bit of research it appears that it's a fairly simple installation. Here is where I am at right now - since I'll be wiring the new (directional) buttons should I do the same for the rest or should I just use the hardware included with the TE?

pfMTMk9.jpg?2

I wasn't sure if there would be any benefit in scrapping it and rewiring it all. I am new to all of this, so please be gentle! Any help I can get would be greatly appreciated.

Gaming monitor for PS4 24" or 27"?

$
0
0
Hey guys,

I'm in the market for a new monitor. I currently use a 24" monitor, I am thinking of upgrading to a 27". I know tournaments usually use 24", but this will primarily be hooked up to my PS4. I don't have experience playing on a 27" monitor, is there any drawbacks to using a bigger monitor to play SFV?

What do you guys use?

Definitive Retail Playstation 4 Arcade Sticks List with Info/Facts/Photos/Advantages/Disadvantages

$
0
0


IMPORTANT INFORMATION

This list will be incomplete for at least a decade. If you have information we are missing, please provide it for the sake of all who can utilize this info.
This is not a tier list. Learn from the information and use it to your advantage.

and please don't image quote.

If you have general arcade stick questions, please ask in the "Absolute Question and Answer Thread v.3 (ASK YOUR QUESTIONS HERE!)" thread
http://forums.shoryuken.com/discussion/194283/absolute-question-and-answer-thread-v-3-ask-your-questions-here/p1

If you desire information on other arcade sticks that are not listed here please visit the "What Stick/Controller Should I Buy? Read the Guide on Pg 1 Before Posting." thread
http://forums.shoryuken.com/discussion/137321/what-stick-controller-should-i-buy-read-the-guide-on-pg-1-before-posting/p1


LIST OF ARCADE STICKS IN ORDER OF WHICH THEY APPEAR BELOW

=Hori BlazBlue Chrono Phantasma Extend Arcade Stick
=Hori Fighting Stick Mini 4
=Hori RAP 4 Premium VLX Kuro
=Hori Dead or Alive 5 Last Round (Grouped with RAP 4 Kai and RAP.V Hayabusa sticks due to same/similar base/parts despite not holding the RAP name)
=Hori RAP 4 Kai
=Hori RAP 4 Kai Silent
=Hori RAP.V Hayabusa
=Hori RAP.V Hayabusa (v2)
=Hori RAP.V Silent Hayabusa
=Hori RAP.V Silent Hayabusa (v2)
=Hori RAP.V4
=Hori RAP.V4 Silent
=Mad Catz Alpha Street Fighter V
=Mad Catz TE2 Standard
=Mad Catz TE2 Guilty Gear Xrd -SIGN-
=Mad Catz TE2 Persona 4 Arena Ultimax
=Mad Catz TE2 Ultra Street Fighter IV
=Mad Catz TE2 Ultra Street Fighter IV Rivals
=Mad Catz TE2 Street Fighter V Chun-Li
=Mad Catz TE2+ Street Fighter V Ryu
=Mad Catz TES+ Street Fighter V Shadowloo
=Sanwa/Arc System Works Guilty Gear Xrd -SIGN- Arcade Stick
=Venom/Mayflash Arcade Stick


+ Is a positive feature
- Is a negative feature
= Is neutral or general information


Categories-Hori.png


Hori-BBCPE-01.png
Hori BlazBlue Chrono Phantasma Extend Arcade Stick
Spoiler:

More images (Promo/Stock/BoxFront/BoxBack/Bottom/Interior)-
Spoiler:
Hori-BBCPE-02.png
Hori-BBCPE-03.png
Hori-BBCPE-04.png
Hori-BBCPE-05.png
Hori-BBCPE-06.png
Hori-BBCPE-07.png
Hori-BBCPE-08.png
Hori-BBCPE-09.png

SRKTT thread-
http://forums.shoryuken.com/discussion/195201/new-hori-blazblue-stick

Release Date-
=Early to Mid 2015 (Unsure of exact month)

Case-
-Hori budget stick case (Same as Fighting Stick V3)
=Width = 335mm, Depth = 230mm, Height (including lever) = 110mm
=Weight (1.5kg)
-No touchpad
-No cord compartment

Metal Panels-
=Top metal panel (standard)
-No bottom metal panel

Plexi/Art-
=Licensed artwork for BlazBlue Chrono Phantasma Extend
=No default plexi
=Plexi options will not likely be available for this stick via 3rd party plexi providers
=Default artwork can leave a sticky residue when removing

Bottom Padding/Feet-
=Small rubber feet
-No padding

Joystick-
-Hori generic joystick listed on Japanese website as "Standard Lever"
-Joystick has individual microswitches not a PCB with 5pin connector
-Difficult to change lever out to Sanwa/Seimitsu without heavy modification detailed HERE on V3 stick with same base
=PCB may have pin connector for Hayabusa/Sanwa/Seimitsu 5 pin connector (unconfirmed)

Buttons-
=Hori Kuro Buttons

PCB-
=Insufficient information
=PCB may have pin connector for Hayabusa/Sanwa/Seimitsu 5 pin connector (unconfirmed)
=PCB may have pin connector for touchpad (unconfirmed)

Wiring-
=Quick disconnects for buttons and joystick directionals
-Below average wiring (Detailed below)
-No pin headers/connectors for any directionals or action buttons. Wires are soldered into thru hole and glued in place

USB Cable-
=Cable Length (3m)

Unanswered Questions Due to Insufficient Testing-
-PCB needs testing and comparison to existing Hori PCBs


Hori-FightingStickMini4-01.png
Hori Fighting Stick Mini 4 for PS4/PS3
Spoiler:
SRKTT thread-
http://forums.shoryuken.com/discussion/204975/hori-fighting-commander-ps3-ps4-pc-xinput-fighting-stick-mini-4-with-hayabusa-like-joystick

More images (Promo/Stock)-
Spoiler:
Hori-FightingStickMini4-02.png
Hori-FightingStickMini4-03.png
Hori-FightingStickMini4-04.png

Release Date-
=December 2015

SRK Front Page article -
http://shoryuken.com/2015/11/20/hori-fighting-stick-mini-4-now-available-through-arcade-shock

Case-
-Hori Mini Case (New/Original Design)
=Weight (1 lb)
=Dimensions (7 x 4.8 x 9 inches)
=8 button design
-No touchpad (Assumption based on stock photos and price)
-No cord compartment (Assumption based on stock photos)

Metal Panels-
=Insufficient information
-No metal panels (Assumption based on stock photos and price)

Plexi/Art-
=No default plexi
=Plexi options will not likely be available for this stick via 3rd party plexi providers

Bottom Padding/Feet-
=Insufficient information
-No rubber feet (Assumption based on stock photos)

Joystick-
=Insufficient information
-Budget Hori joystick (Assumption based on price)

Buttons-
=Insufficient information
-Budget Hori buttons (Assumption based on price)

PCB-
=Insufficient information

Wiring-
=Insufficient information

USB Cable-
=Wired

Unanswered Questions Due to Insufficient Testing-
-PCB needs testing and comparison to existing Hori PCBs


Hori-HRAP4VLX-01.png

Hori RAP4 Premium VLX
- Real Arcade Pro 4 Premium VLX Kuro for PS4 & PS3
Spoiler:

More images (Promo/Stock/Box/Top/Interior/Mods/PCB)-
Spoiler:
Hori-HRAP4VLX-02.png
Hori-HRAP4VLX-03.png
Hori-HRAP4VLX-04.png
Hori-HRAP4VLX-05.png
Hori-HRAP4VLX-06.png
Hori-HRAP4VLX-07.png
Hori-HRAP4VLX-08.png
Hori-HRAP4VLX-09.png
Hori-HRAP4VLX-10.png
Hori-HRAP4VLX-11.png
Hori-HRAP4VLX-12.png
Hori-HRAP4VLX-13.png
Hori-HRAP4VLX-14.png
Hori-HRAP4VLX-15.png
Hori-HRAP4VLX-16.png
Hori-HRAP4VLX-17.png

SRKTT thread-
http://forums.shoryuken.com/discussion/195793/the-hori-ps4-vlx-thread

SRKTT Definitive Hori RAP thread-
http://forums.shoryuken.com/discussion/196423/hori-real-arcade-pro-thread-for-all-versions-in-progress-could-use-your-help-and-input-v2

Case-
Hori VLX Case (Same as VLX models for PS3/360)
=Sizes - Width = 570mm, Depth = 260mm, Height (including lever) = 140mm
=Weight (5.4kg/11.9lbs)
=Interior of case has plenty of space for mounting PCBs
+Touch panel is present
=Has cord compartment but door is flimsy as usual with all sticks

Metal Panels-
+Both top and bottom metal panels
+Replacement metal panels will be offered via @Jasen Hicks of Jasen's Customs

Plexi/Art-
=No default plexi
=Default artwork can leave a sticky residue when removing
=Plexi option is difficult for 3rd party plexi providers to provide due to the dimensions/size of the panel. May be offered by @Jasen Hicks in the future

Bottom Padding/Feet-
=Padding
=Does not include the bonus stability base previously provided with the first 2 runs of VLX Premium sticks

Joystick-
=Hori Hayabusa joystick

Buttons-
=Hori Kuro buttons

PCB-
=Common ground PCB but needs diodes in order to multi-mod. A step by step how to was done by @yoooooon - I've resized/rehosted the images for backup/archive purposes and the details can also be seen in the below spoiler tag-
Spoiler:
yoooooon wrote: »
Hi guys,

I finally got around to dual modding this for Xbox 360. Man, it's a pain in the ass.

Here's some things to keep in mind if you give this a shot.

1. As mentioned previously, you'll need diodes. I found a suggestion somewhere on SRK saying to use 1N914B diodes, which I bought 300 on eBay for like $8 dollars. Try to avoid overpaying for them since you need at least 15 for one dual mod. Here's an example of ones I've used and they've worked. Someone may have better suggestions. Here's a pic of the pack I bought.
Hori-HRAP4VLX-DualMod01.png

2. The anode (side without the line marker) needs to go towards the hori pcb, and the cathode (the side with the marker) needs to go to a central barrier strip. You'll need I believe 15 of these wires with the diode in line. I would suggest not putting the diode in the middle of the wire and towards one of the sides so that when you cover it up, you'll know the orientation by the placement of the diode. Here's a pic of one I made.
Hori-HRAP4VLX-DualMod02.png

3. Here's how the PCB works. I did this from memory so I need to double check this, but I believe it's correct. One thing to note, the row of pins that are closer to the middle are the signal lines (the points at which you use your diode wires), the grounds and other wires you will not need wires with diodes. Back and PS home you will need diode wires. (Those might be reversed in the picture, but I'm sure it's those two pins.)
Hori-HRAP4VLX-DualMod03.png

4. Instead of wiring to the pins on the PCB, I used a 30-pin header to wire to instead. I personally try to do minimal mods to the actual stick so everything can be reversed back to stock if need be. I know, weird. Here's a sample of what it looks like. I had to use an exacto knife to get this one to fit, but it wasn't too much work.
Hori-HRAP4VLX-DualMod04.png

5. Some in progress wiring. The way I had it wired is to have everything lead to a central barrier strip from the two pcbs. This includes signal lines from the HORI pcb (with diodes) and signal lines from the xbox pad linking to the new button and joystick wiring I hooked up. One thing to remember is that for back/select and PS Home to work, you'll have to intercept the signal from the hori pcb from the 4 and 6 wire headers at the top of the pcb. I used a jewelers sized flat head screwdriver to lift up the tab on the wire and pull it out. I then hooked up wire to that and had it go into the button array. Here's some in-progress wiring.
Hori-HRAP4VLX-DualMod05.png

6. Getting close. My wiring is still a rats nest, but something I will eventually clean up. However, EVERYTHING IS WORKING! If you noticed, I used pin headers to wire up the usb cable so I didn't have to cut anything up.
Hori-HRAP4VLX-DualMod06.png

The main reason why I wired it this way with a barrier strip was so that I could easily change out the Xbox 360 pad to any future dual mod pad that I need to without too much headache.

The mod in a nutshell - I believe - you need diodes on the signal lines from the hori pcb, you need a central point at which the two padhacks connect, and you need to do special wiring to the PS Home and back/select button to get those to work. If you don't care about those then you can just leave it as is.

Hope this helps anyone that's looking to give this a try.

Wiring-
=Clean wiring uses very nice quick disconnect ends and an IDE/PATA style ribbon cable from PCB to action buttons and 5 pin joystick connector

USB Cable-
=Wired
=Cable length (3m/9.8ft)

Unanswered Questions Due to Insufficient Testing-
To Edit


Hori-DoA5LR-01.png

Hori Dead or Alive 5 Last Round Arcade Stick
-Hori Dead or Alive 5 Last Round for PS4 & PS3
Not considered a Hori Real Arcade Pro by name, but is the exact same base and PCB as other sticks bearing the RAP in name
Spoiler:

More images (Promo/Stock/BoxFront/BoxBack/Bottom/Interior/PCB)-
Spoiler:

Hori-DoA5LR-02.png
Hori-DoA5LR-03.png
Hori-DoA5LR-04.png
Hori-DoA5LR-05.png
Hori-DoA5LR-06.png
Hori-DoA5LR-07.png
Hori-DoA5LR-08.png
Hori-DoA5LR-09.png
Hori-DoA5LR-10.png
Hori-DoA5LR-11.png
Hori-DoA5LR-12.png
Hori-DoA5LR-13.png
Hori-DoA5LR-14.png
Hori-DoA5LR-15.png
Hori-DoA5LR-16.png
Hori-DoA5LR-17.png
Hori-DoA5LR-18.png
Hori-DoA5LR-19.png

SRKTT thread-
http://forums.shoryuken.com/discussion/194638/hori-ps4-ps3-dead-or-alive-5-last-round-stick/p1

Release Date-
=Early 2015 (February or March? Unsure of exact month)

Case-
Hori Case (New form factor upgrade from RAPV3/RAPVX/RAPV4 style where buttons are now on the side instead of on top/face)
=One main plastic base. Does not have individual plastic pieces.
=Sizes DoA5LR - Width = 430mm, Depth = 237mm, Height (including lever) = 114mm
=Weight (2.2kg)
=Interior of case has plenty of space for mounting PCBs
=Must open from bottom (Which voids the warranty)
+PS4 touch panel on back
+Analog sticks mounted on front of stick (They are removable by opening up case SEE PHOTOS)
+Cord compartment

Metal Panels-
+Both top and bottom metal panels
=Vewlix layout with standard spread between joystick and buttons

Plexi/Art-
=No default plexi
=Default artwork can leave a sticky residue when removing
=No current 3rd party plexi options. Tek-Innovations may offer in 2016

Bottom Padding/Feet-
=No padding
=Four small rubber feet

Joystick-
=Hori Hayabusa joystick

Buttons-
=Hori Kuro buttons

PCB-
=Unsure if common ground PCB. May exist some type of dual mod issues where signals are held high/low if variable. Needs more research.
=Multiple PCBs (main PCB, side PCB, touch screen)
=Touch screen PCB is connected to main PCB using a small ribbon cable
=Side PCB, joystick, USB cable, and analog sticks are connected to main PCB using standard pin connectors
-Buttons are connected to main PCB by solder and glue

Wiring-
=Typical

USB Cable-
=Wire and cord compartment
=Cable length (3m)


Hori-HRAP4KAI-01.png

Hori RAP 4 Kai
-Hori Real Arcade Pro 4 Kai for PS4 & PS3
Spoiler:

More images (Promo/Stock/BoxFront/BoxBack/Bottom/Interior/PCB)-
Spoiler:
Hori-RAP4Kai-02.png
Hori-RAP4Kai-03.png
Hori-RAP4Kai-04.png
Hori-RAP4Kai-05.png
Hori-RAP4Kai-06.png
Hori-RAP4Kai-07.png
Hori-RAP4Kai-08.png
Hori-RAP4Kai-09.png
Hori-RAP4Kai-10.png
Hori-RAP4Kai-11.png
Hori-RAP4Kai-12.png
Hori-RAP4Kai-13.png
Hori-RAP4Kai-14.png
Hori-RAP4Kai-15.png
Hori-RAP4Kai-16.png

SRKTT thread (HRAP4Kai)-
HRAP 4 Kai thread was merged with the HRAP.V4 thread.
Go to page 6 to see coverage for the HRAP 4 Kai. The first 5 pages are for the older base model HRAP.V4 and HRAP.V4 Silent
http://forums.shoryuken.com/discussion/189004/hori-hrap-v4-announced-compatible-with-ps3-and-ps4

SRKTT Definitive Hori RAP thread-
http://forums.shoryuken.com/discussion/196423/hori-real-arcade-pro-thread-for-all-versions-in-progress-could-use-your-help-and-input-v2

Case-
Hori Case (New form factor upgrade from RAPV3/RAPVX/RAPV4 style where buttons are now on the side instead of on top/face)
=One main plastic base. Does not have individual plastic pieces.
=Width = 430mm, Depth = 237mm, Height (including lever) = 114mm
=Weight (2.2kg)
=Interior of case has plenty of space for mounting PCBs
=Must open from bottom (Which voids the warranty)
=PS4 touch panel on back
+Cord compartment

Metal Panels-
+Both top and bottom metal panels
=Vewlix layout with wider spread between joystick and buttons

Plexi/Art-
=No default plexi
=Default artwork can leave a sticky residue when removing
=Plexi is available via Tek-Innovations.com

Bottom Padding/Feet-
+Padding on bottom
-No rubber feet

Joystick-
=Hori Hayabusa joystick

Buttons-
=Hori Kuro buttons

PCB-
=Common ground PCB. May exist some type of dual mod issues where signals are held high/low if variable. Need to discuss with modders more.
=Multiple PCBs (main PCB, side PCB, touch screen)
=Touch screen PCB is connected to main PCB using a small ribbon cable
=Side PCB is connected to main PCB using two standard molex style connectors
=Joystick is connected to main PCB using a standard molex style connector
-Buttons are connected to main PCB by solder and glue
=USB cable is connected to main PCB by using a standard molex style connector

Wiring-
=Typical

USB Cable-
=Wire and cord compartment
=Cable length (3m)


Hori-HRAP4KaiSilent-01.png

Hori RAP 4 Kai Silent
-Hori Real Arcade Pro 4 Kai Silent for PS4 & PS3
Spoiler:

More images (Promo/Stock/BoxFront/BoxBack/Bottom/Interior/PCB) COMING SOON NOT DONE YET -
Spoiler:
insert extra photos here

SRKTT thread-
Go to page 6 to see coverage for the HRAP 4 Kai and it's Silent twin. The first 5 pages are for the older base model HRAP.V4 and HRAP.V4 Silent
http://forums.shoryuken.com/discussion/189004/hori-hrap-v4-announced-compatible-with-ps3-and-ps4

SRKTT Definitive Hori RAP thread-
http://forums.shoryuken.com/discussion/196423/hori-real-arcade-pro-thread-for-all-versions-in-progress-could-use-your-help-and-input-v2

Case-
Hori Case (New form factor upgrade from RAPV3/RAPVX/RAPV4 style where buttons are now on the side instead of on top/face)
=One main plastic base. Does not have individual plastic pieces.
=Width = 430mm, Depth = 237mm, Height (including lever) = 114mm
=Weight (2.2kg)
=Interior of case has plenty of space for mounting PCBs
=Must open from bottom (Which voids the warranty)
=PS4 touch panel on back
+Cord compartment

Metal Panels-
+Both top and bottom metal panels
=Vewlix layout with wider spread between joystick and buttons

Plexi/Art-
=No default plexi
=Default artwork can leave a sticky residue when removing
=Plexi is available via Tek-Innovations.com

Bottom Padding/Feet-
+Padding on bottom
-No rubber feet

Joystick-
=Hori Hayabusa joystick with optical PCB

Buttons-
=Hori Kuro buttons with silencer pads

PCB-
=Common ground PCB. May exist some type of dual mod issues where signals are held high/low if variable. Need to discuss with modders more.
=Multiple PCBs (main PCB, side PCB, touch screen)
=Touch screen PCB is connected to main PCB using a small ribbon cable
=Side PCB is connected to main PCB using two standard molex style connectors
=Joystick is connected to main PCB using a standard molex style connector
-Buttons are connected to main PCB by solder and glue
=USB cable is connected to main PCB by using a standard molex style connector

Wiring-
=Typical

USB Cable-
=Wire and cord compartment
=Cable length (3m)


Hori-HRAPVHAYABUSA-01.png
Hori-HRAPVHAYABUSAv2-01.png
Hori-HRAPVSilent-01.png
Hori-HRAPVSilentv2-01.png

Hori RAP.V
-Hori Real Arcade Pro.V Hayabusa for PS4 & PS3 (version 1 - Kuro buttons)
-Hori Real Arcade Pro.V Hayabusa for PS4 & PS3 (version 2 - Hayabusa buttons)
-Hori Real Arcade Pro.V Silent Hayabusa for PS4 & PS3 (version 1 - Kuro buttons)
-Hori Real Arcade Pro.V Silent Hayabusa for PS4 & PS3 (version 2 - Hayabusa buttons)
Spoiler:

SRKTT thread-
Go to page 6 to see coverage for the HRAP V Hayabusa (version 1). The first 5 pages are for the older base model HRAP.V4 and HRAP.V4 Silent
http://forums.shoryuken.com/discussion/189004/hori-hrap-v4-announced-compatible-with-ps3-and-ps4

SRKTT Definitive Hori RAP thread-
http://forums.shoryuken.com/discussion/196423/hori-real-arcade-pro-thread-for-all-versions-in-progress-could-use-your-help-and-input-v2

Case-
Hori Case (New form factor upgrade from RAPV3/RAPVX/RAPV4 style where buttons are now on the side instead of on top/face)
=One main plastic base. Does not have individual plastic pieces.
=Width = 430mm, Depth = 237mm, Height (including lever) = 114mm
=Weight (2.2kg)
=Interior of case has plenty of space for mounting PCBs
=Must open from bottom (Which voids the warranty)
=PS4 touch panel on back
+Cord compartment

Metal Panels-
+Both top and bottom metal panels
=Vewlix layout with standard spread between joystick and buttons

Plexi/Art-
=No default plexi
=Default artwork can leave a sticky residue when removing
=No 3rd party plexi options yet. Tek-Innovations may offer in future

Bottom Padding/Feet-
=No padding
=Four small rubber feet

Joystick-
=Hori Hayabusa joystick
=RAP.V Silent uses optical switches with a Hori Hayabusa joystick

Buttons-
=Hori Kuro buttons
=RAP.V Silent uses foam pads inside the normal Hori Kuro buttons
=RAP.V Hayabusa (version 2) uses new Hayabusa buttons which have a matte finish

PCB-
=Common ground PCB. May exist some type of dual mod issues where signals are held high/low if variable. Need to discuss with modders more.
=Multiple PCBs (main PCB, side PCB, touch screen)
=Touch screen PCB is connected to main PCB using a small ribbon cable
=Side PCB is connected to main PCB using two standard molex style connectors
=Joystick is connected to main PCB using a standard molex style connector
-Buttons are connected to main PCB by solder and glue
=USB cable is connected to main PCB by using a standard molex style connector
+XInput is active on the PCB for HRAP.V Hayabusa (Version 2) and will likely be present on the HRAP.V Silent Hayabusa (Version 2) as well

Wiring-
=Typical

USB Cable-
=Wire and cord compartment
=Cable length (3m)


Hori-HRAPv4-01.png
Hori-HRAPv4SILENT-01.png

Hori RAP V4 - Hori RAP V4 Silent
-Hori Real Arcade Pro.V4 Hayabusa for PS4 & PS3
-Hori Real Arcade Pro.V4 Silent Hayabusa for PS4 & PS3
Spoiler:
SRKTT thread-
http://forums.shoryuken.com/discussion/189004/hori-hrap-v4-announced-compatible-with-ps3-and-ps4

SRKTT Definitive Hori RAP thread-
http://forums.shoryuken.com/discussion/196423/hori-real-arcade-pro-thread-for-all-versions-in-progress-could-use-your-help-and-input-v2

Modding guide/documentation via @Darksakul -
http://forums.shoryuken.com/discussion/comment/8852461/#Comment_8852461

Case-
Hori Case (Same as RAPV3/RAPVX/UMvC3/DoA models for PS3/360)
=One main plastic base. Does not have individual plastic pieces.
=Sizes - Width = 430mm, Depth = 240mm, Height (including lever) = 125mm
=Weight (2.2kg)
=Interior of case has plenty of space for mounting PCBs
=Must open from bottom (Which voids the warranty)

Metal Panels-
+Both top and bottom metal panels

Plexi/Art-
=No default plexi
=Default artwork can leave a sticky residue when removing
+Tek Innovations does have plexi option (Same as V3/VX non-Kai)

Bottom Padding/Feet-
=No padding
=Four small rubber feet

Joystick-
=RAP v4 Silent uses optical switches with a Hori Hayabusa joystick
=RAP v4 Standard uses microswitches with a Hori Hayabusa joystick

Buttons-
=RAP v4 Standard uses normal Hori Kuro buttons
=RAP v4 Silent uses foam pads inside the normal Hori Kuro buttons

PCB-
=Common ground. Unsure if active high/low. Unsure if able to multi-mod without complications due to insufficient testing.
+Easy to remove main PCB from base
=Button signals/grounds, and USB cable are soldered to PCB while joystick connector and ribbon cables to Turbo/Home PCB are removable from main PCB

Wiring-
=Typical

USB Cable-
=Wire and cord compartment


Categories-Madcatz.png


Madcatz-ALPHA-01.png

Madcatz Street Fighter V FightStick ALPHA for PS4/PS3
Spoiler:
SRKTT thread-
http://forums.shoryuken.com/discussion/202351/madcatz-street-fighter-v-fightstick-alpha

Release Date-
=Unknown

SRK Front Page article via @d3v -
http://shoryuken.com/2015/08/31/mad-catz-unveils-street-fighter-v-arcade-stick-and-controller

Case-
Fightstick Alpha Case (New/Original Design)
=Weight (Unknown)
=Dimentions (Unknown)
=6 button Vewlix design

Metal Panels-
=Unknown

Plexi/Art-
=Unlikely to have any future plexi option due to case design (No where to screw in plexi and curved base front)

Bottom Padding/Feet-
=Has some type of padding (Specifics unknown)
=Does not appear to have feet in stock photo (Unknown)

Joystick-
=Unknown

Buttons-
=Unknown

PCB-
=Unknown

Wiring-
=Unknown

USB Cable-
=Wired
=Unknown if cable is removable


Madcatz-TE2-Standard-01.png
Madcatz-TE2-GG-01.png
Madcatz-TE2-P4AU-01.png
Madcatz-TE2-USFIV-01.png
Madcatz-TE2-Rivals-01.png
Madcatz-TE2-SFVChunLi-01.png
Madcatz-TE2-SFVRyu-01.png

Madcatz TE2 USFIV/GGXrd/P4AU
-Mad Catz Arcade FightStick Tournament Edition 2 for PS4 & PS3
-Mad Catz Guilty Gear Xrd -SIGN- Arcade FightStick Tournament Edition 2 for PS4 & PS3
-Mad Catz Persona 4 Arena Ultimax Arcade FightStick Tournament Edition 2 for PS4 & PS3
-Mad Catz Ultra Street Fighter IV Arcade FightStick Tournament Edition 2 for PS4 & PS3
-Mad Catz Ultra Street Fighter IV Arcade FightStick Tournament Edition 2 for PS4 & PS3 Rivals
-Mad Catz Street Fighter V Arcade FightStick Tournament Edition 2 Chun-Li for PS4 & PS3
-Mad Catz Street Fighter V Arcade FightStick Tournament Edition 2+ for PS4 & PS3 (Ryu Artwork)
Spoiler:
SRKTT thread-
http://forums.shoryuken.com/discussion/190326/official-usfiv-ggxrd-p4u-te2-thread

Case-
TE2 Case (Same on XB1/PS3/PS4/360 versions)
=Weight (Unknown)
=Width/Length/Height with Balltop (Unknown)
=Base consists of multiple heavy duty plastic pieces screwed together
=Interior of case has roughly 5.5cm of height space for mounting PCBs and/or storage
=Side hinge clasps are metal, front hinge clasp is plastic
+Hinges can be nice for replacing parts and storage for extra buttons etc
+Comes with reversible screwdriver flat/hex for maintenance needs
+Replacement sides and bezels offered on Madcatz website for customization options
+Same design/production base by major company for multiple consoles and releases means there will be plenty 3rd party customization options in the future
+Curve of base on back makes it difficult to accidentally press the arcade stick against an object and hit the Start/Select buttons
-Hinges don't clasp as solid as they should causing a small give with pressure

Metal Panels-
+Both top and bottom metal panels
-Sanwa/Seimitsu screw-ins not compatible with Kick1 due to nut being in way of joystick mounting plate unless you pry up the end of mounting plate

Plexi/Art-
=Multiple types of default plexis depending on which stick was purchased and when it was purcahsed (Will be referred to as Old Plexi and New Plexi)
=Default plexi goes around the buttons instead of under them. This has both advantages and disadvantages as listed below
+All Default Plexi: Default plexi easy to remove for replacing artwork without having to remove wires/quickdisconnects/buttons
-All Default Plexi: Default plexi doesn't always sit 100% securely as it's not being held down by buttons
=Default Old Plexi is 1/8" thick in the center but 1/16" thick along the sides where the border/bezel sits on top
+Default Old Plexi: (needs advantages listed here)
-Default Old Plexi: (needs disadvantages listed here)
=Default New Plexi is 1/32" thick and is placed under the bezel
+Default New Plexi: (needs advantages listed here)
-Default New Plexi: (needs disadvantages listed here)
=Tek Innovations does have replacement plexi option 1/16 thickness that sits underneath the buttons and bezel. 1/32 thickness will be offered in future.

Bottom Padding/Feet-
=Has a foam padding
=Does not have feet
+Good for lap
-Slides a bit on hard flat surfaces

Joystick-
+Sanwa JLF-TP-8YT

Buttons-
+Sanwa OBSF-30 and OBSF-24
-These buttons utilize clear rings that allow the button to rise and be flush with the clear top panel
-A few reported issues of stock buttons being shipped with broken or loose tabs likely due to rough installation during assembly.

PCB-
+Common ground. Possible to multi-mod.
+Removable plastic cover from internal USB plug allows removal of PCB easy which neutralizes any issue of short USB wires soldered to bottom of PCB.
+LED PCB (Basic) is offered on Madcatz website for customization options
+LED PCB aka "LVT3" (Super customizable) is offered by Paradise Arcade Shop for customization options
+Touchpad is present on the new SFV TE2+ model with Ryu art (Unsure if this will be common for future TE2 sticks)

Wiring-
+Clean wiring using an PATA/IDE style ribbon cable connector on PCB to 20 color coded wires (10 signal 10 ground) to buttons.
=Quick disconnects have a tab on them. This has both advantages and disadvantages as listed below.
+You won't experience a quick disconnect becoming loose due to the tab
-Pressing down release tab on each individual wire can be tough for those with big fingers and is much more difficult to remove than usual disconnects

USB Cable-
=Removable proprietary "ProCable" using a circular 5 pin DIN style connector. This has both advantages and disadvantages as listed below
=Screws into connector on back of arcade stick base. Can prevent disconnection of signal if cord is pulled which can be good or bad depending on situation.
+Removable cable
-Must order ProCable replacements from Madcatz. May have luck finding as "MLG ProCable"
=Replacement connector to make your own ProCables may be "Model PMDX-5Pin" (Unconfirmed)


Madcatz-TESPlus-Shadowloo-01.png

Madcatz Street Fighter V Arcade FightStick Tournament Edition S+ for PS4 & PS3
Spoiler:
SRKTT thread-
=Insufficient information

Release Date-
=Insufficient information

SRK Front Page article -
http://shoryuken.com/2015/12/03/mad-catz-unveils-line-of-street-fighter-v-arcade-sticks-fightpads/

Case-
Madcatz TE/TE-S base modified from original base (Unsure how different interior plastic mold base is yet)
=Weight (Unknown)
=Dimentions (Unknown)
=8 button Vewlix design

Metal Panels-
+Both top and bottom metal panels
-Sanwa/Seimitsu screw-ins not compatible with Kick1 due to nut being in way of joystick mounting plate unless you pry up the end of mounting plate

Plexi/Art-
=No default plexi
=Plexi options from 3rd party supplies like Tek Innovations is possible but due to new turbo area may have to be remeasured
=If you choose to remove the turbo area, mount PCB in interior of case, and make buttons for Home/Turbo/L3/R3/Touchpad etc elsewhere on case, you could
get the existing TE/TE-S plexi option from Tek Innovations with no turbo area cut and it should fit properly. Will have to verify the joystick and button holes are exact same as previous TE1/TE-S models

Bottom Padding/Feet-
=Unsure if has padding on bottom
=Does appear to have feet in stock photos

Joystick-
+Sanwa JLF-TP-8YT

Buttons-
+Sanwa OBSF-30 & OBSF-24

PCB-
=Insufficient information

Wiring-
=Insufficient information

USB Cable-
=Wired
=Unknown if cable is removable


Categories-ArcSystemWorksSanwa.png


Sanwa-GuiltyGear-00.png

Sanwa/Arc System Works Guilty Gear Xrd -SIGN- Arcade Stick (Unsure if official name)
Spoiler:
SRKTT thread-
http://forums.shoryuken.com/discussion/194900/

SRK Front Page article-
http://shoryuken.com/2014/09/12/arc-system-works-and-sanwa-denshi-releasing-arcade-stick-alongside-guilty-gear-xrd-sign-console-launch/

Case-
Original Case
=One main plastic base. Does not have individual plastic pieces.
=Sizes - Width = 360mm, Depth = 280mm, Height (including lever) = 110mm
=Weight (2.2kg)
-Has open area cord compartment in back with no flap

Metal Panels-
=Has top metal panel
-Does not have bottom metal panel

Plexi/Art-
+Default Plexi
+Comes with 3 different pieces of art for under plexi
=Default plexi goes around the buttons instead of under them allowing easy art swap

Bottom Padding/Feet-
=Foam padding

Joystick-
=Sanwa JLF-TP-8YT

Buttons-
=Sanwa OBSF-30 and OBSF-24
=Sega Noir Button Layout

PCB-
=No information

Wiring-
=Typical

USB Cable-
=2.5 meters


Categories-Venom.png


Venom-01.png

Venom Arcade Stick (Made by Mayflash?)
Spoiler:
SRKTT thread-
http://forums.shoryuken.com/discussion/195434/venom-arcade-stick-ps4-ps3

Guide newbie thread on how to customize/mod-
http://forums.shoryuken.com/discussion/202199/newbie-guide-venom-ps4-full-sanwa-mod-with-octo-for-116-uk-pricing

Case-
Existing retail photos look like same build to the Mayflash V2 arcade stick for PS3/360/PC
=Width = 320mm, Depth = 260mm, Height = 120mm
=Weight (2.1kg)
=Has cord compartment

Metal Panels-
+Both top and bottom metal panels
+Top metal panel has grooves for button tabs for easy install/remove

Plexi/Art-
+Has default plexi for custom artwork insertion
+Stock artwork isn't glued or attached to default stock plexi
=Same artwork template as Mayflash v2 - https://mega.co.nz/#!iUUQ0IYY!mYbNwtx3nUbrFTjXnUYf067g4lVwB-hDRMdfJzwppbA

Bottom Padding/Feet-
=Has a foam padding on corners
=Does not have feet

Joystick-
=Default Non-branded joystick of average quality with individual microswitches (Microswitch brand unknown)
=Default joystick compatible with Sanwa gates

Buttons-
-Stock Sanwa knockoff buttons of bad quality
=Microswitches use a Seimitsu PS14-G clone switch. It has a very similar feel, the same QD placement, and the same thin microswitch plunger as Seimitsu.
+Easy to replace stock buttons with any standard 30mm button

PCB-
=Common ground PCB
=Has 3 PCBs. One main, one for Start/Select/Turbo/etc, and one for LEDs

Wiring-
=Quick disconnects for action buttons
-Soldered on microswitches for joystick
-Stock joystick wiring to PCB is to 4 individual 2pin connectors and PCB has empty 5pin connector for joystick. This means replacing joystick requires splice of existing wires to 2pin connectors or usage of 5pin connector.

USB Cable-
=Cable Length (3m)
=Utilizes 5pin connector to PCB


===Things I need to edit on this post include===
=Shitloads of pictures of each joystick from stock to interior to PCB etc
=More Information! FEED ME INFO! NEED MORE EXP POINTS FOR KNOWLEDGE LEVEL UP!


Innovation PSX/Saturn to Dreamcast Adapter

$
0
0
Does anyone have these? I have 2 of them for my Saturn Controller

On the Playstation Side, Why is L & R on R1 & R2 ..I can't use my PS2 Saturn Controller with it

I am going to get this for my PS Fighters http://www.raphnet.net/electronique/snes_to_psx/index_en.php#mappings, and using it on my Dreamcast Adapter, But the Button Layout is stupid, It should be L on L1 & R on R1 like other Adapters

PS4/PC PCB

$
0
0
Hello, I'm trying to build a hitbox from scratch.

Are there any pcbs on the market that would support both PS4 and PC? PS3 compatibility is a plus.

Korean arcade parts discussion

$
0
0
Introduction Post

I admit I haven't have experience with Korean arcade parts, but I start a loose guide listing of what I do know and let people discus about Korean parts and maybe we can build up a half descent database.
I will reference the old THE ULTIMATE KOREAN ARCADE PART FAQ!! to flesh thing thread out.
What was noticed in the Tech Talk community is that many of the old Korean arcade part threads are dead and many threads have broken images, broken links, out of date and inactive.

Special thanks to (but not limited to) the following forum members (in no particular order) who ether helped me directly or those who contributed to older threads (even indirectly) which I tried to use to build this one.
d3v, slaycruz, armi0024, Upas, laugh, Takahashi, deadfrog, kowal, Moonchilde, hibachifinal, kkolding, Fearless, el greco,

Questions regarding modding an empty madcatz TE stick.

$
0
0
So for about a few years now, I've had 2 empty stick cases. A madcatz TE 1, and a hori HRAP3. Currently I own a madcatz fightstick pro, so this is mostly just a mod I wanna do for fun and to add a second/third stick for my collection, but how exactly do I go about modding these? I know of the akishop PS360+, but all of the tutorials I've seen about it online only go into how to mod a TE1/2 in conjunction with the old sticks pcb. How many wires/daisy chains do I need to get? My layout is a home/start button, an 8 button layout, and the obvious joystick. I won't be using the custom home/turbo buttons that will comes with the stick, so is there a way to using a combination of buttons to use as a home button if I use the ps360+?
Basically, I'd appreciate it if someone could lend me a hand in prepping for this before I actually go ahead and mod this stick case.

USB ProCable 5M ?

$
0
0
Hi all,

Today I just got my TE2+ and while I'm happy with it I have a big issue with the length of the cord. I know it's fine for most people 10f/3M but I'd really like to get a 5M one.

Anyway idea where I could find one ? Worse case I could cut it and redo one myself or just use a usb extension but I'd rather find one and get it over with ;)

Thanks

HFC4 + MKX Pad system mode PROBLEM!!

$
0
0
Hi everyone,

So I'm having a huge brain fart with dual-modding a HFC4 PCB with an MKX Xbone pad. I have everything working already (including DPDT switch to go from one PBC to the other) the only problem are the SYSTEM MODES.

How do I install (wire) 1 SPDT switch to work for both PCBs? I currently have it setup like the image bellow but it is only working for PS4 to PS3 and vise versa, the Xbox side gets stuck on Xbox One and doesn't switch over to 360. I have done this exact mod twice in the past ( about 11 months ago) but never took notes and can't for the life of me remember how to set up the MODES to the SPDT switch.

ARC EYE 3: LEDs made easy!

$
0
0
Yes, I did say I wasn't going to make LEDs anymore, but that doesn't mean I can't work with one of the premier fightstick modders on the scene to bring you:

AE3-2.jpg
[media=youtube]VNwV9ZbXaLA[/media]


Quick Facts:
  • Yes, Toodles is my partner on this project!
  • New LED design to make it even easier to install
  • New LED controller to go with the LEDs (handles 8 buttons only)
  • Designed for 30mm SANWA (snap in semitsus and rollies are also compatible)
  • Arceye2 is not obsolete. It remains vaild for semitsu screw ins and can work with the new LED controller with slight modification to the controller
  • Yes, the new design is scalable to other button sizes / types in the future (but no plans currently)
  • Install / demo videos will be made shortly after EVO
  • Availability is tentative for late July
FAQ:

Q: What kind of joystick will this work on?
A: Any common ground controller including any of Toodles' products, PS360+, Hori, Madcatz, Paewang, DualStrike. Some versions of Qanba/Eightarc sticks are not compatible because they're not common ground.

Q: So how do i tell if my stick common ground ?
A: Please search the forums / google

Q: Is this plug and play?
A: If you have a 360 TE/TE-S Madcatz, you only need to solder one wire for power. Everything else is plug and play. If you have any other type of common ground controller, you will need to handle connection from Remora to the controller board. I will provide diagrams and pics in post #3 and offer advice where I can, but NO SUPPORT WILL BE PROVIDED for these types of setups. If you read through this post and still have no idea what to do, i recommend hiring someone to do the mod for you (it'll probably be a bit too advanced for a novice).

If you have a PS3 Madcatz stick, the header pinout is different than the 360 TE (for connecting remora to the controller). With a screwdriver you should be able to re-position the pins inside the header. Toodles is looking into an alternative solution in the meantime.

Q: Will you mod my stick for me?
A: Neither of us have the time I'm afraid, but you can hire someone like Gummo or JDM714

Q: Where do I find JST cables?
A: This should work
Viewing all 8072 articles
Browse latest View live